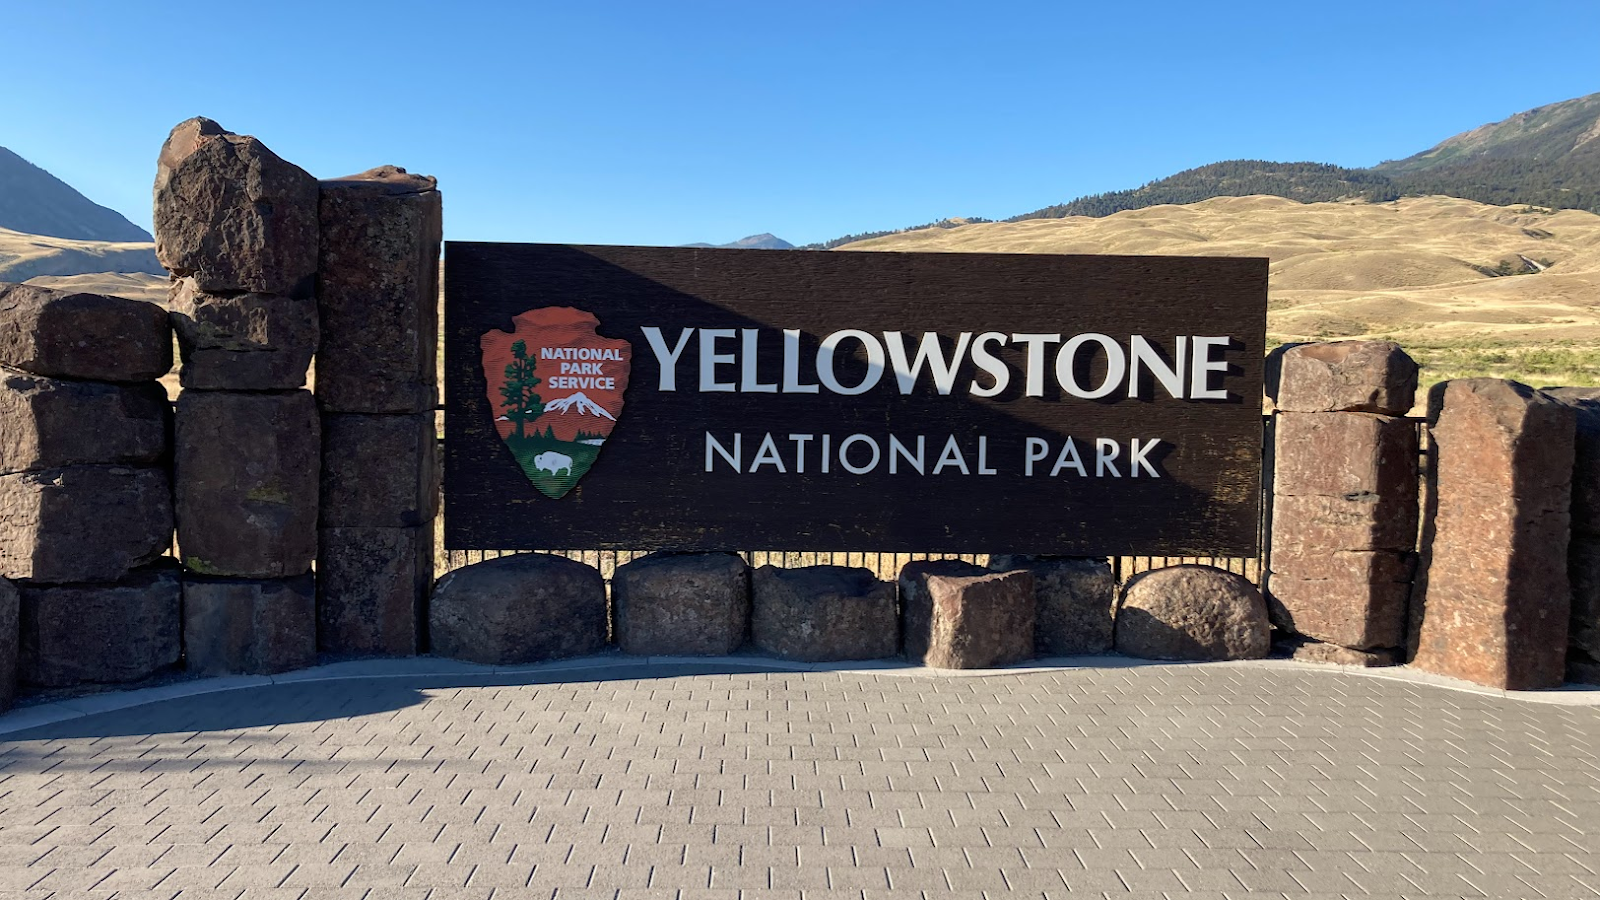
Yellowstone National Park is one of the most iconic parks in the United States, covering over 2.2 million acres of stunning landscapes, geysers, waterfalls, and wildlife. If you only have two days to explore, planning a Yellowstone itinerary can feel overwhelming but don’t worry!
In this two-day Yellowstone itinerary, I’ll show you exactly what my wife Tonya and I did during our trip, including must-see sights, tips for avoiding crowds, the best places to stay, and insider advice to make the most of your time in the park.
Whether it’s your first visit or your fifth like me, this guide will help you experience Yellowstone’s highlights without feeling rushed.
Quick 2-Day Yellowstone Itinerary Overview
If you’re short on time, here’s a quick look at how this Yellowstone itinerary flows.
Day 1 Highlights
- Roosevelt Arch
- Mammoth Hot Springs
- Wraith Falls
- Tower Fall
- Grand Canyon of Yellowstone
- Norris Geyser Basin
Overnight: West Yellowstone
Day 2 Highlights
- Firehole Falls
- Fountain Paint Pot Trail
- Grand Prismatic Spring
- Old Faithful
- West Thumb Geyser Basin
- Hayden Valley
- Artist Point
- Lower Yellowstone Falls
Exit: North Entrance toward Bozeman
Table of Contents
Yellowstone Itinerary: Day 1
- Roosevelt Arch
- Mammoth Hot Springs
- Wraith Falls
- Blacktail Plateau Drive
- Petrified Tree
- Tower Fall
- Mt. Washburn View
- Grand Canyon of Yellowstone: Lower Falls, Lookout Point, Grand View, Inspiration Point
- Canyon Village
- Norris Geyser Basin
Yellowstone Itinerary: Day 2
- Firehole Falls
- Fountain Paint Pot Trail
- Firehole Lake Drive
- Midway Geyser Basin
- Black Sand Basin
- Old Faithful
- Grand Prismatic Overlook
- Continental Divide
- West Thumb Geyser Basin
- Mud Volcano Area
- Hayden Valley
- Upper Falls View
- Artist Point
- Brink of Upper Falls
- Places to Stay for Yellowstone
- Where We Stayed
- Places to Fly into for Yellowstone
- Helpful Tips for Your Trip
- FAQ
- Final Thoughts
Following the Figure 8
Yellowstone National Park is a huge national park covering more than 2.2 million acres, so you aren’t going to be able to see everything in just two days.
My main objective was to make the most of our time and see as much as we could during the limited time we had in the park.
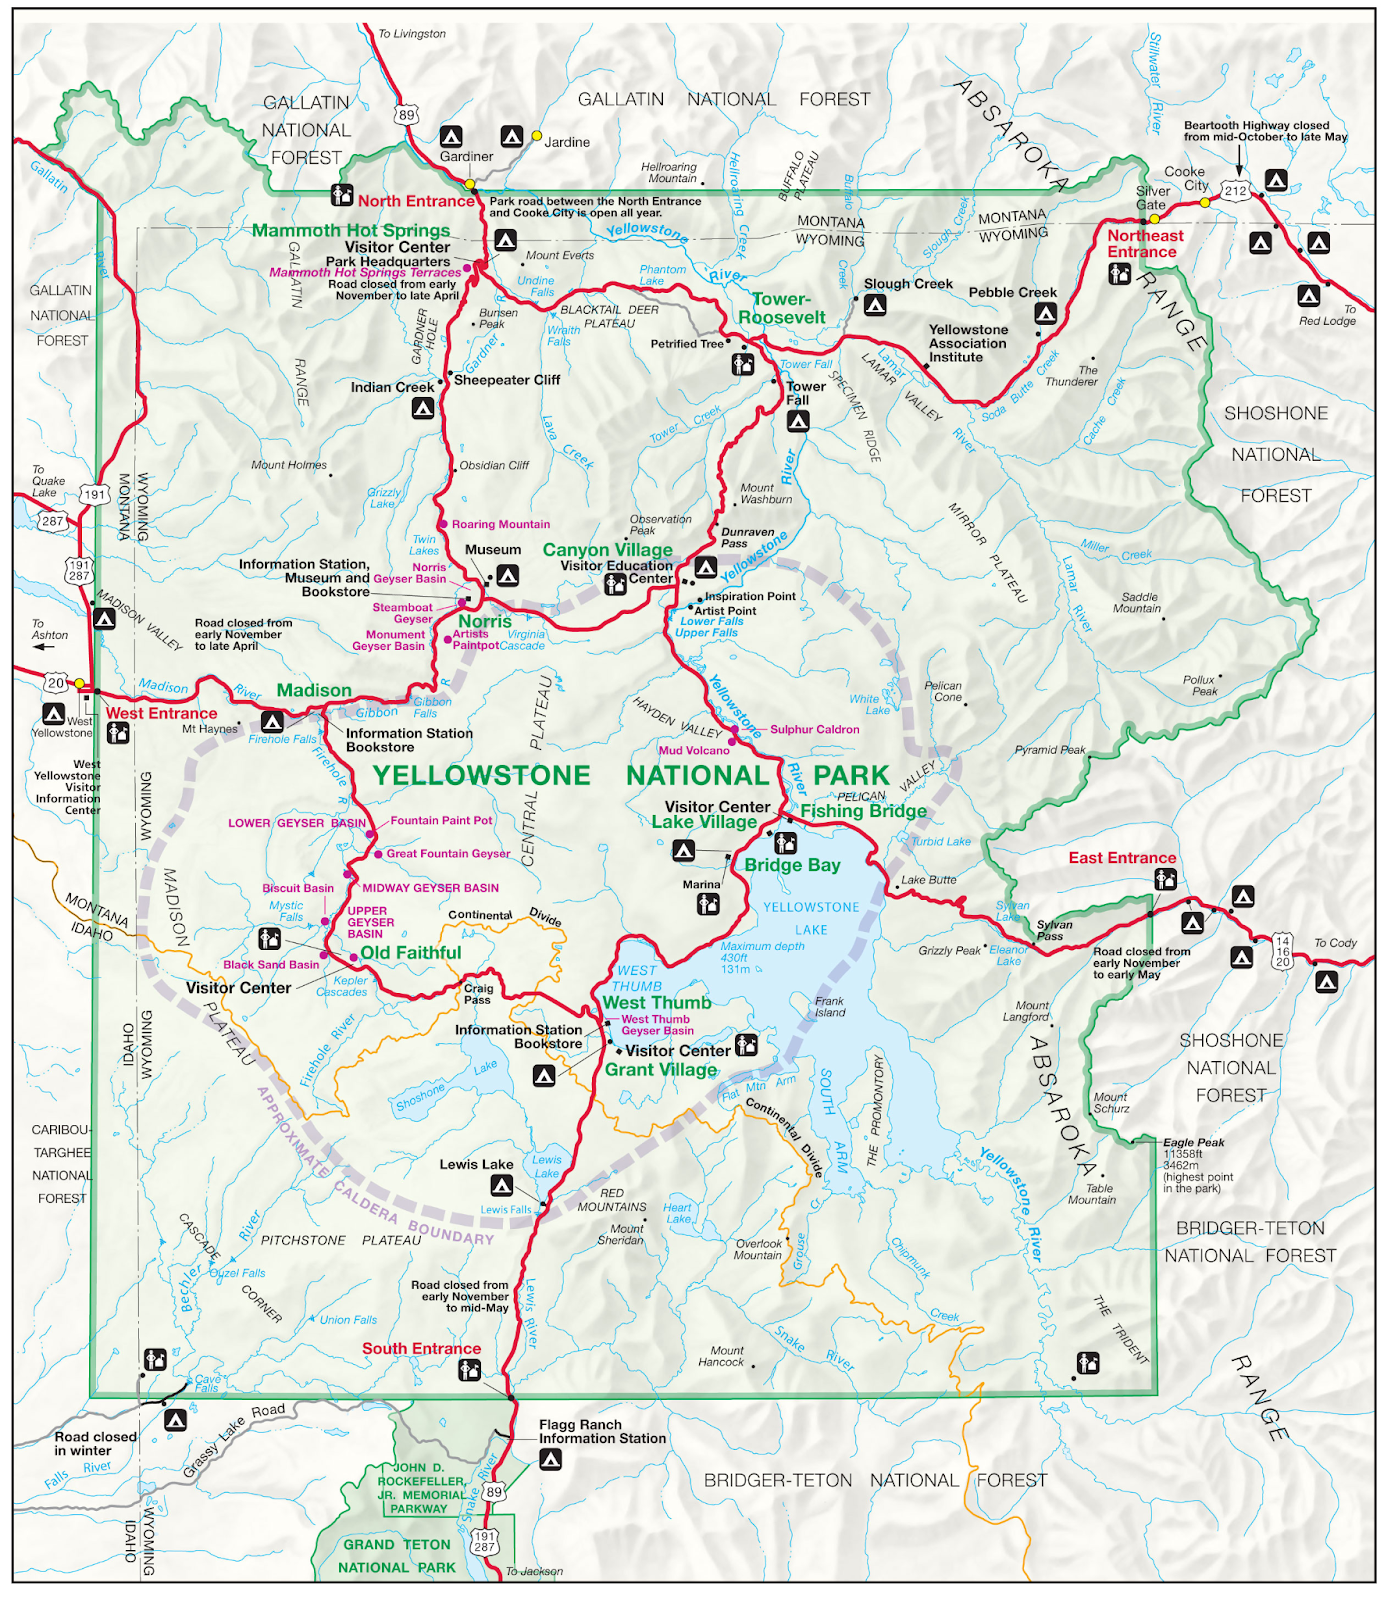
One thing that really helped us plan our Yellowstone itinerary was understanding the park’s road system. Yellowstone’s main roads form a large figure eight loop, commonly called the Grand Loop Road.
This loop connects most of the park’s major attractions and makes it possible to visit many highlights without constantly backtracking.
For this Yellowstone itinerary, we followed the figure eight layout to create an efficient route. On Day 1, we entered through the North Entrance near Gardiner, Montana, and focused on the northern portion of the loop.
On Day 2, we explored the western and southern sections of the figure eight before exiting again through the North Entrance.
Following the figure eight route allowed us to see many of Yellowstone’s most famous locations including geysers, waterfalls, wildlife areas, and scenic viewpoints while keeping our driving time reasonable.
If you’re visiting Yellowstone for the first time, understanding this figure-eight layout will make planning your Yellowstone itinerary much easier.
Planning Your Yellowstone Itinerary
Planning a Yellowstone itinerary can feel overwhelming because the park is massive. Yellowstone covers over 2.2 million acres, making it one of the largest national parks in the United States.
Here are a few things that helped us plan our Yellowstone itinerary successfully:
- We entered through the North Entrance in Gardiner, Montana
- We stayed overnight in West Yellowstone, which gave us easy access to Day 2 attractions
- We started early each day to avoid crowds
- We prioritized major highlights instead of trying to see everything
If this is your first visit, focus on the main stops along the Grand Loop Road, which connects most of Yellowstone’s top attractions.
Day 1 Route for Yellowstone national Park
The yellow is the route that we took on our first day in Yellowstone. We entered the park at 8:00 am through the North Entrance and we left the park just after 5:00 pm.
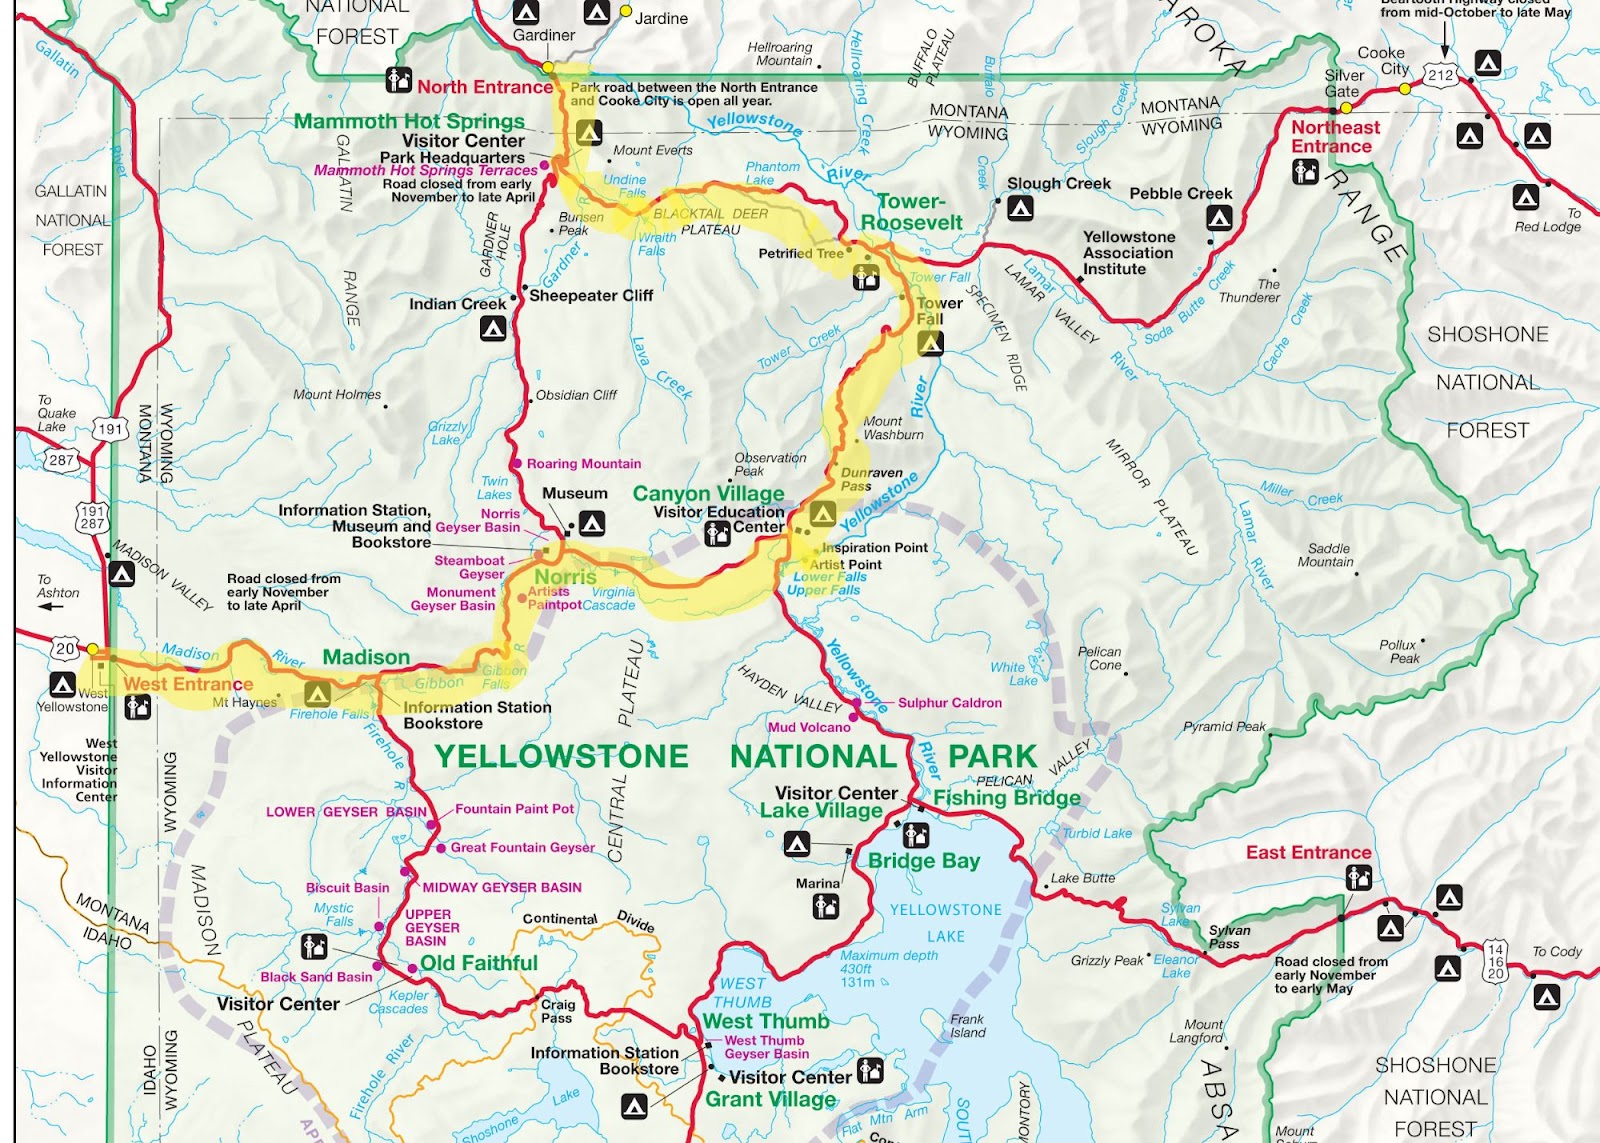
Yellowstone Itinerary Day 1
North Entrance → Canyon Village → West Yellowstone
Start Time: 8:00 AM
Overnight: West Yellowstone
Day 1 Overview
- Enter North Entrance → Quick photo at Roosevelt Arch (10–15 mins)
- Explore Mammoth Hot Springs (1–1.5 hours)
- Optional stop at Wraith Falls (30 mins)
- Drive Blacktail Plateau Drive (20–30 mins)
- Quick stop at Petrified Tree (10 mins)
- Visit Tower Fall (30-45 mins)
- Optional photo stop at Mount Washburn viewpoint (15 mins)
- Explore Grand Canyon of the Yellowstone (2-2.5 hours)
- Brink of Lower Falls
- Lookout Point
- Grand View
- Inspiration Point
- Stop at Canyon Village (20 mins)
- Finish at Norris Geyser Basin (1 hour)
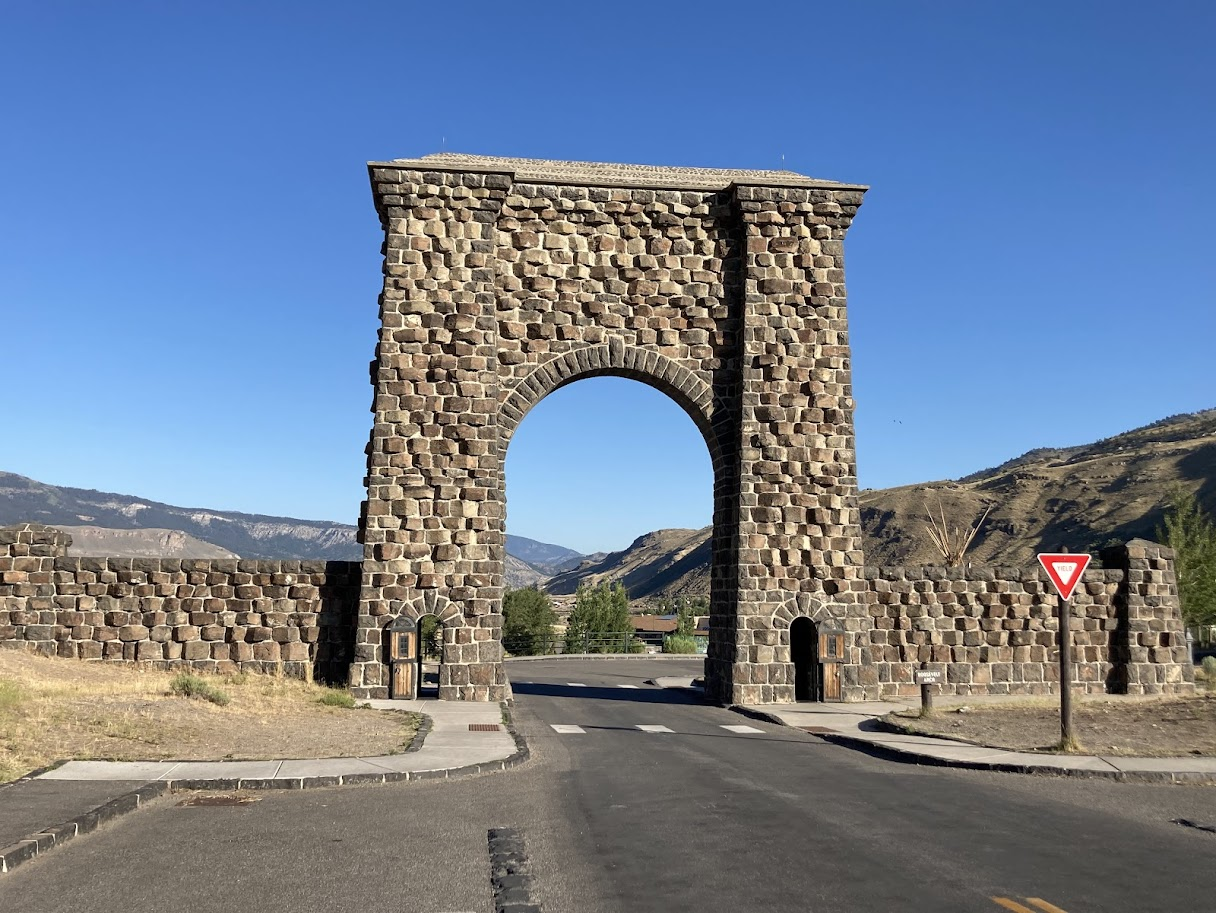
Roosevelt Arch
The Roosevelt Arch is located just outside the North Gate of Yellowstone National Park. It is quite impressive and was built in 1903. It is worth a quick stop and makes a great way to begin your Yellowstone itinerary.
President Theodore Roosevelt laid the cornerstone for the arch, and the words “For the Benefit and Enjoyment of the People” are carved across the top. It’s one of the most recognizable landmarks near the North Entrance and makes a great photo opportunity.
We parked nearby, walked up to the arch, and took a few photos before continuing into the park. Since this is such a quick stop, it’s an easy way to stretch your legs before heading to the next destination.
Drive Time to Next Stop: About 10 minutes to Mammoth Hot Springs.
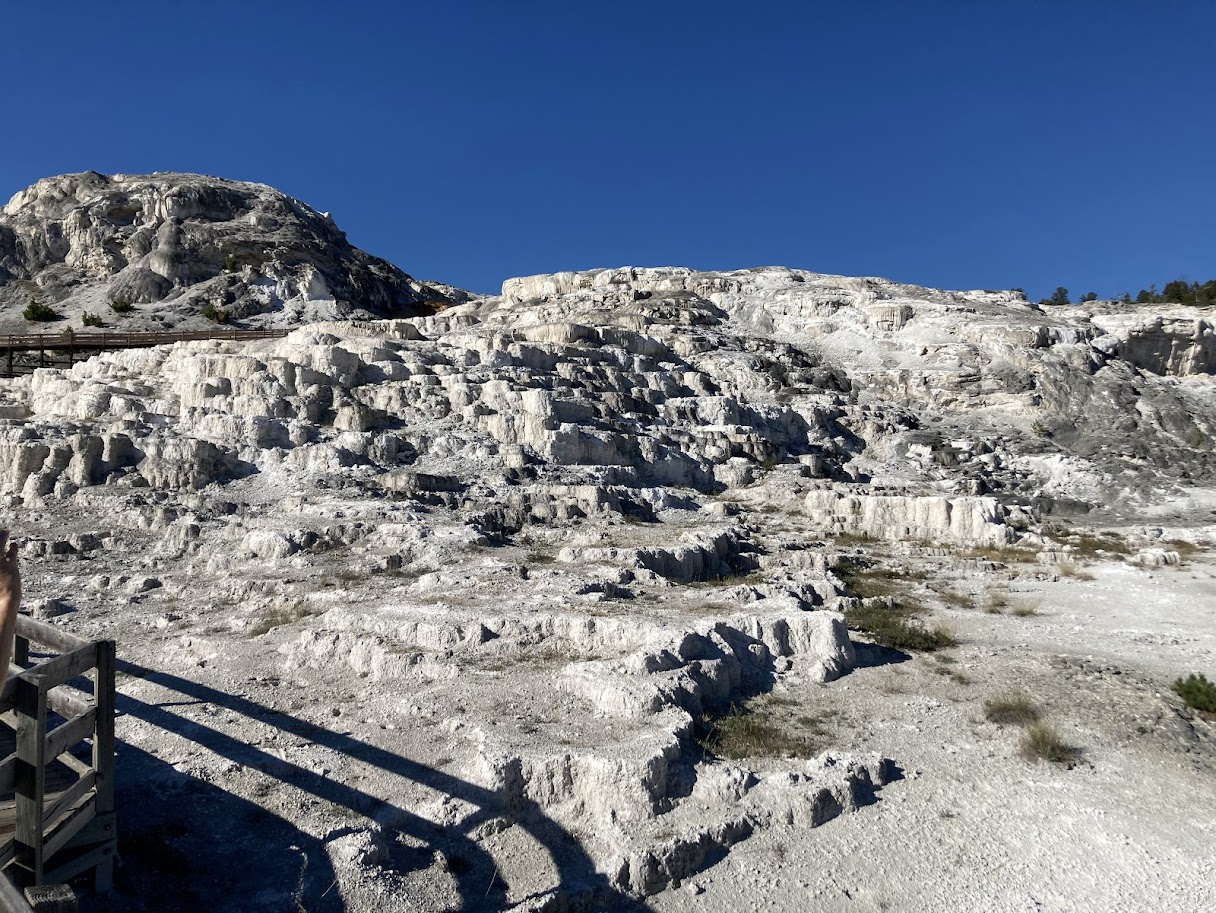
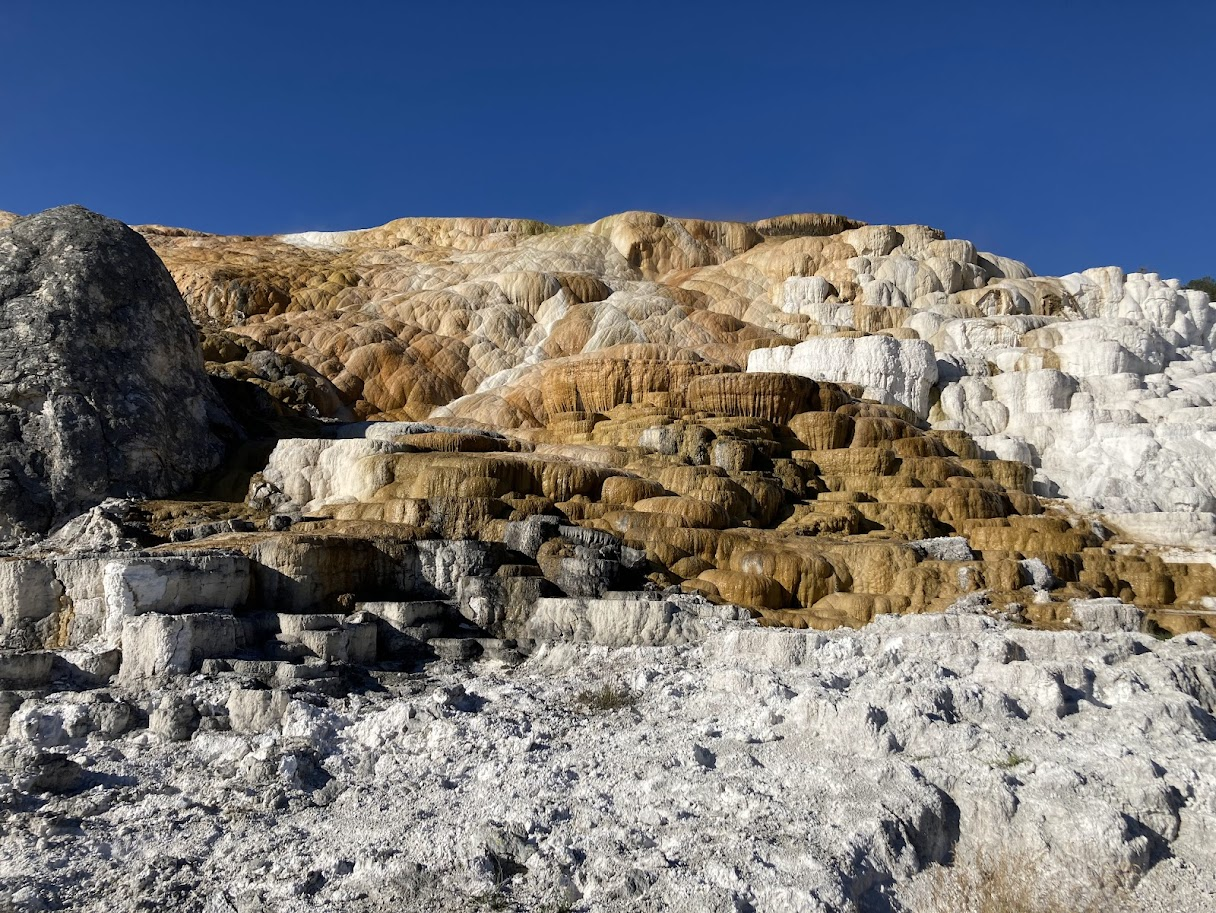
Mammoth Hot Springs
After entering the park at the North Entrance, our first major stop on this Yellowstone itinerary was Mammoth Hot Springs. This area is known for its unique limestone terraces, which look very different from the geysers and waterfalls found in other parts of Yellowstone.
The limestone layered terraces are pretty cool to see. Some of them are all white while others have a combination of numerous colors.
Most areas are explored via boardwalks. Expect moderate walking with some elevation changes, especially in the Upper Terraces.
What to See at Mammoth Hot Springs
- Lower Terraces — Easily accessible and great views
- Upper Terraces — Slightly quieter and worth the drive
- Minerva Terrace — One of the most photographed areas
- Palette Spring — Beautiful colors and layered formations
There is parking just below the hot springs, as well as 3 other lots as you head south on the Grand Loop Road. You can park in one area and walk everywhere.
Another option is to park in different lots and walk to see some of the hot springs. The second strategy is dependent on how busy the area is when you are there.
Some other things in this area of the park to see include the Albright Visitor Center and Fort Yellowstone.
Drive Time to Next Stop: About 10 minutes to Wraith Falls
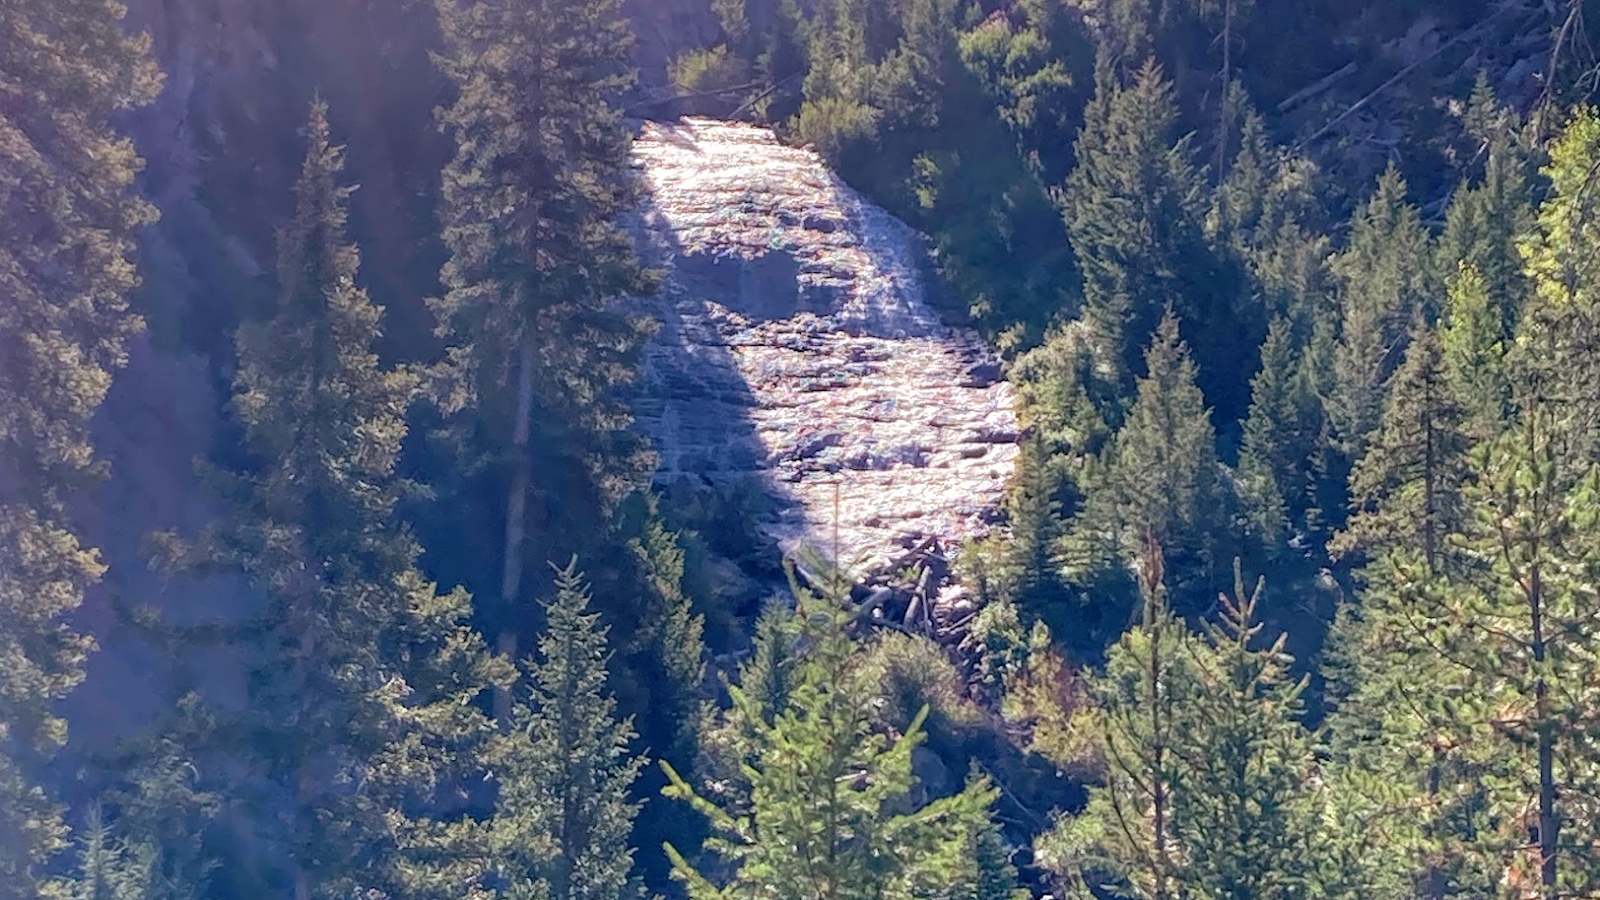
Wraith Falls
Wraith Falls was the next stop on our Yellowstone itinerary. Wraith Falls isn’t a popular stop, but my wife and I didn’t want to visit only the well-known attractions in the park.
We also wanted to experience some lesser known places, and Wraith Falls turned out to be one of those hidden gems.
Once you arrive at the trailhead for Wraith Falls, there is a small parking area where you can leave your vehicle. The hike to the falls is 1 mile round trip and is classified as an easy hike, making it a good option for most visitors.
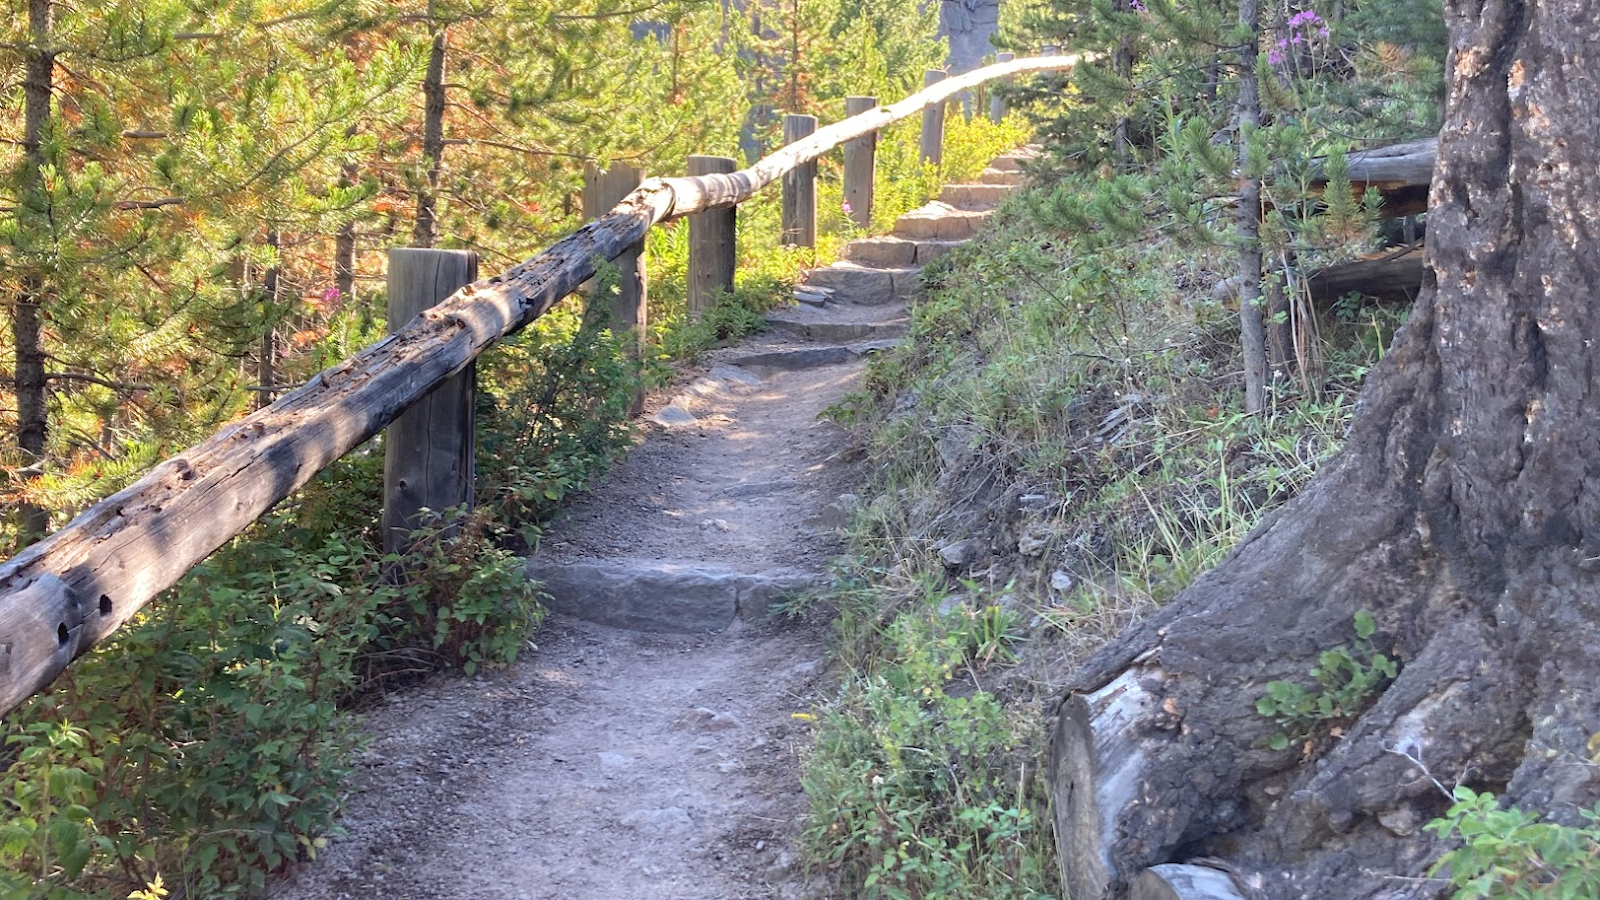
Most of the hike is through open fields, and the trail is well marked with very little elevation change. We crossed a small wooden bridge and then climbed a short set of steps to reach the falls. The hike was especially enjoyable because it was short and not crowded at all.
If you’re looking for an easy, less crowded hike to include in your Yellowstone itinerary, Wraith Falls is definitely worth considering.
Drive Time to Next Stop: About 5 minutes to Blacktail Plateau Drive
Blacktail Plateau Drive
It is a short drive from Wraith Falls to the one way dirt road Blacktail Plateau Drive. The road is 7 miles in length and travels through the woods and meadows of Blacktail Deer Plateau. The road reconnects back up with the Great Loop Road near the Petrified Tree.
It is a great road to travel if you are looking to get out of the traffic that you see in most of the park. We only saw 3 other cars while on the road.
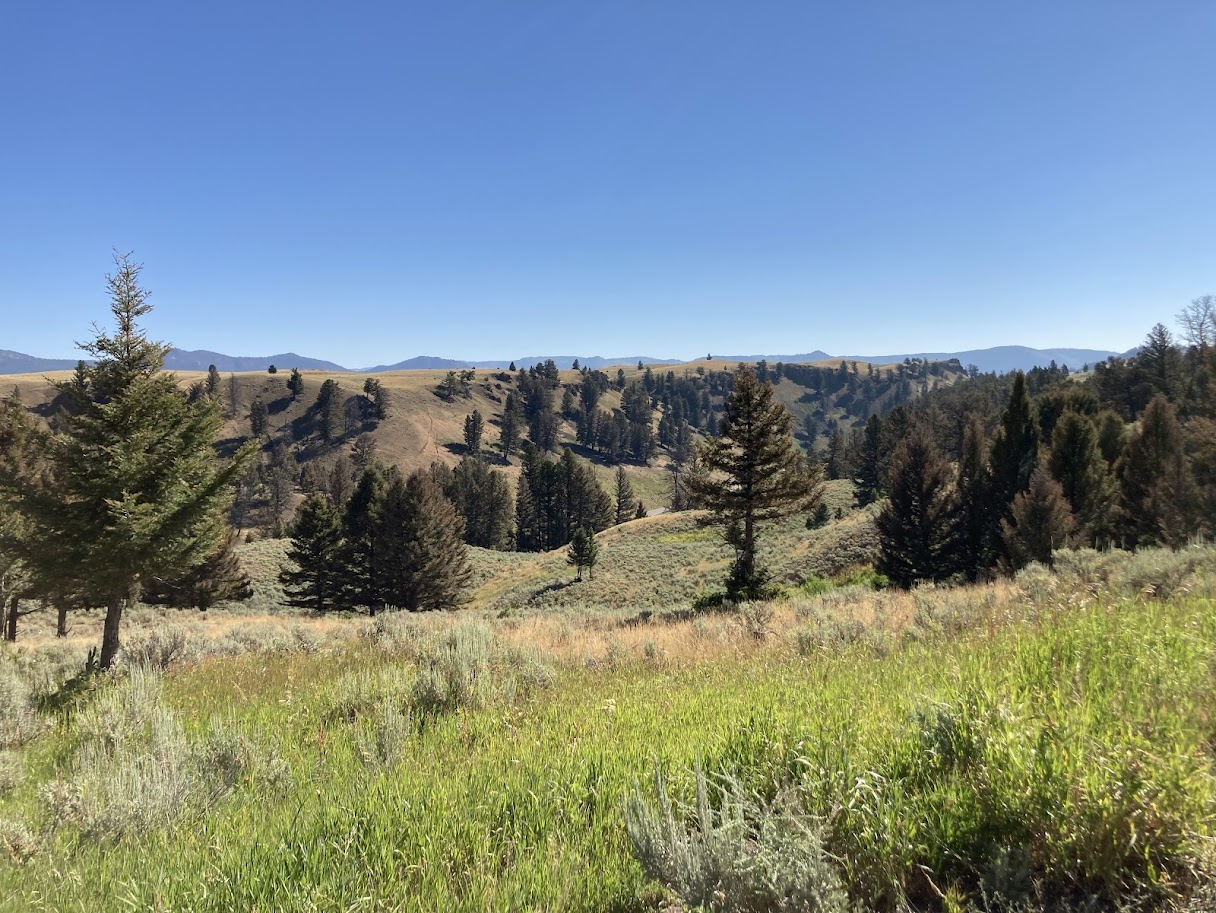
There are many open fields along the road where you would expect to see wildlife but unfortunately that wasn’t the case for us.
Even though we didn’t see any wildlife, there was still some pretty scenery to see on the 20 minute drive on the road.
Drive Time to Next Stop: A few minutes to the Petrified Tree

Petrified Tree
Once you get to the end of Blacktail Plateau Drive, it is a short distance to get to the quarter mile road that takes you back to the Petrified Tree.
There is a small parking area close to the tree. Trailers and large vehicles aren’t allowed back to the parking area. There is a pullout area located at the start of the road leading back to the tree where trailers and large vehicles can park.
Once in the parking area, there is a short sidewalk that leads up to the tree. The tree was once a large redwood. It is something you don’t see everyday and worth a quick stop to enjoy.
Drive Time to Next Stop: About 10 minute drive to Tower Fall
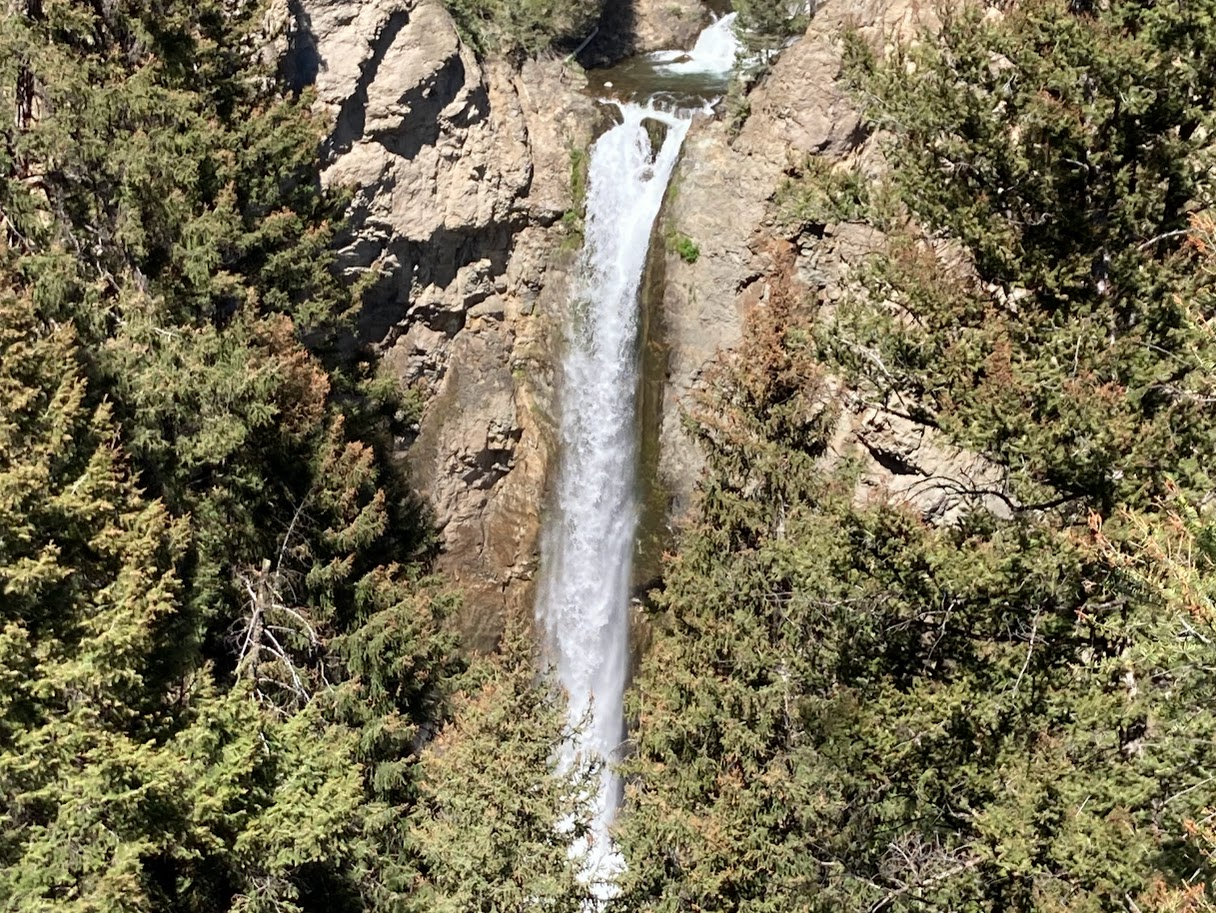
Tower Fall
The Tower Fall is located on Tower Creek. The fall themselves are 132 feet high. There’s a good sized parking lot for the falls, though you might have to circle around for a spot if it’s busy.
To see the falls, you pass the General Store and walk down the nice paved walkway 500 feet to the falls overlook. I am a sucker for waterfalls and it is well worth the stop.
If you are feeling a little more adventurous, you can take a short hike down to the creek. It is a pretty steep trail with numerous switchbacks.
My wife and I didn’t do it but a friend and I did the hike the year before. The one disappointing part of the hike is that the views at the bottom aren’t that great.
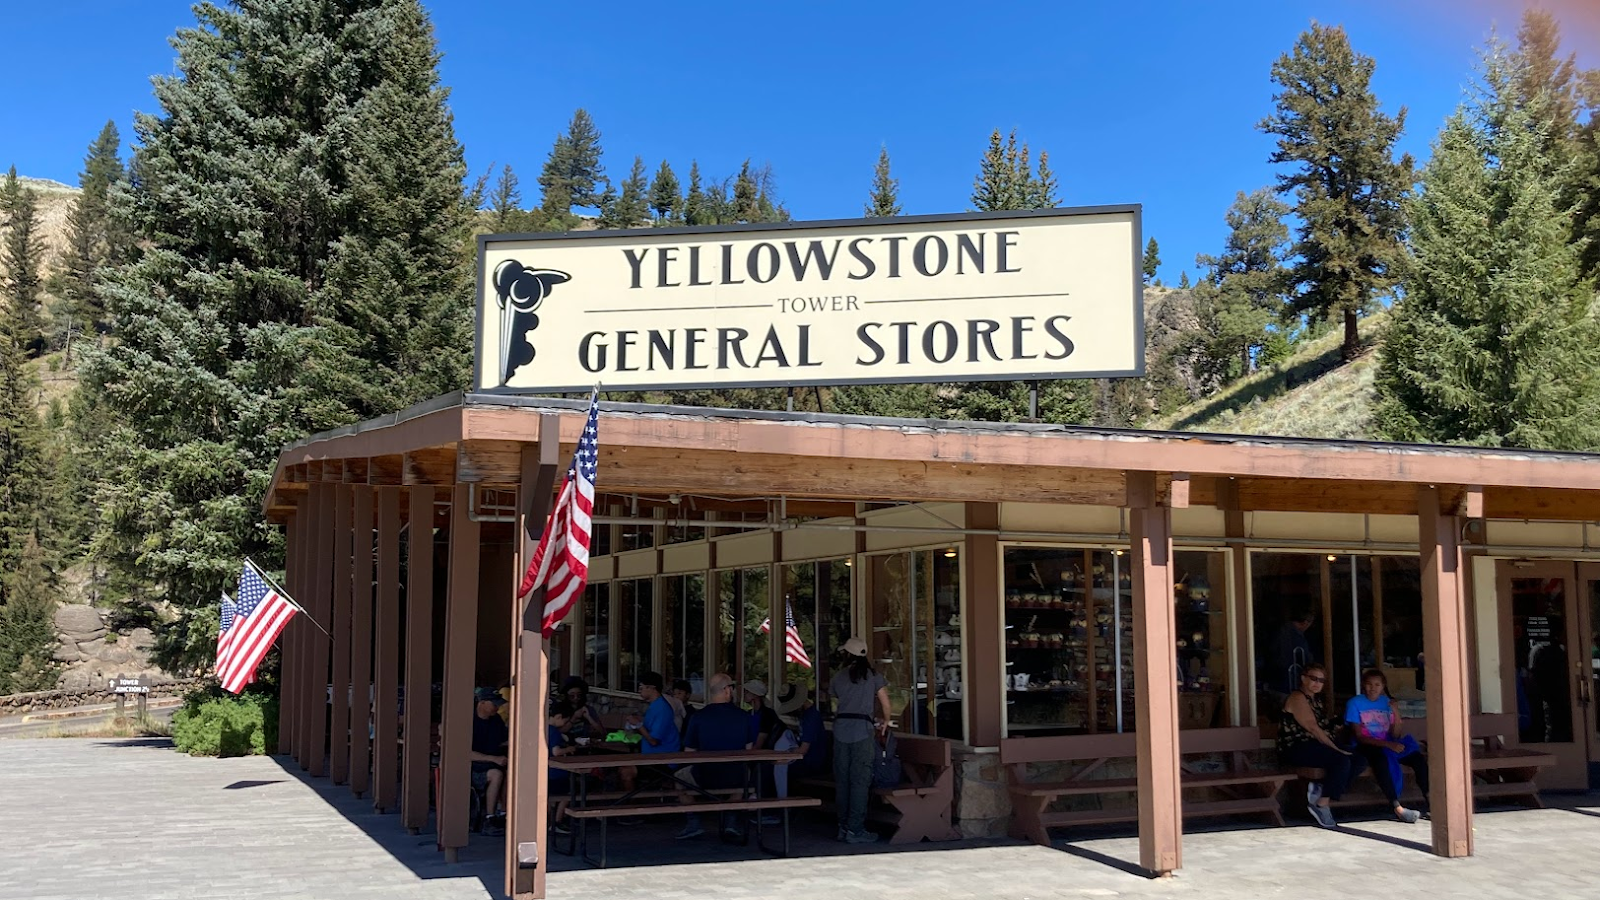
Besides seeing Tower Fall, there is also a General Store at this stop. They have souvenirs, groceries, ice cream and apparel to purchase.
Drive Time to Next Stop: About 15 minutes to Mt. Washburn
Mt. Washburn Hike
This particular location was a spur of the moment stop for us. We pulled into the nice sized parking area knowing we would figure out our plan once we parked.
The trail at first has a gradual climb to it. We walked for about a third of a mile up the hill. There is a nice view of the valley below at this point.
The whole hike is 6.4 miles round trip. We knew that we didn’t have the time for that length of hike. So, we took some pictures and headed back down to the car.
Drive Time to Next Stop: About 20-25 minutes to Brink of the Lower Falls
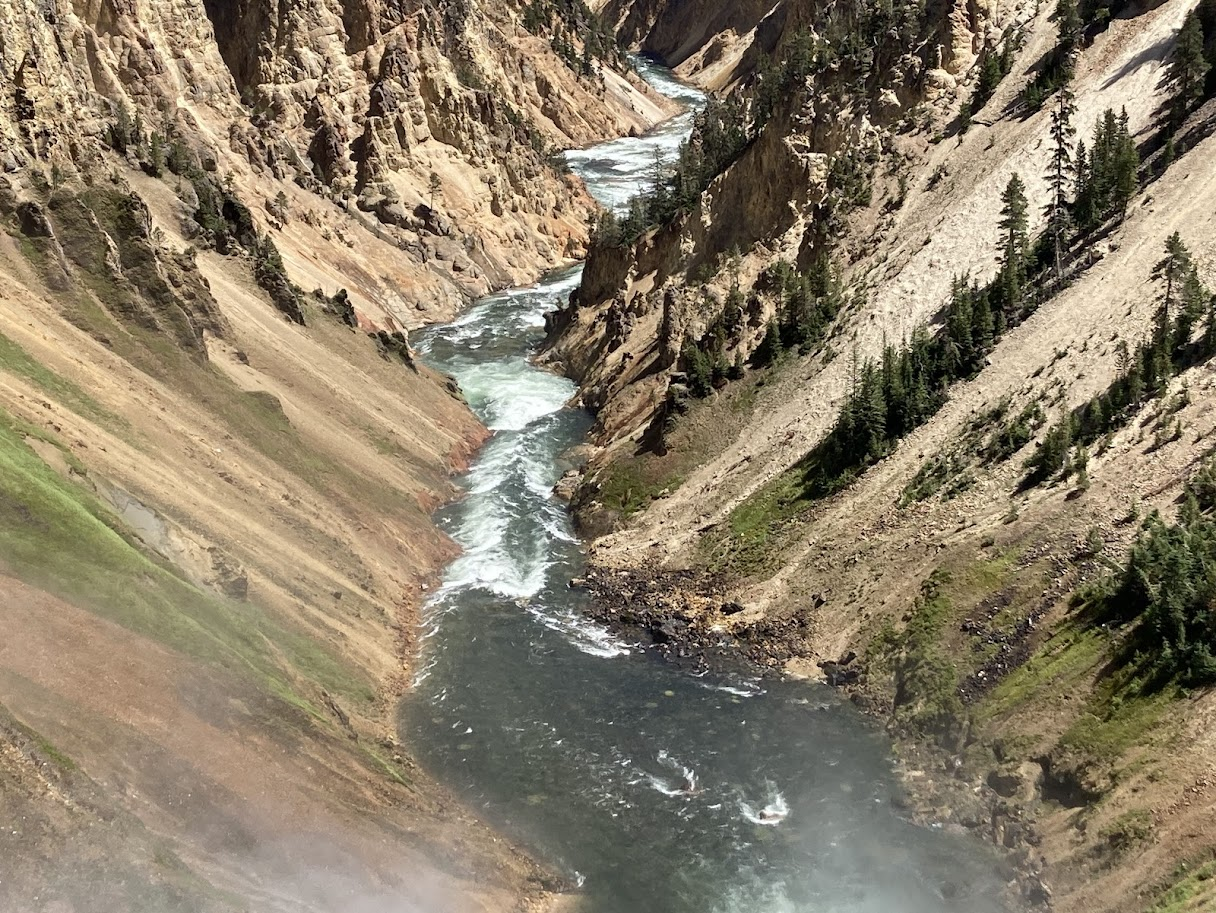
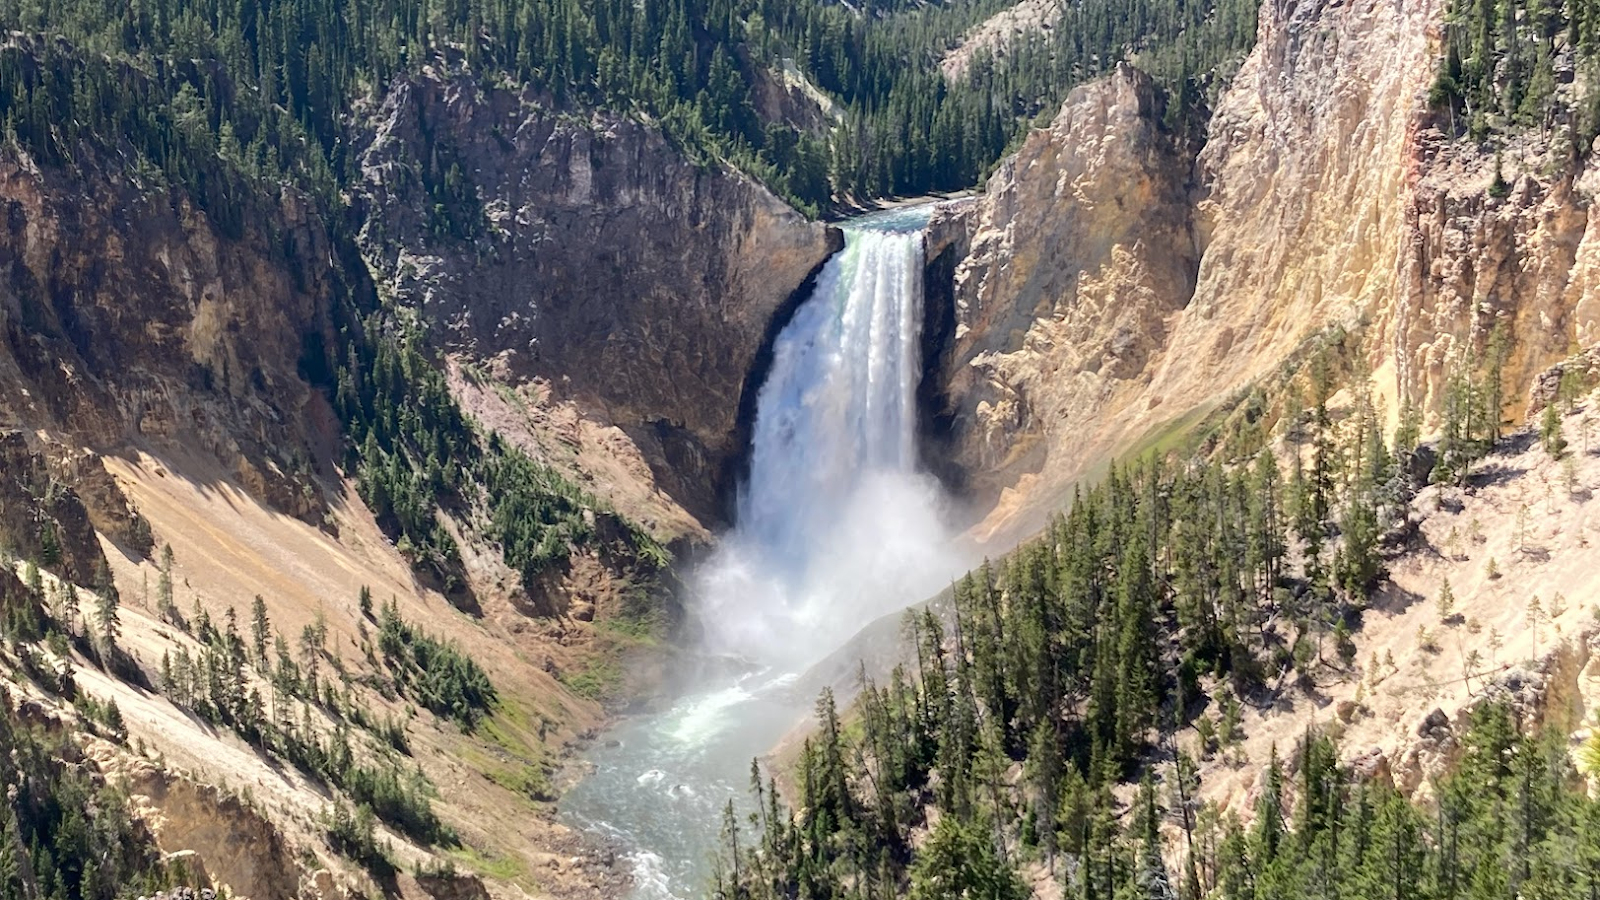
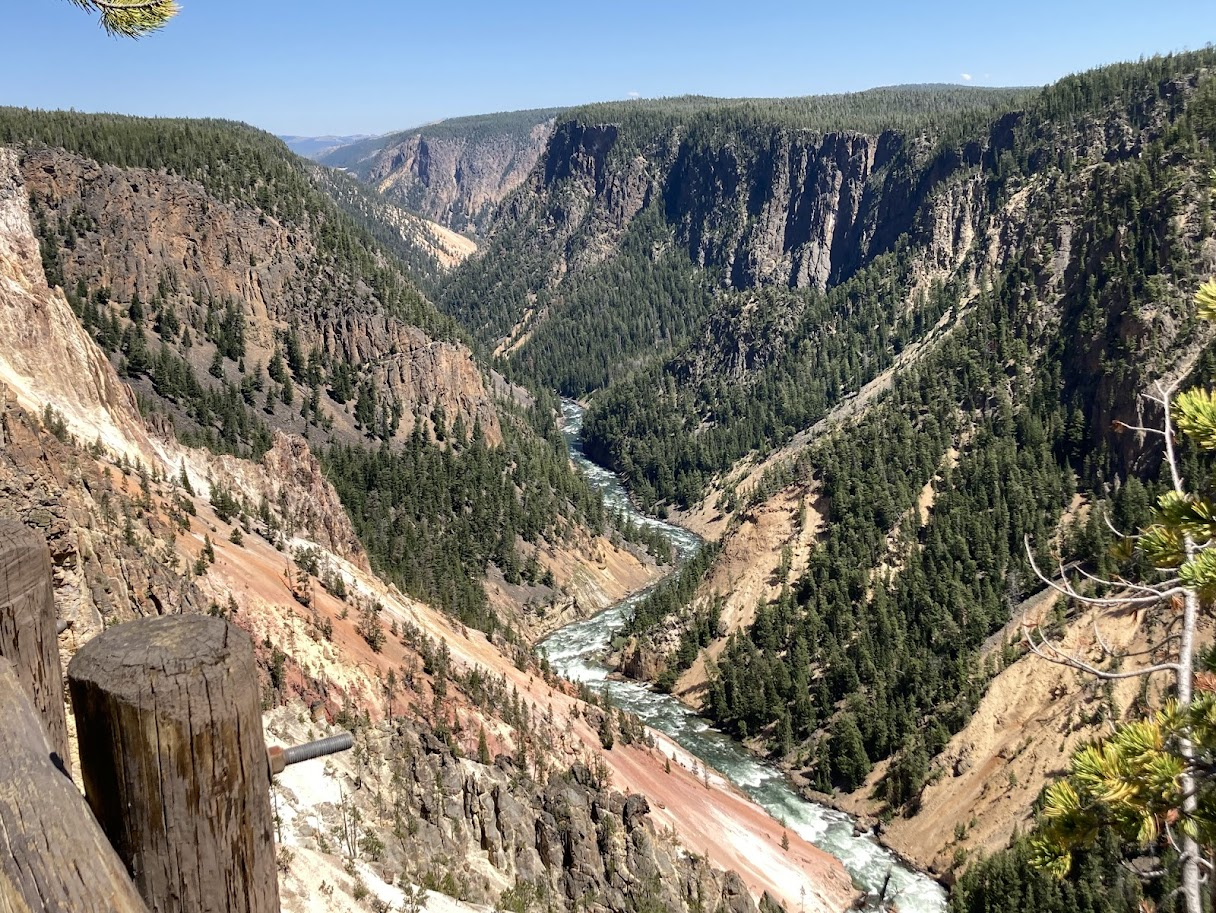
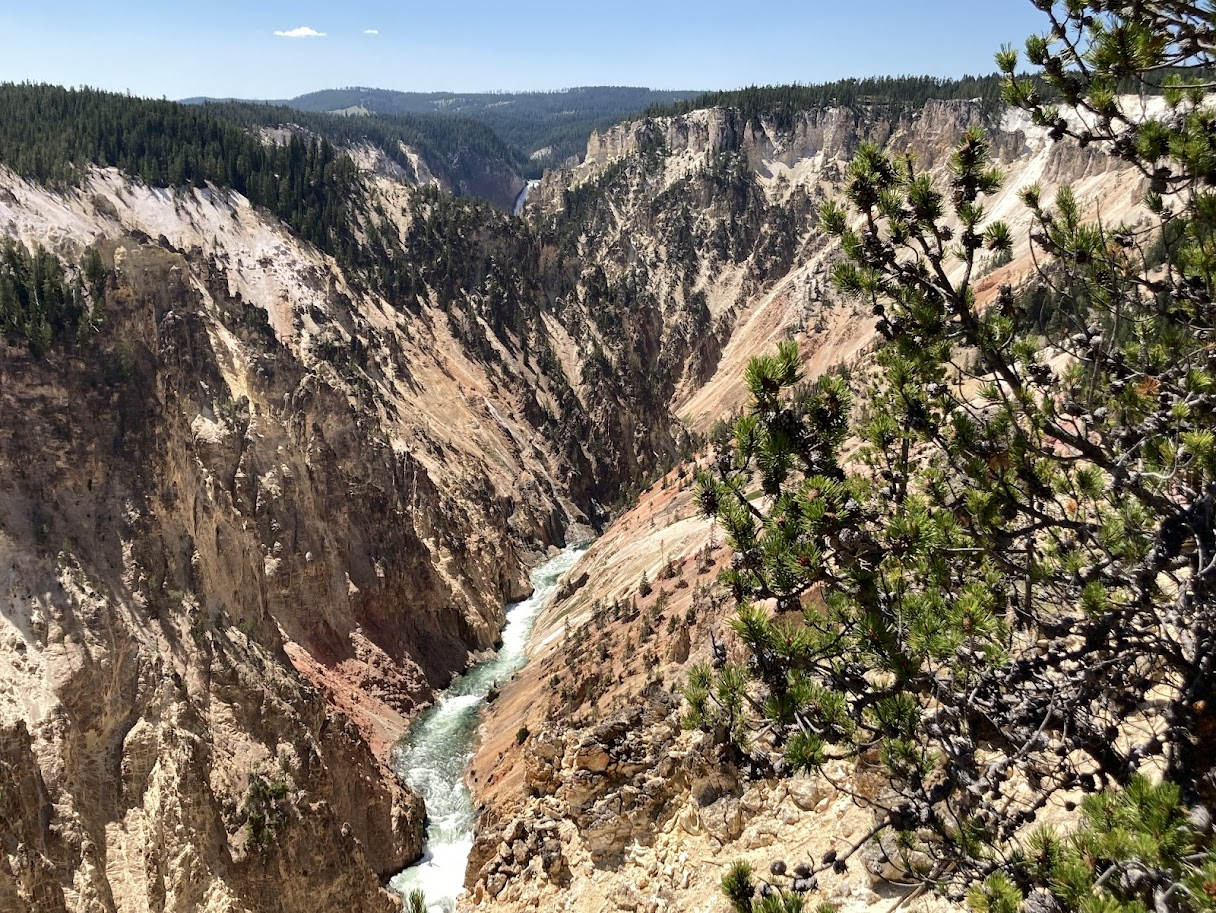
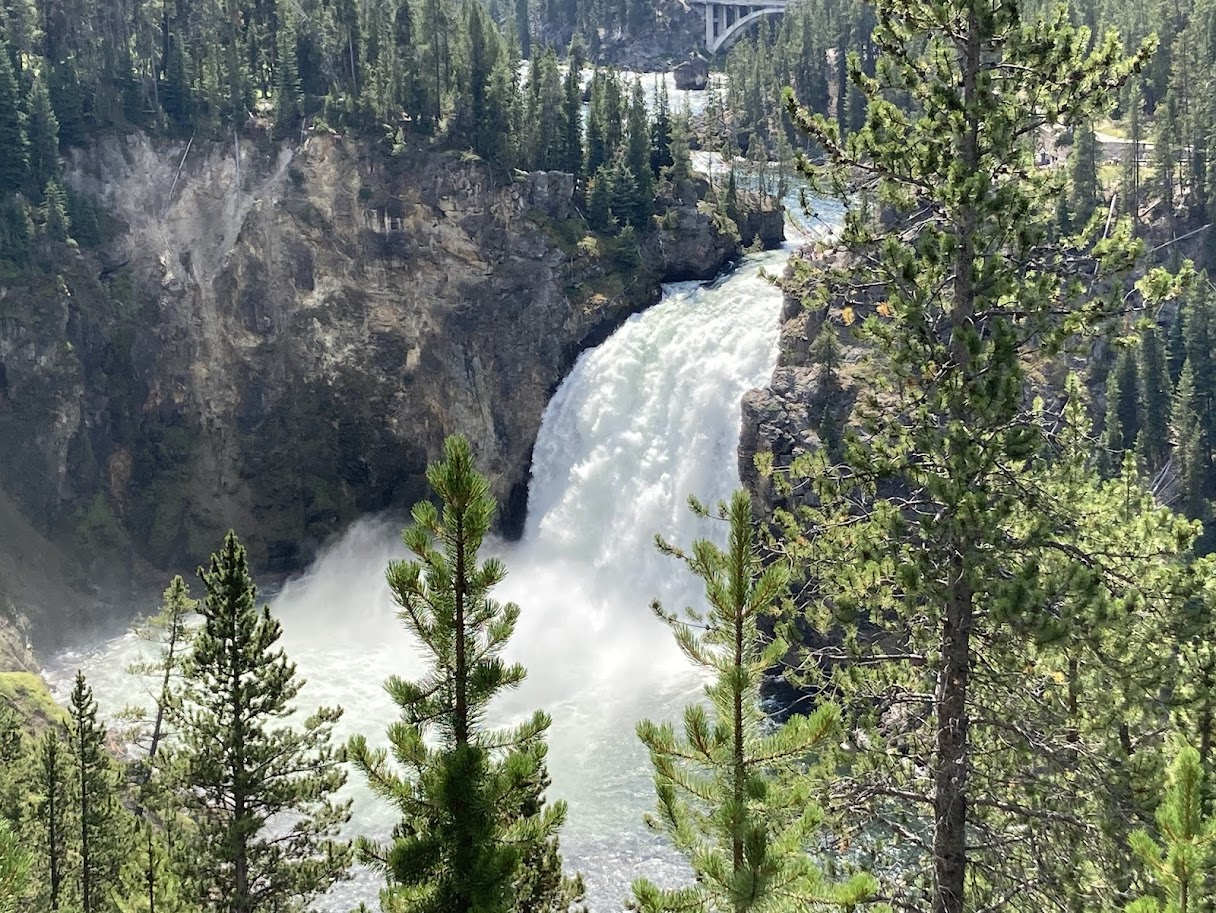
Grand Canyon of Yellowstone: The Best Views in This Itinerary
The Grand Canyon of the Yellowstone is my favorite part of the park. I love the look of the canyon with the Yellowstone River running through it along with the Lower and Upper Falls.
The canyon is around 20 miles in length and ranges from 1,500 to 4,000 feet wide. It is also 800 to 1,200 feet deep. The Upper Falls is 109 feet high while the Lower Falls is a more impressive 308 feet high.
For day one, we concentrated on stops that had views of the Lower Falls. The best road to see views of the Lower Falls is the one way North Rim Road.
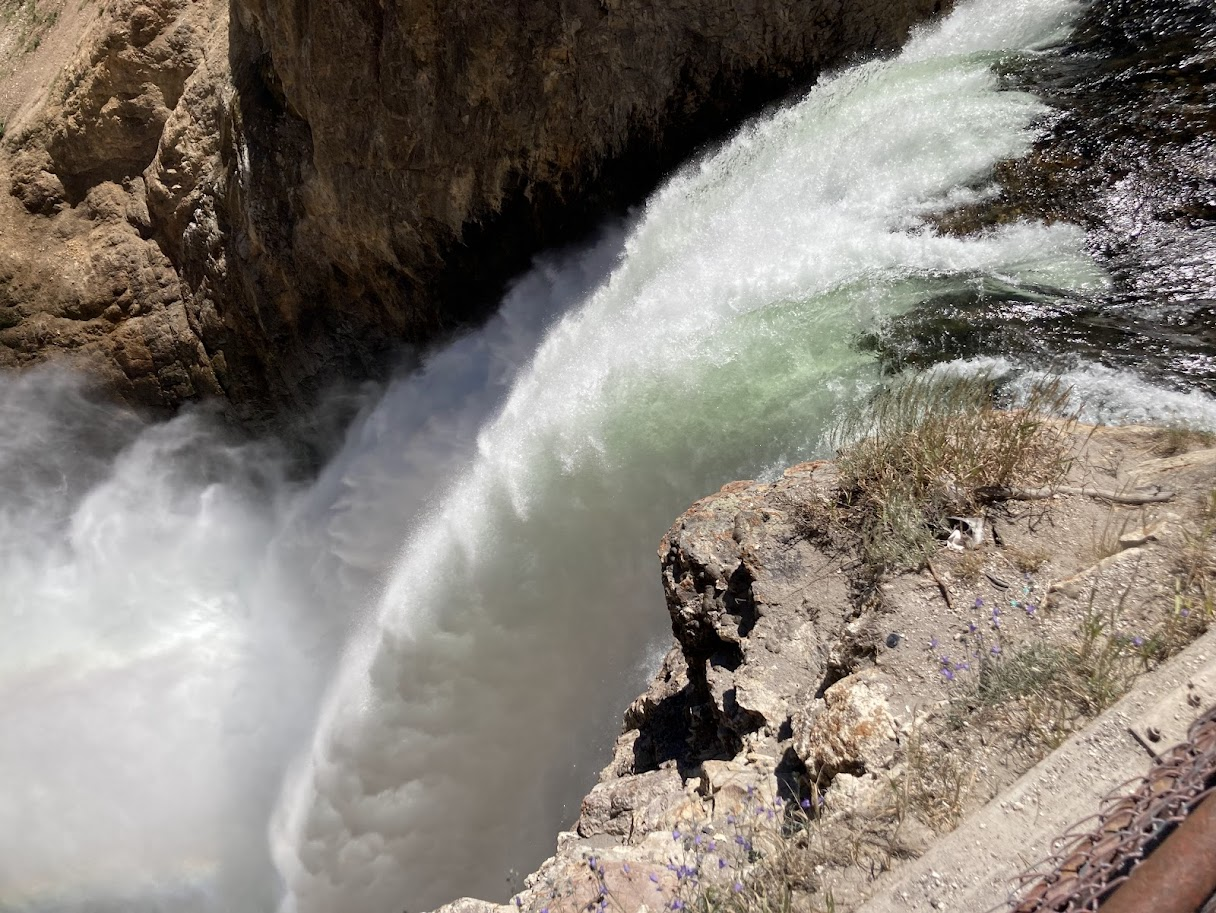
Brink of Lower Falls
After turning onto North Rim Road, it is a tenth of a mile to the parking area for the trails that lead to the Brink of Lower Falls and the Brink to Upper Falls. The two trails follow each other before they split off from one another.
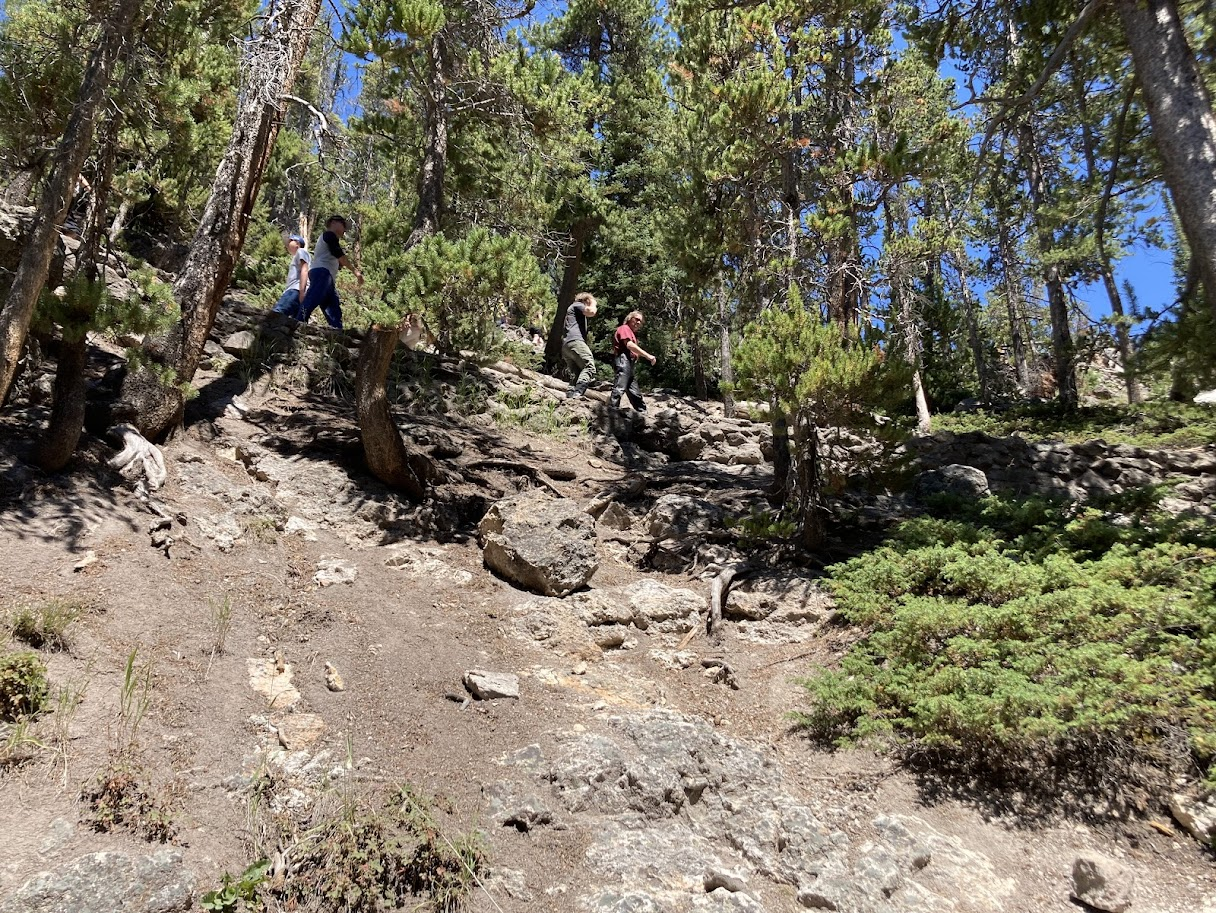
The trail leading down to the Lower Falls is ⅜ of a mile one way with a drop of 600 feet. It may not sound like much but it is definitely a nice little workout.
Tonya had knee replacement surgery eight weeks before our trip. She was able to do this hike. She was a beast.
The trail has numerous switchbacks to help with the drop. There are also places to stop and sit down along the way with most of them being in the shade.
The payoff is worth it once you get down to the overlook to the falls. It felt like we could touch them. We were so close that you can feel the true power of the falls as the water flows over the edge.
Drive Time to Next Stop: A few minutes to Lookout Point
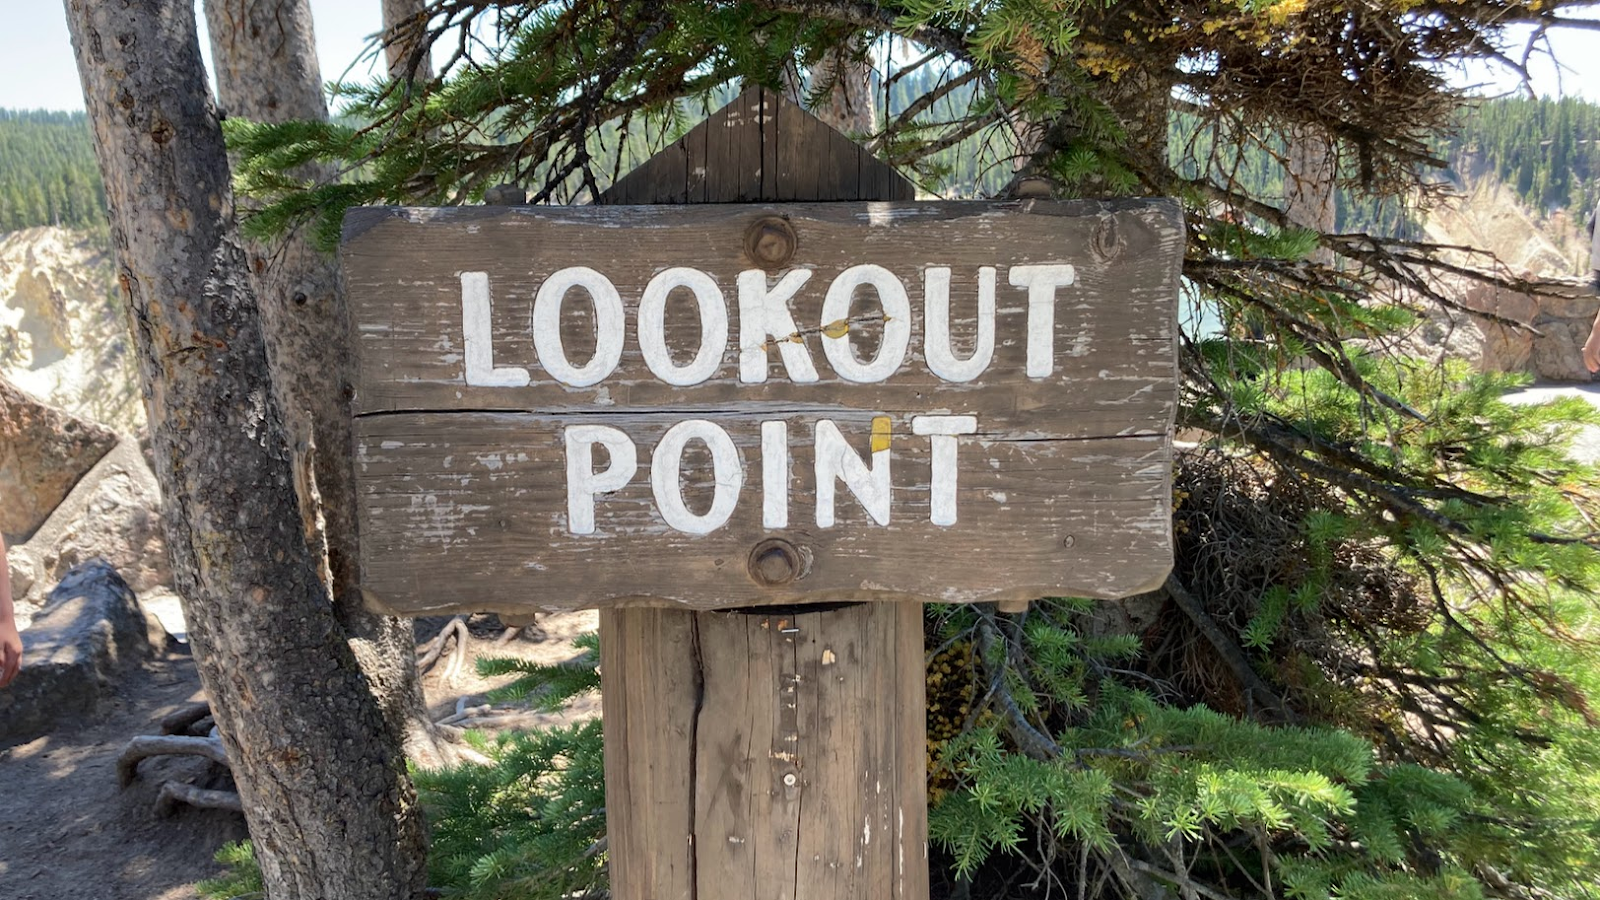
Lookout Point
Lookout Point is a half mile drive down the road from the Brink of Lower Falls. There is parking on the right side of the road and a pullout on the left side once you get to this area.
It is around 150 yards down to Lookout Point from the parking area. The path is paved with some steps leading down to the overlook. There are fantastic views of the falls and the canyon from this point.
If you want a closer vantage point, you can walk down to Red Rock Point. The trail is ⅜ of a mile long and kind of steep since it descends 500 feet. The trail also has numerous steps and is rough in areas. We didn’t go to this point since we did the Brink to Lower Falls.
Drive Time to Next Stop: A few minutes to the Grand View
Grand View
Two tenths of a mile from Lookout Point is the Grand View. It is a very short walk from the parking area to the overlook. You can’t see the falls from this vantage point because of some bends in the river.
Even though you can’t see the falls from the Grand View it is very much worth a stop. You have excellent views of the canyon along with the Yellowstone River running through it.
Drive Time to Next Stop: A few minutes to Inspiration Point
Inspiration Point
Inspiration Point is a little over a mile from Grand View. This is a very popular area so there is a nice sized parking lot. It is a short walk from the end of the parking area down to the 3 different viewing areas. The path leading down to the viewing areas is nicely paved.
You only get a slight view of the falls from Inspiration Point but you do get a great view of the canyon along with the Yellowstone River. I liked this viewpoint better than the Grand View. I liked the fact that you could see more of the canyon.
Depending on what time of day that you are at Inspiration Point, there are going to be large crowds. You will have to be patient when trying to get that perfect shot.
Drive Time to Next Stop: About 5-10 minutes to Canyon Village
Canyon Village
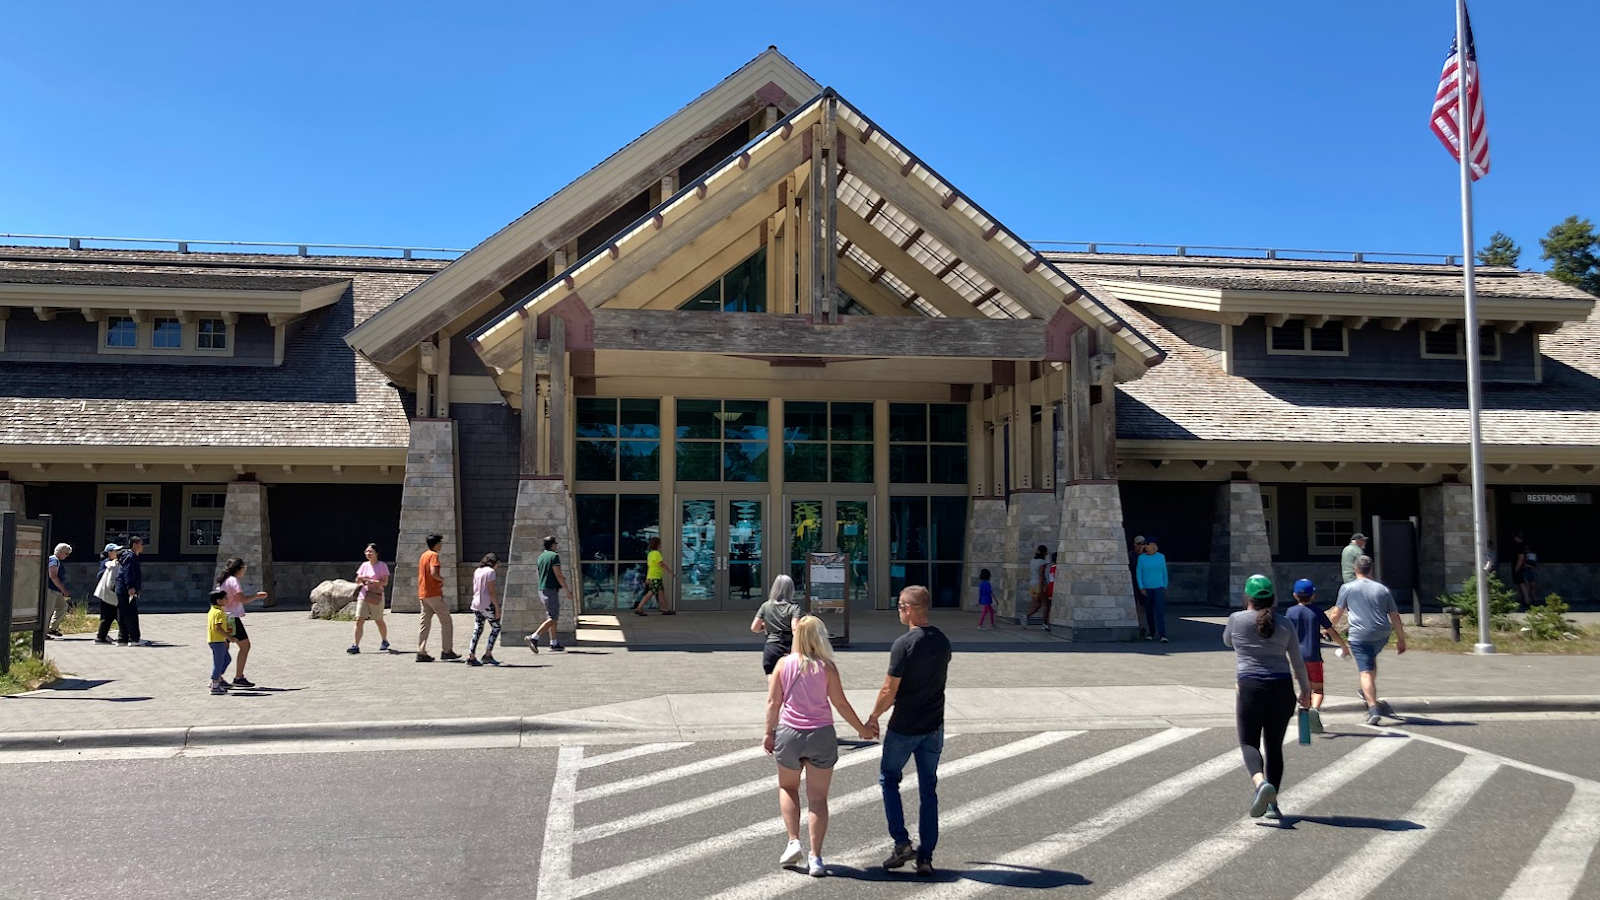
We went to the Canyon Village to go to the education center. In the center, there is a bookstore, theater, gift shop, a help desk, restrooms, and a 3D model of the park. You can also talk with rangers and get any of your questions answered. The center itself was really nice.
The Canyon Village also has a post office, sports store, restaurant, and a general store. This is a great stop to make if you
Drive Time to Next Stop: About 25 minutes to Norris Geyser Basin
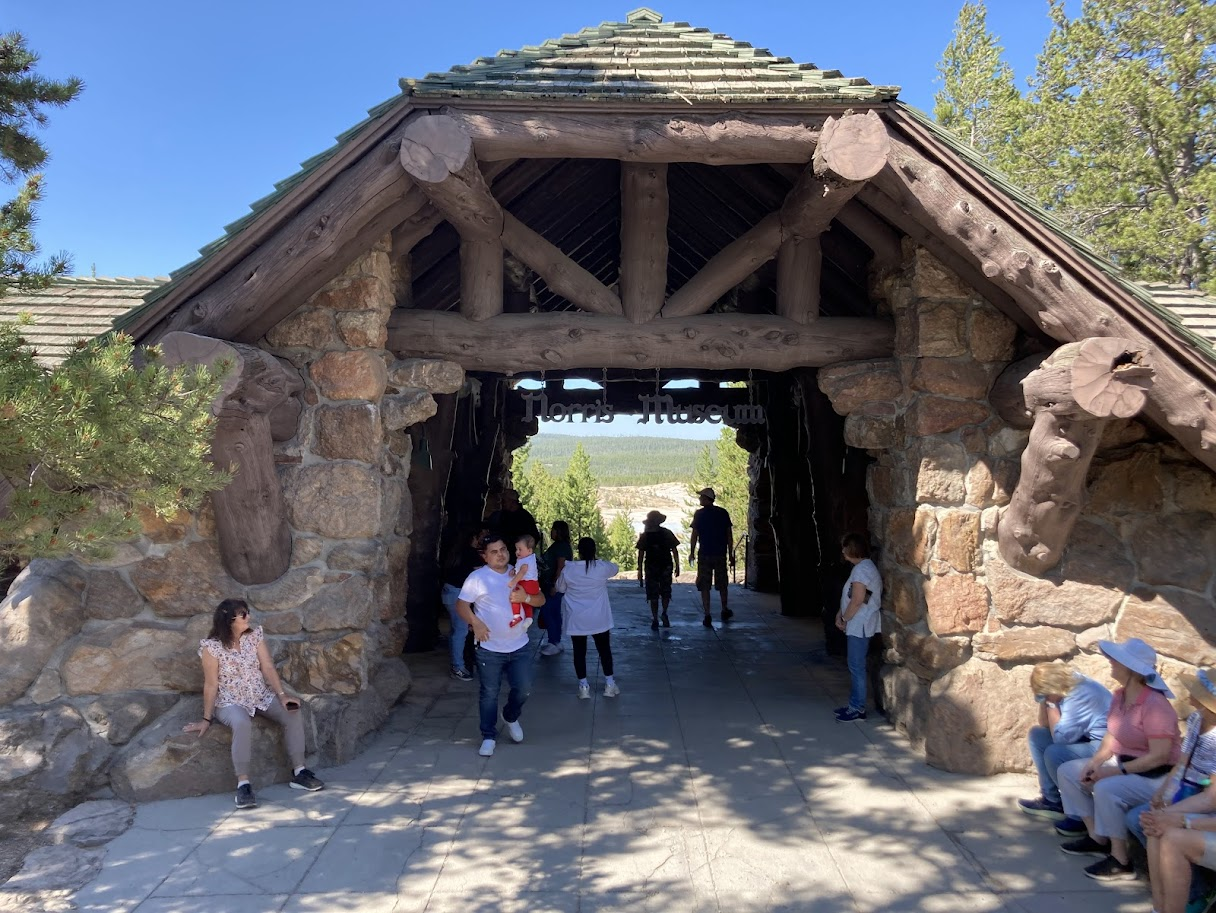
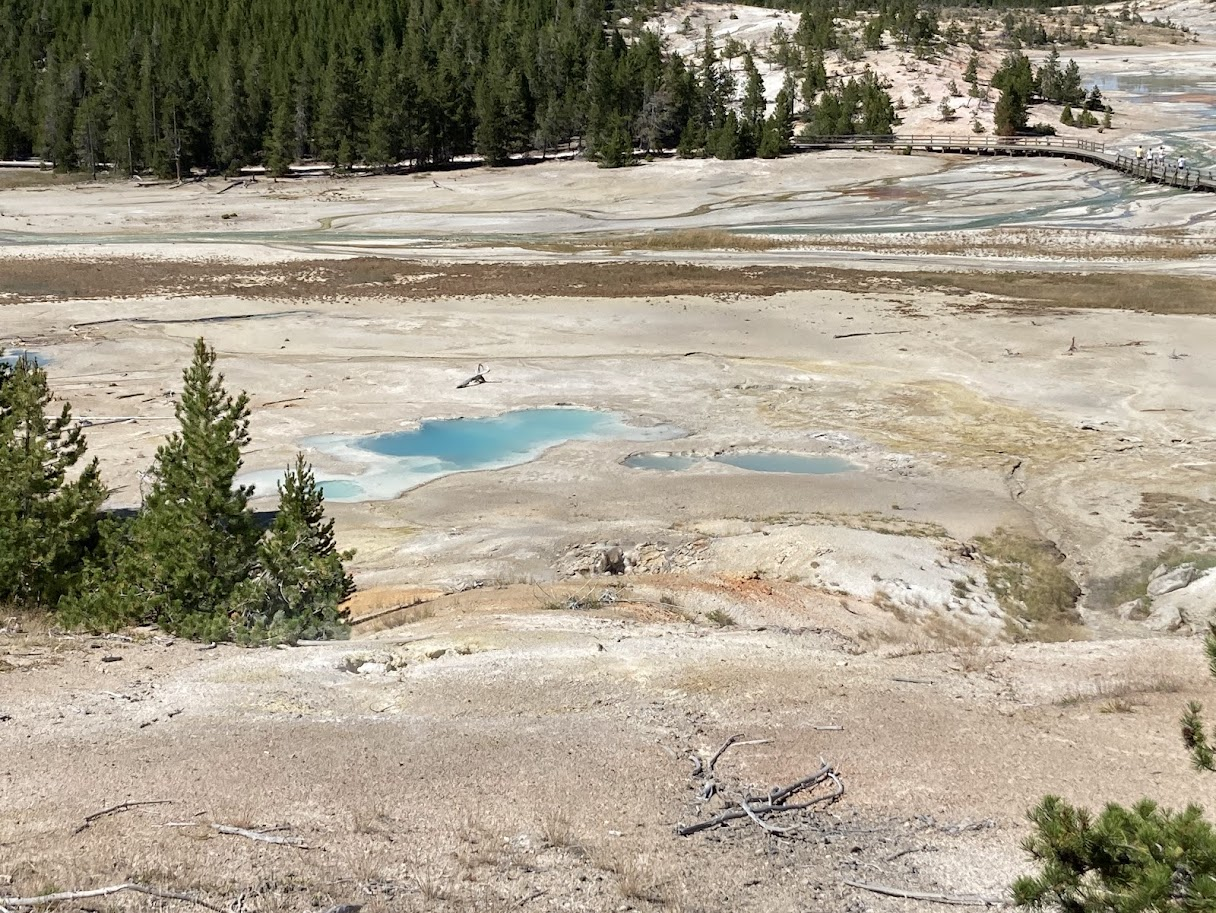
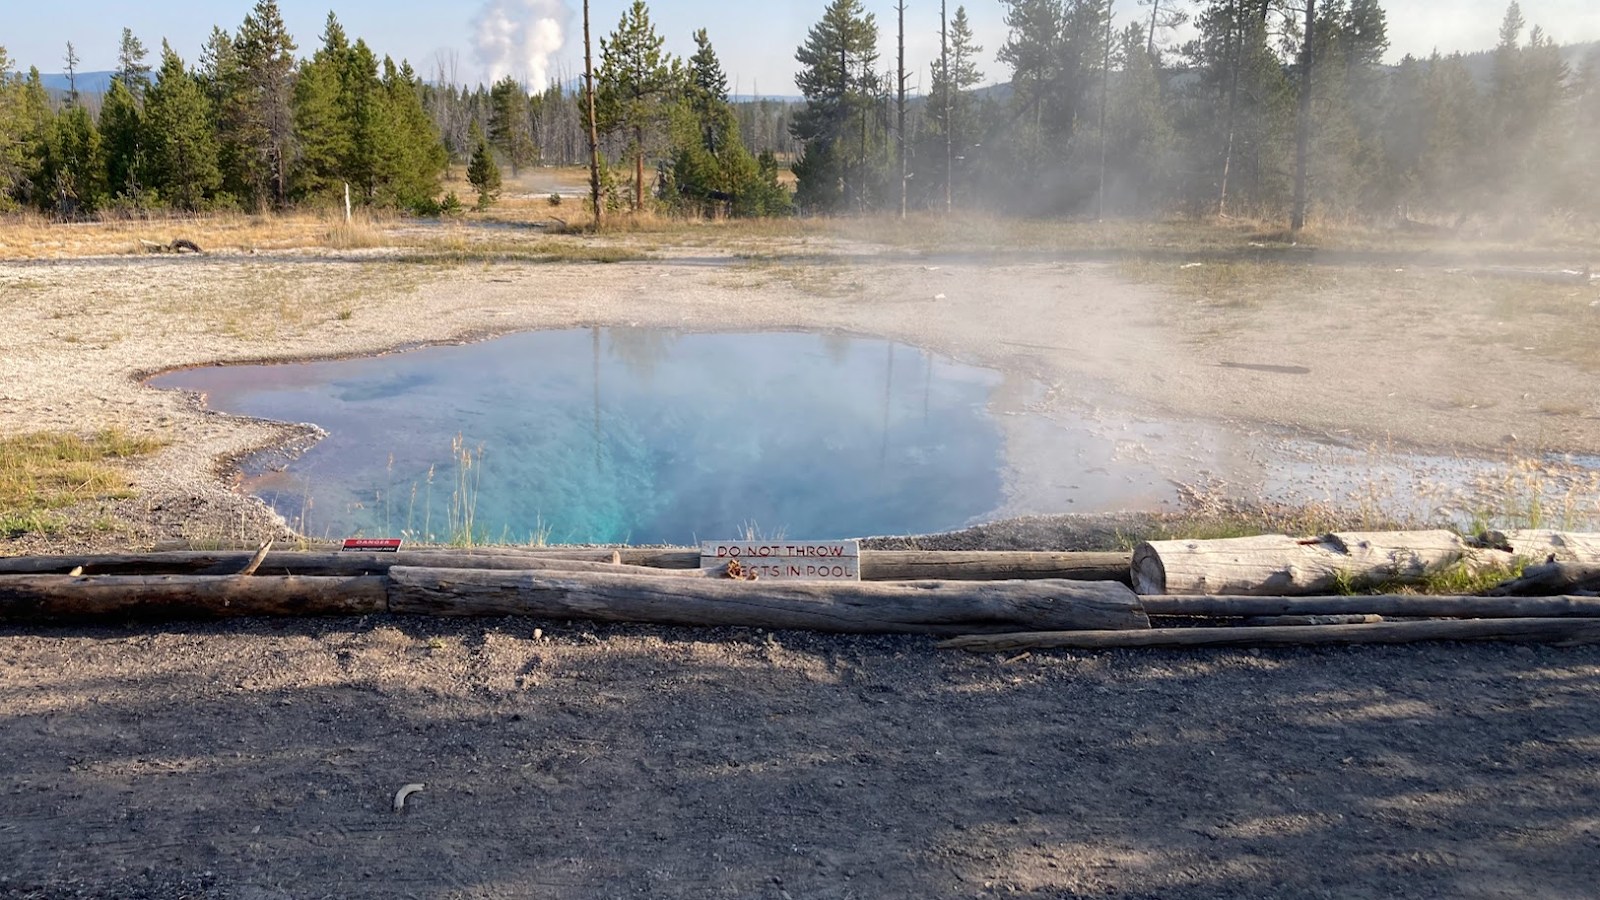
Norris Geyser Basin: A Must See Stop on Any Yellowstone Itinerary
The Norris Geyser Basin is one of the more popular geyser areas in Yellowstone. There is a large parking area but it still took us 20 minutes to get into the parking lot since it was so busy. You’ll want to keep that in mind when planning out your day.
The two main areas in the basin are the Back Basin and Porcelain Basin. There are over 2 miles of boardwalk that you can walk to see the geysers.
It is a short walk from the parking area to get to the Norris Museum. The museum has an open air foyer that is different and I think is pretty cool looking. Tonya and I spent our time in the Porcelain Basin.
Once you walk through the museum, there is an overlook area that gives you a great view of the Porcelain Basin. There are wide trails and boardwalks that makes it easy to explore the area.
In the Porcelain Basin you’ll see hot springs, geysers, and fumaroles. The Porcelain Basin is more open than the Back Basin area. It was a great last stop for the day.
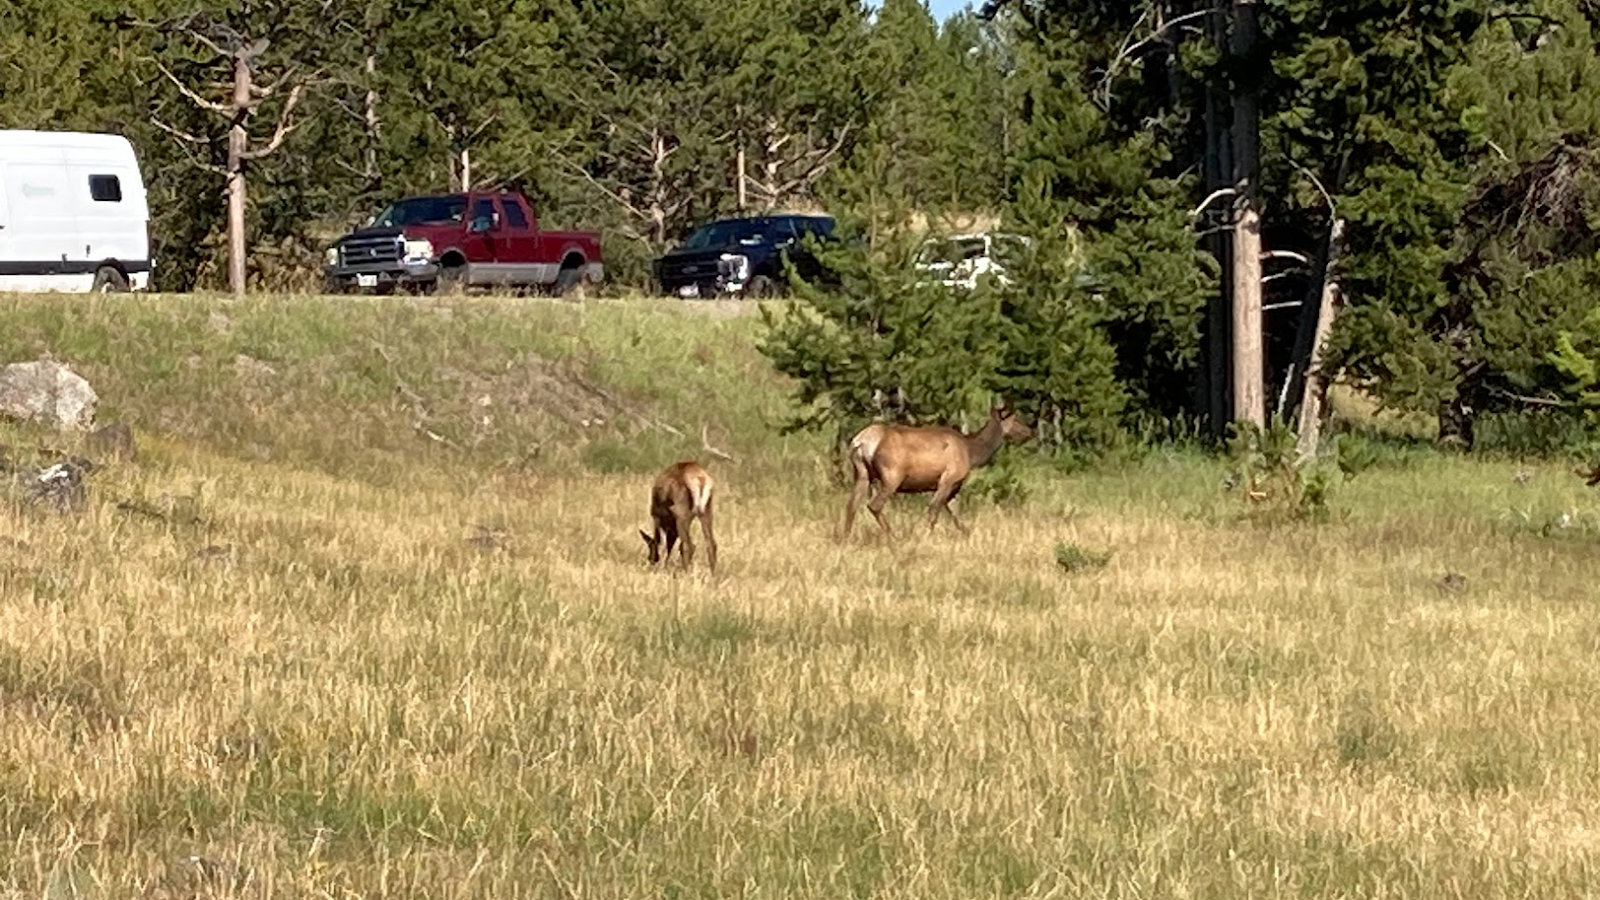
You never know when you are going to see wildlife in Yellowstone. As we were driving to West Yellowstone, we stopped to see a couple elk that were grazing near the road.
Explore the Full Out West Road Trip
⭐ This Yellowstone itinerary was part of our larger western road trip that included several amazing destinations. If you’re planning a similar adventure, these guides will help you plan each stop: ⭐
- 17 Day American West Itinerary (Our complete route and planning guide)
- Glacier National Park Itinerary — How we explored Glacier National Park
- Hikes in Glacier National Park — Some of the best hikes in Glacier NP
- Stops on Going-to-the-Sun Road — Best stops to make on the scenic road
- Things to Do in Albuquerque — What to see and do in Albuquerque
- Pikes Peak Cog Railway — Tips for riding to the top of Pikes Peak
- Great Sand Dunes NP Itinerary — What we did in Great Sand Dunes NP
Day 2 Route
The yellow is the route that we traveled on day two. We entered the park at 7:00 am through the West Entrance and left the park at 4:30 pm. There was no wait to get into the park at that time.

Yellowstone Itinerary Day 2
West Entrance → North Exit
Start Time: 7:00 am
Exit: North Entrance toward Bozeman
Day 2 Overview
- Visit Firehole Falls (10 mins)
- Walk Fountain Paint Pot Trail (30–40 mins)
- Drive Firehole Lake Drive (20–30 mins)
- Explore Midway Geyser Basin (1 hour)
- Grand Prismatic Spring
- Excelsior Geyser
- Visit Black Sand Basin (30-45 mins)
- Watch Old Faithful erupt (1-1.5 hrs)
- Hike to Grand Prismatic Spring Overlook (1 hr)
- Stop at Continental Divide Trailhead (10 mins)
- Walk West Thumb Geyser Basin (30-45 mins)
- Visit Mud Volcano Area (15-30 mins)
- Wildlife viewing in Hayden Valley (30 mins)
- End at Artist Point (15 mins)
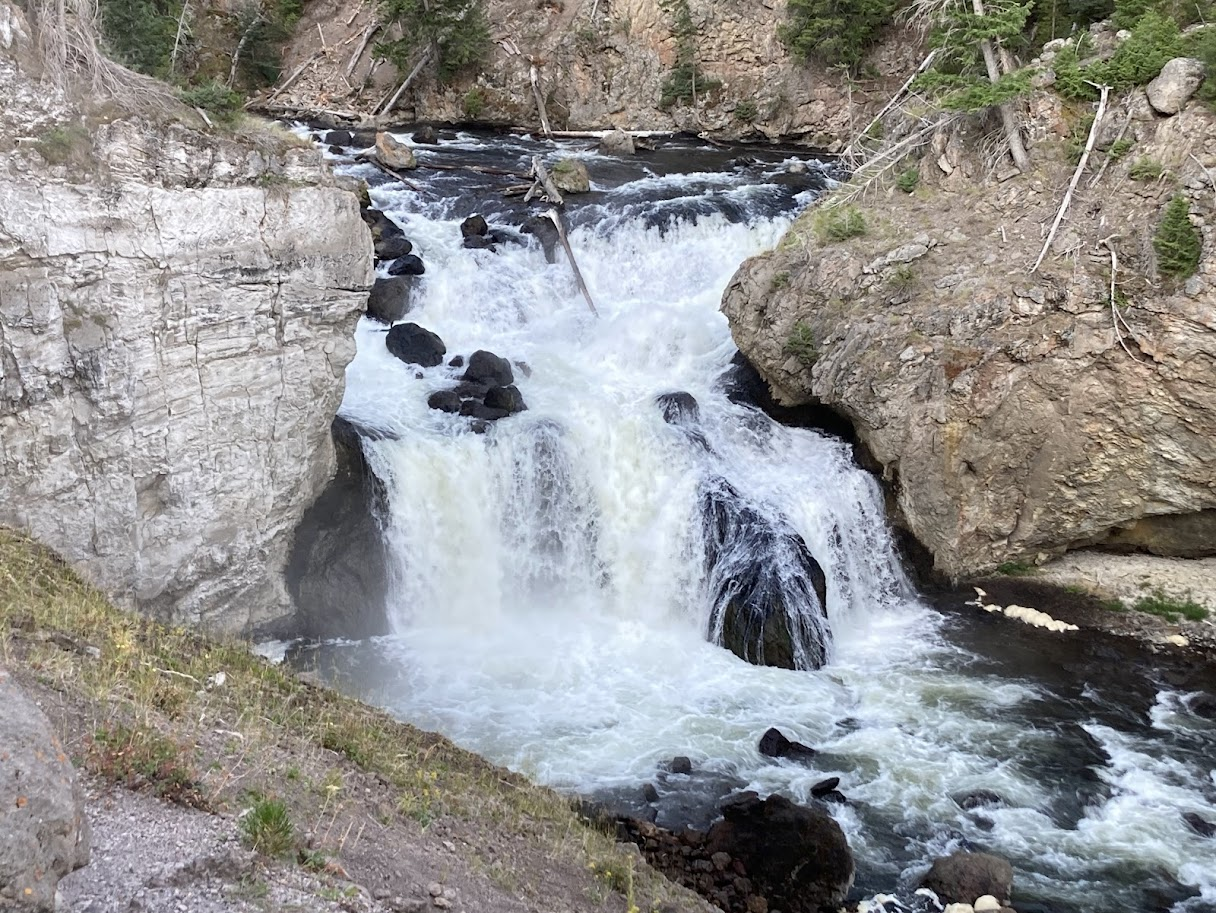
Firehole Falls
Firehole Falls is located on the 2 mile one way Firehole Canyon Drive which is right off the Grand Loop Road. Once you get to the 40 foot Firehole Falls, there is a small parking area.
The nice thing about the falls is that you just have to cross the road to see them. I thought it was a nice waterfall and it was worth a stop.
During the summer months, there is an area on Firehole Canyon Drive that you can pull off and take a dip in the water in a swimming hole.
Drive Time to Next Stop: About 15 minutes to Fountain Paint Pot
Fountain Paint Pot Trail
The Fountain Paint Pot Trail is located in the Lower Geyser Basin right off of the Grand Loop Road. I like this area because along the .5 mile loop boardwalk you can see the four different hydrothermal features in the park, which are geysers, hot springs, mudpots, and fumaroles.
The boardwalk is nice and wide and well maintained. If you have small children, it’s definitely an area where you would especially want to keep your eye on them.
There is a large parking lot at this location which makes it nice even during really busy times.
Drive Time to Next Stop: A few minutes to Firehole Lake Drive
Firehole Lake Drive
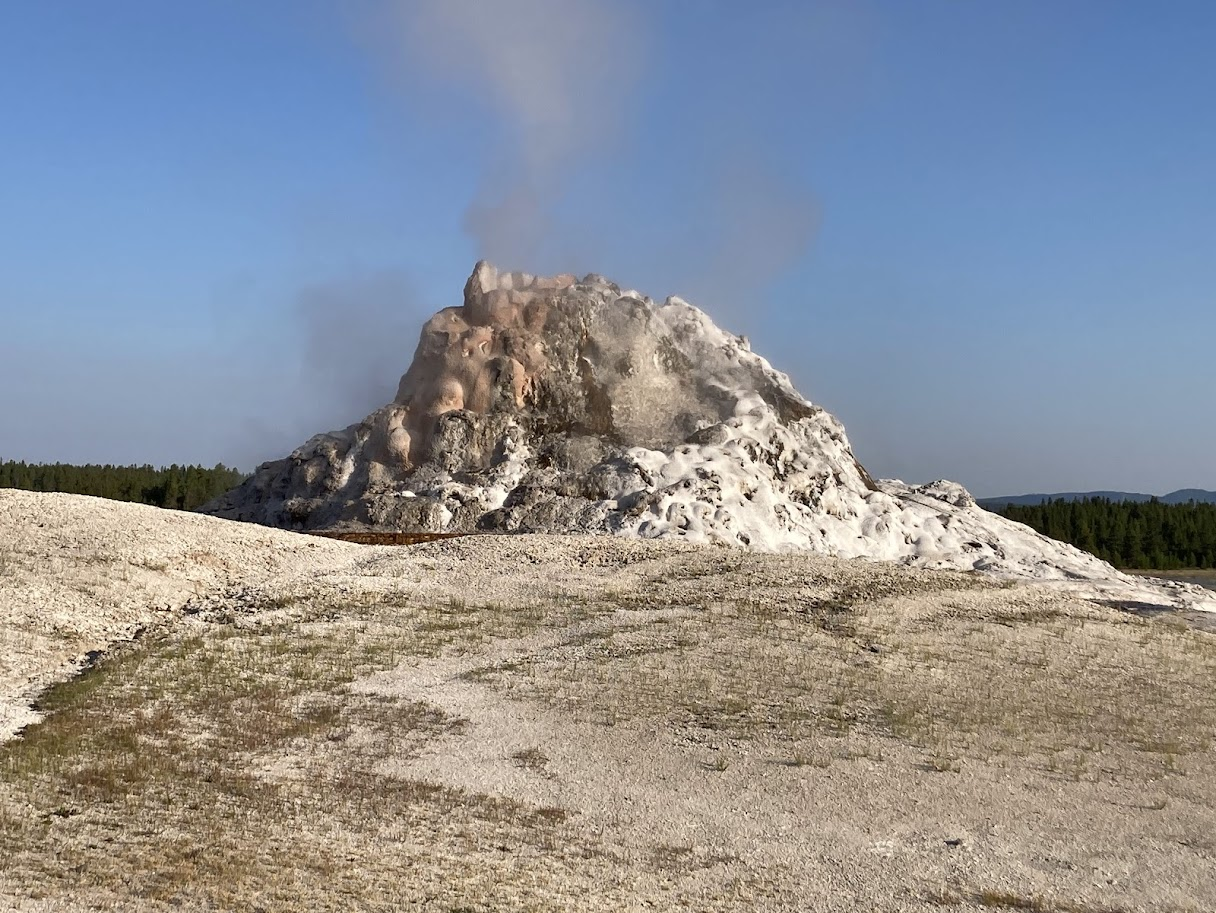
A little over a mile south of Fountain Paint Pot Trail is the Firehole Lake Drive. This 3 mile one way road has numerous geysers and hot springs that you can view from the road.
Some of the features on this stretch of road include: Firehole Spring, Surprise Pool, Great Fountain Geyser, and White Dome Geyser.
There is a boardwalk around Firehole Lake that you can walk around. Since, we were in the park early, there were no other cars that we saw as we enjoyed this loop. This little drive was well worth a bit of our time.
Drive Time to Next Stop: About 10 minutes to Midway Geyser Basin
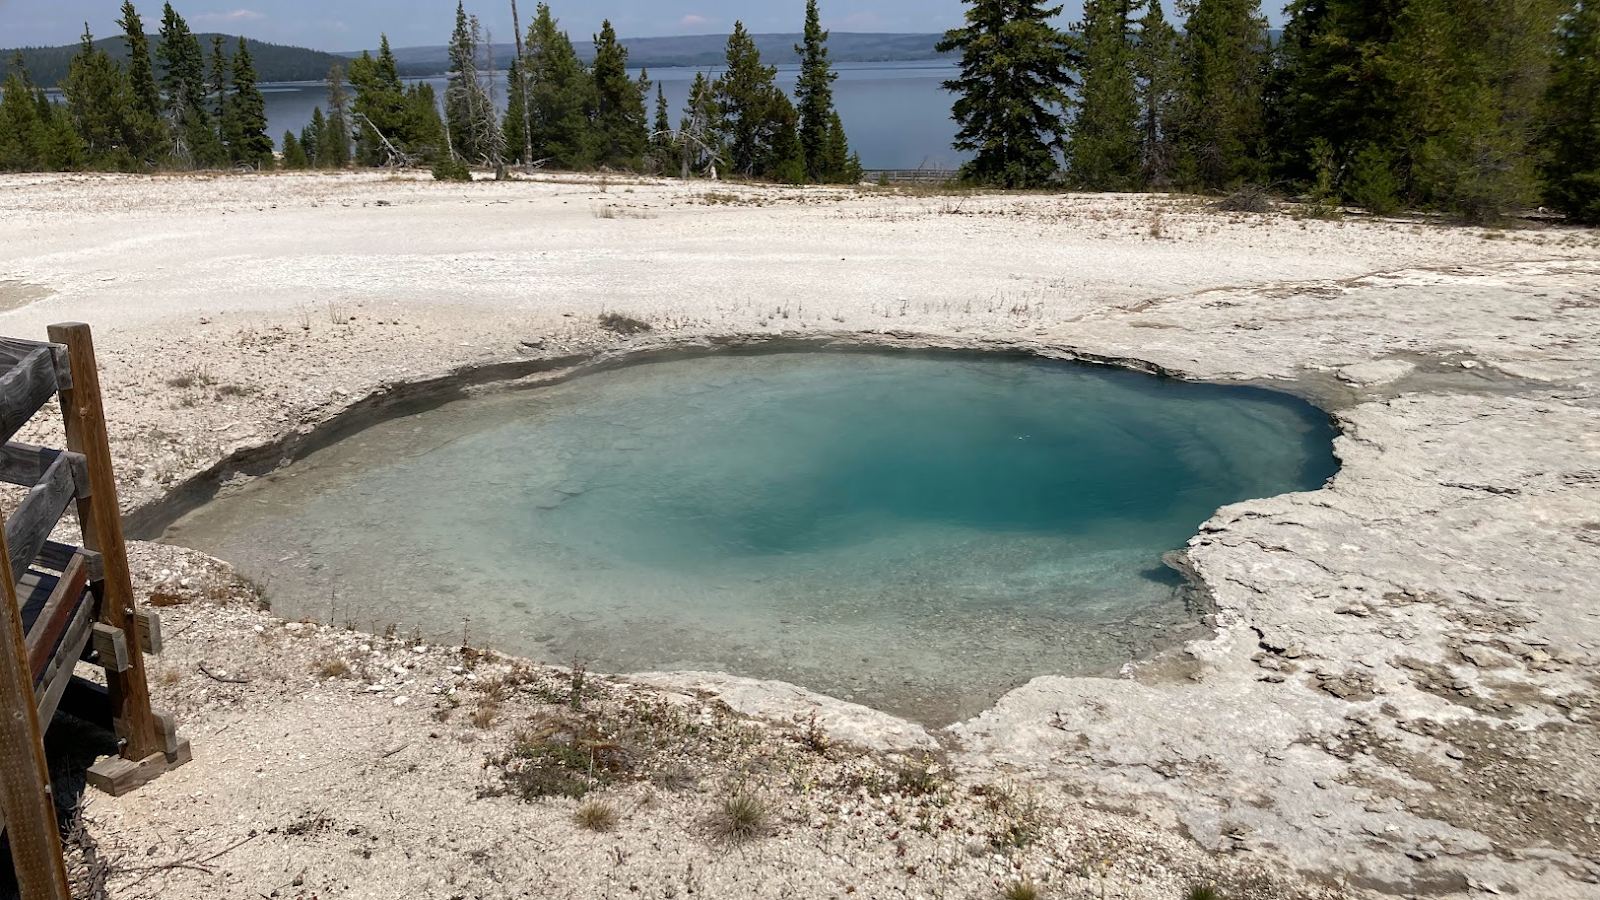
Midway Geyser Basin
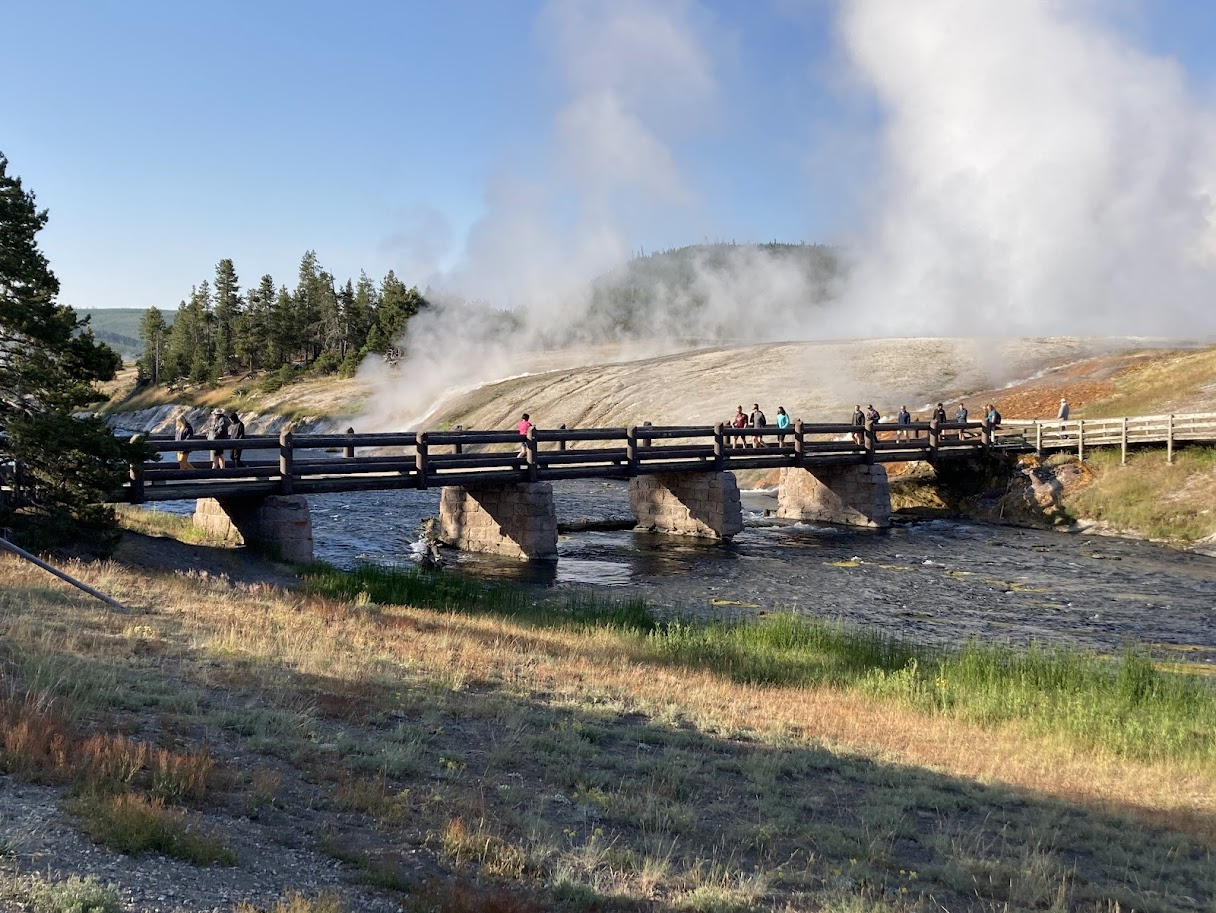
The Midway Geyser Basin is a very popular area in Yellowstone. It is home to the famous Grand Prismatic Spring, which is one of the largest hot springs in the world. You can also see the Excelsior Geyser, Opal Pool and Turquoise Pool at this location.
From the parking area, you will take a short walk to cross the bridge over Yellowstone River. The bridge is a nice place to stop and take some pictures.
Once across the bridge, you’ll hike up to the main boardwalk. The boardwalk is .7 miles in length and makes a loop around the different features.
If you go early in the day, it’s easier to find a parking spot in the parking lot. The downside is that it’s usually harder to see the bodies of water because of all of the steam coming off of them.
The parking lot is not that big here. My wife and I didn’t have issues finding a parking spot since we were there early in the morning.
The year before my friend and I had to wait a half an hour to get a parking spot since we were there later in the day. You can also park on the road and walk down to the basin when it is busy.
Drive Time to Next Stop: About 10 minutes to Black Sand Basin
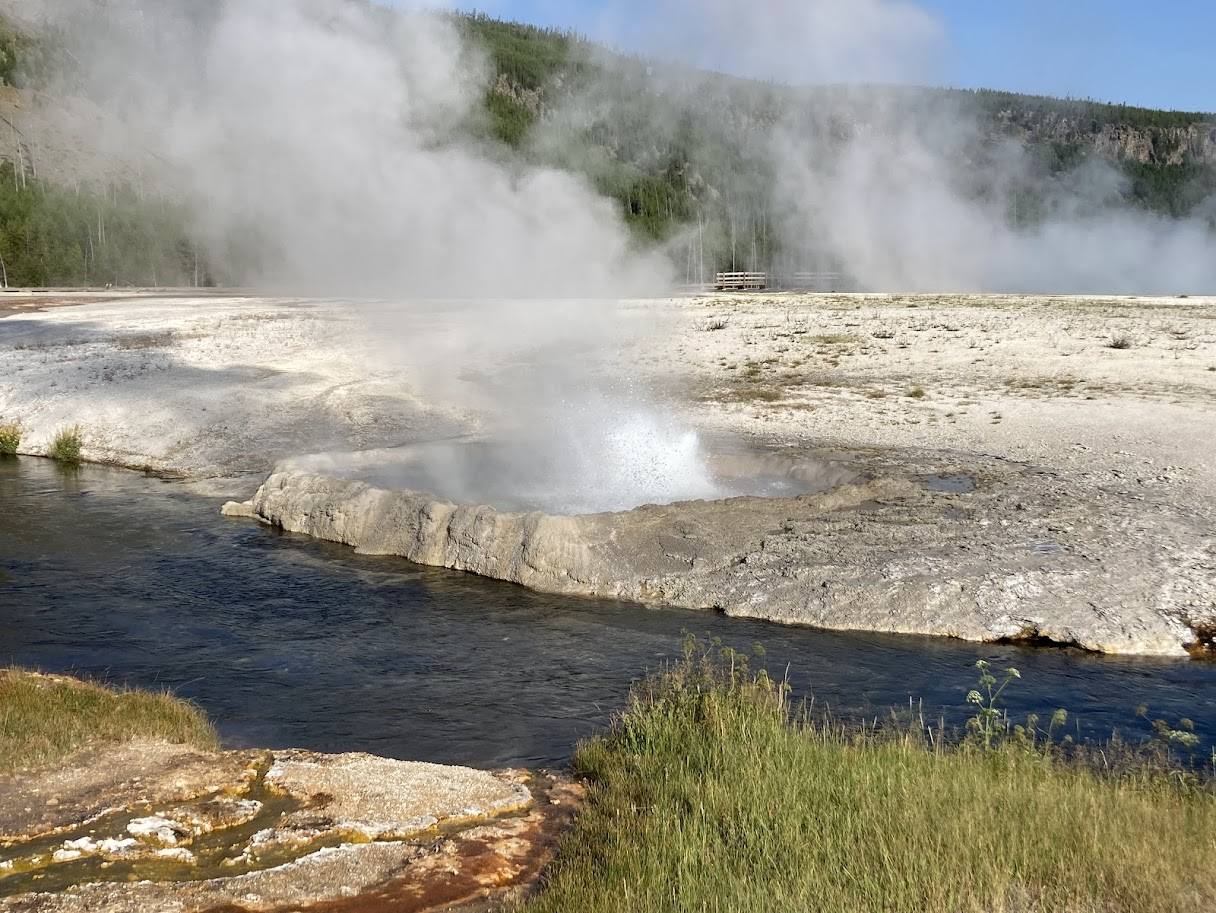
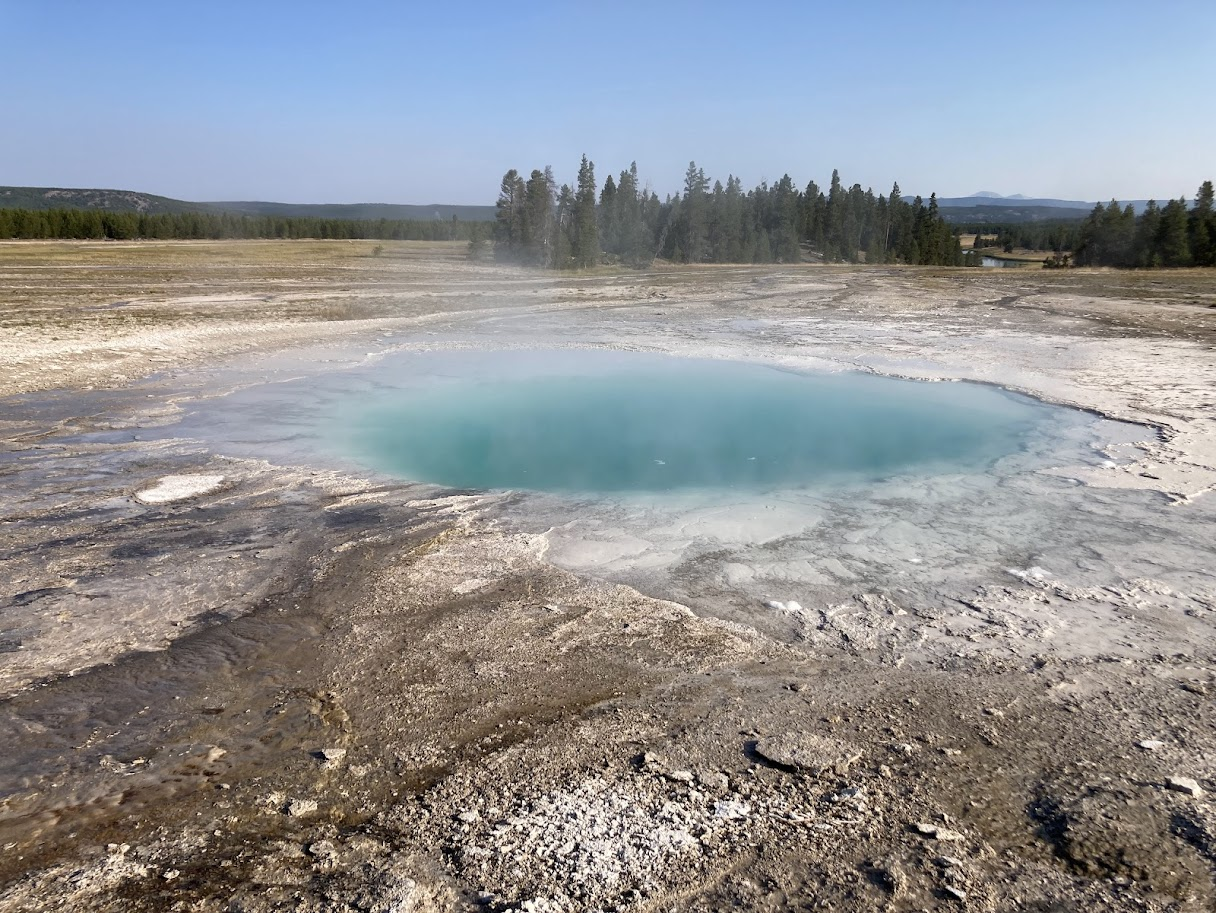
Black Sand Basin
Black Sand Basin is located a mile north of Old Faithful. The basin is easily accessible via a 0.5-mile boardwalk trail, making it a popular yet often less crowded spot for viewing colorful hot springs, including Emerald Pool, Rainbow Pool, and Sunset Lake.
The Cliff Geyser is my favorite since it is located right on Iron Spring Creek and it erupts up to 40 feet in the air every few minutes.
Drive Time to Next Stop: About 5 minutes to Old Faithful
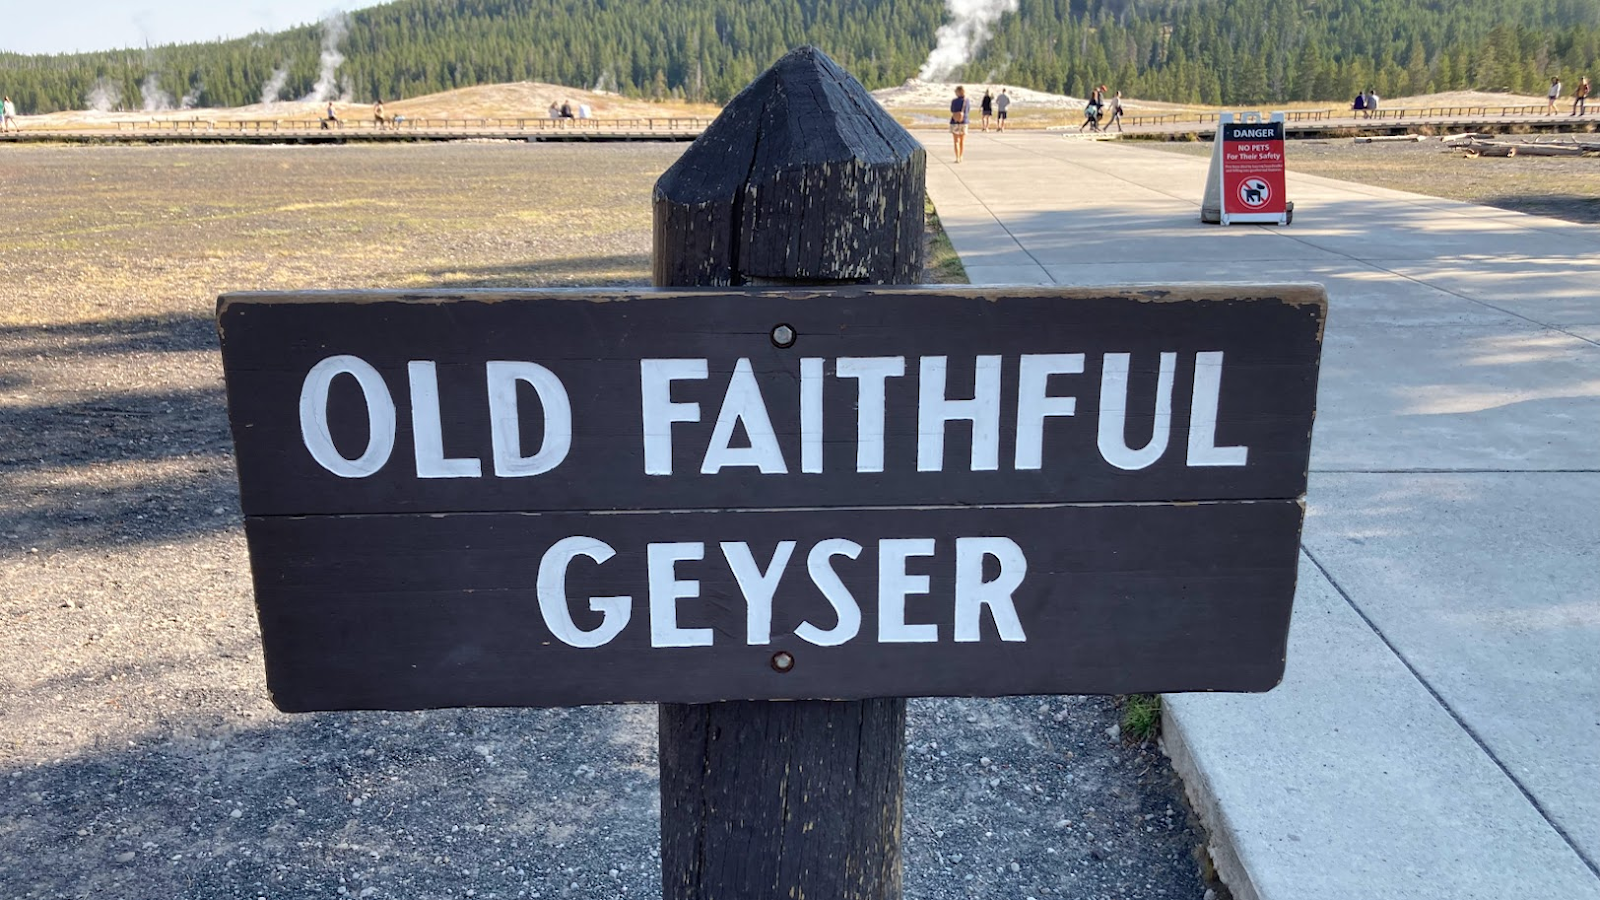
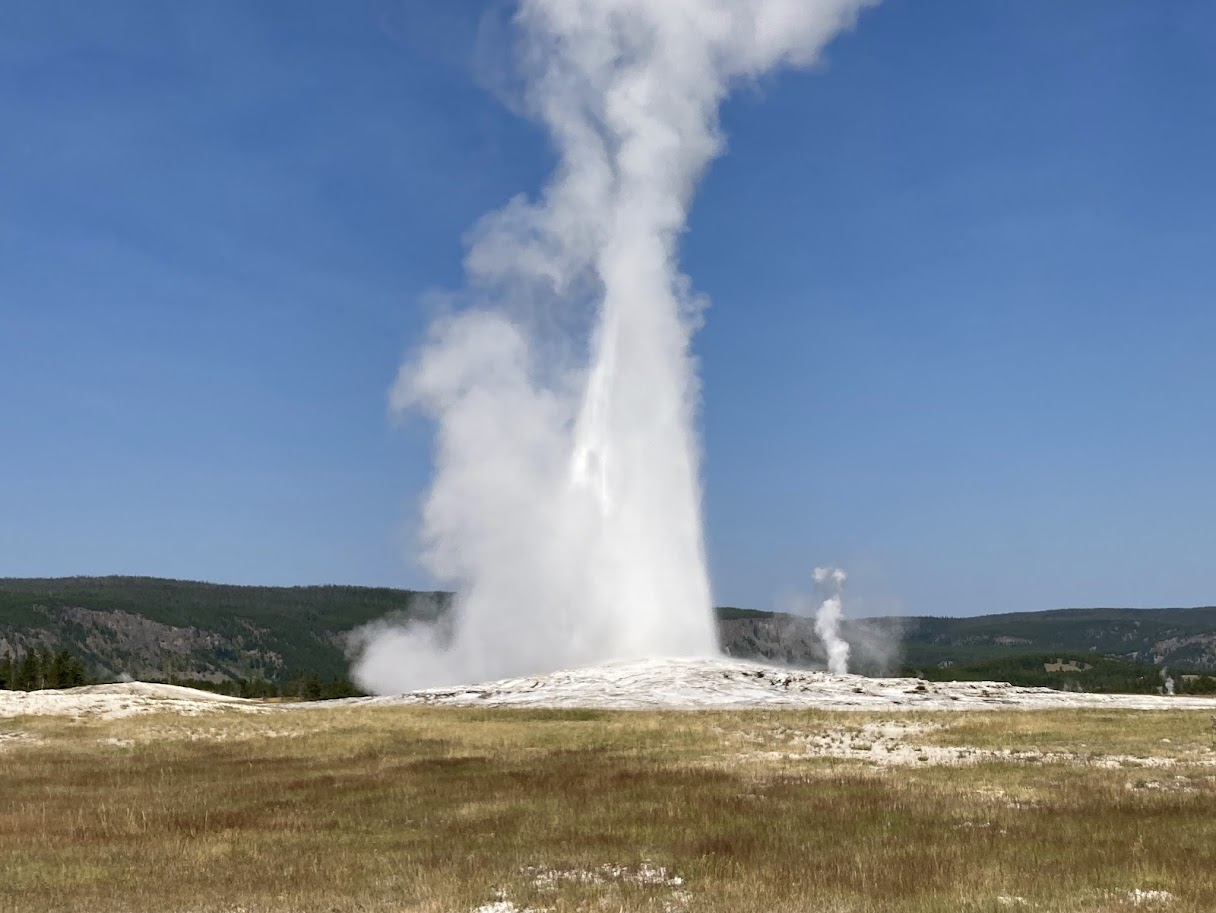
Old Faithful: The Iconic Heart of Every Yellowstone Itinerary
Old Faithful needs no introduction. The geyser erupts approximately every 90 minutes with eruptions reaching heights of 106 to 180 feet. Each eruption lasts from one to five minutes.
There are benches all around the geyser on the boardwalk that you can sit down to watch the eruption. You can also go to the Old Faithful viewing area.
The Old Faithful area has a lot more going on then just Old Faithful. There are a number of hotels around Old Faithful with the most famous one being Old Faithful Inn. You can also find a really nice visitor center, eateries, a gas station, a post office and a medical clinic.

In this same area, there are many other geysers, springs and pools to see. It is very easy to walk the boardwalks to see the other features in this area. We did that while waiting for Old Faithful to erupt.
Drive Time to Next Stop: About 10-15 minutes to Grand Prismatic Overlook

Grand Prismatic Overlook: The Shot Every Yellowstone Visitor Wants
This is the only thing that we backtracked on with the route we were taking. The overlook is just over 7 miles north of Old Faithful. We waited to do this hike later in the day so that the steam would be off of the Grand Prismatic.
This area can be really busy depending on what time of day you arrive. There is a small and large parking lot. You can also park on the side of the road which is what we did.
The hike to the overlook is 1.5 miles round trip. It is flat for the majority of it but the last part is uphill. You get great views of the Grand Prismatic once you get to the overlook. Expect to see a lot of people while you hike and once at the overlook.
Drive Time to Next Stop: About 20 minutes to Continental Divide
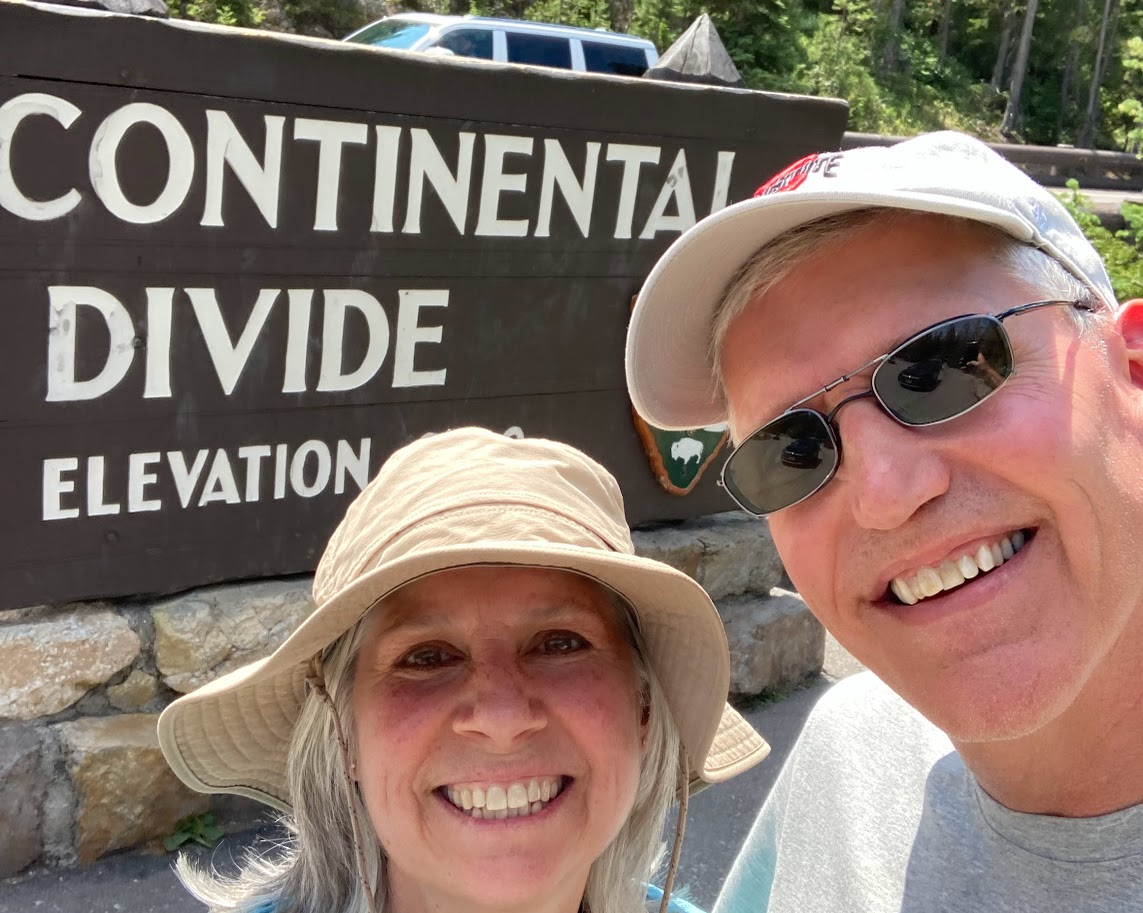
Continental Divide
The Continental Divide in Yellowstone has water on one side of the divide that flows to the Atlantic Ocean and on the other side of the divide to the Pacific Ocean. There are a couple of times that you cross the Continental Divide as you drive east on US-20.
There is a sign with a small parking lot at the first place you cross the continental divide. We stopped to take a couple of pictures at the divide.
Drive Time to Next Stop: About 20 minutes to West Thumb Geyser Basin
West Thumb Geyser Basin
What makes the West Thumb Geyser Basin unique from most of the other basins in the park is that it is located on Yellowstone Lake. Not only do you see different thermal features on land but there are some that are located just under the water.
From the parking lot, it’s a mile hike loop trail with much of it on the boardwalks to see the different geysers.
The boardwalk has an upper area, as well as a lower area near the lake’s edge. I liked this stop since you had the lake as a nice backdrop with the different geysers.
Drive Time to Next Stop: About 40-45 minutes to Mud Volcano Area
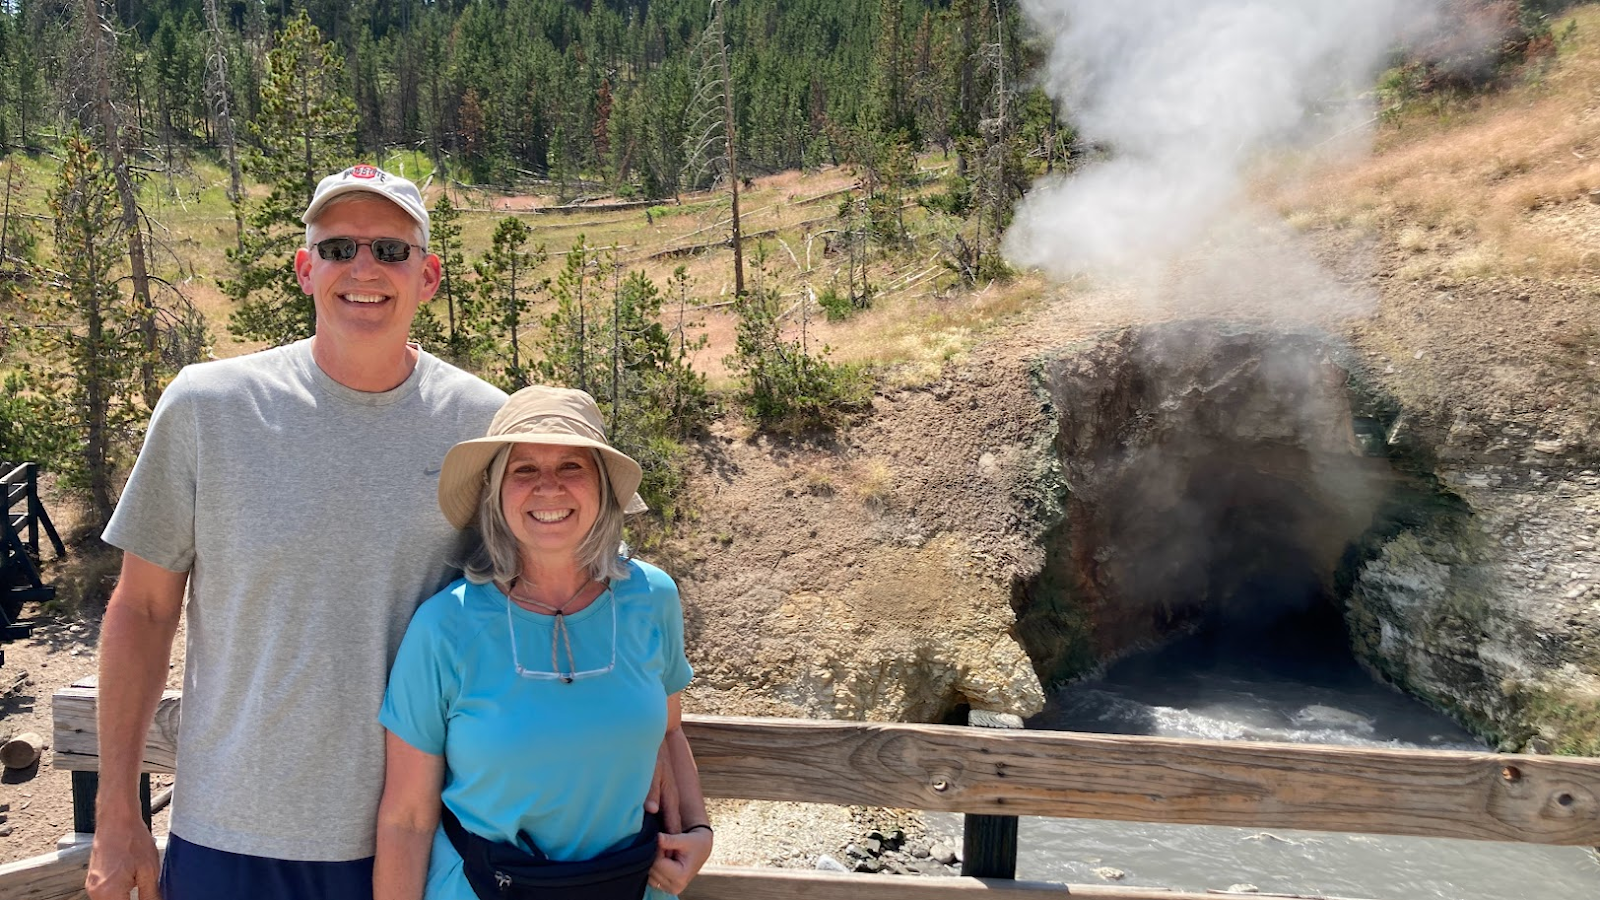
Mud Volcano Area
If you want to smell some serious sulfur smells, then the Mud Volcano Area is the place for you. The smell comes from microrganisms that use hydrogen sulfide which they convert into sulfuric acid.
The boardwalk to see the different features is ⅔ of a mile long. It is a little less steep if you go in a clockwise motion on the boardwalk. My favorite feature at this stop was Dragon Mouth’s Spring.
Drive Time to Next Stop: About 10 minutes to Hayden Valley
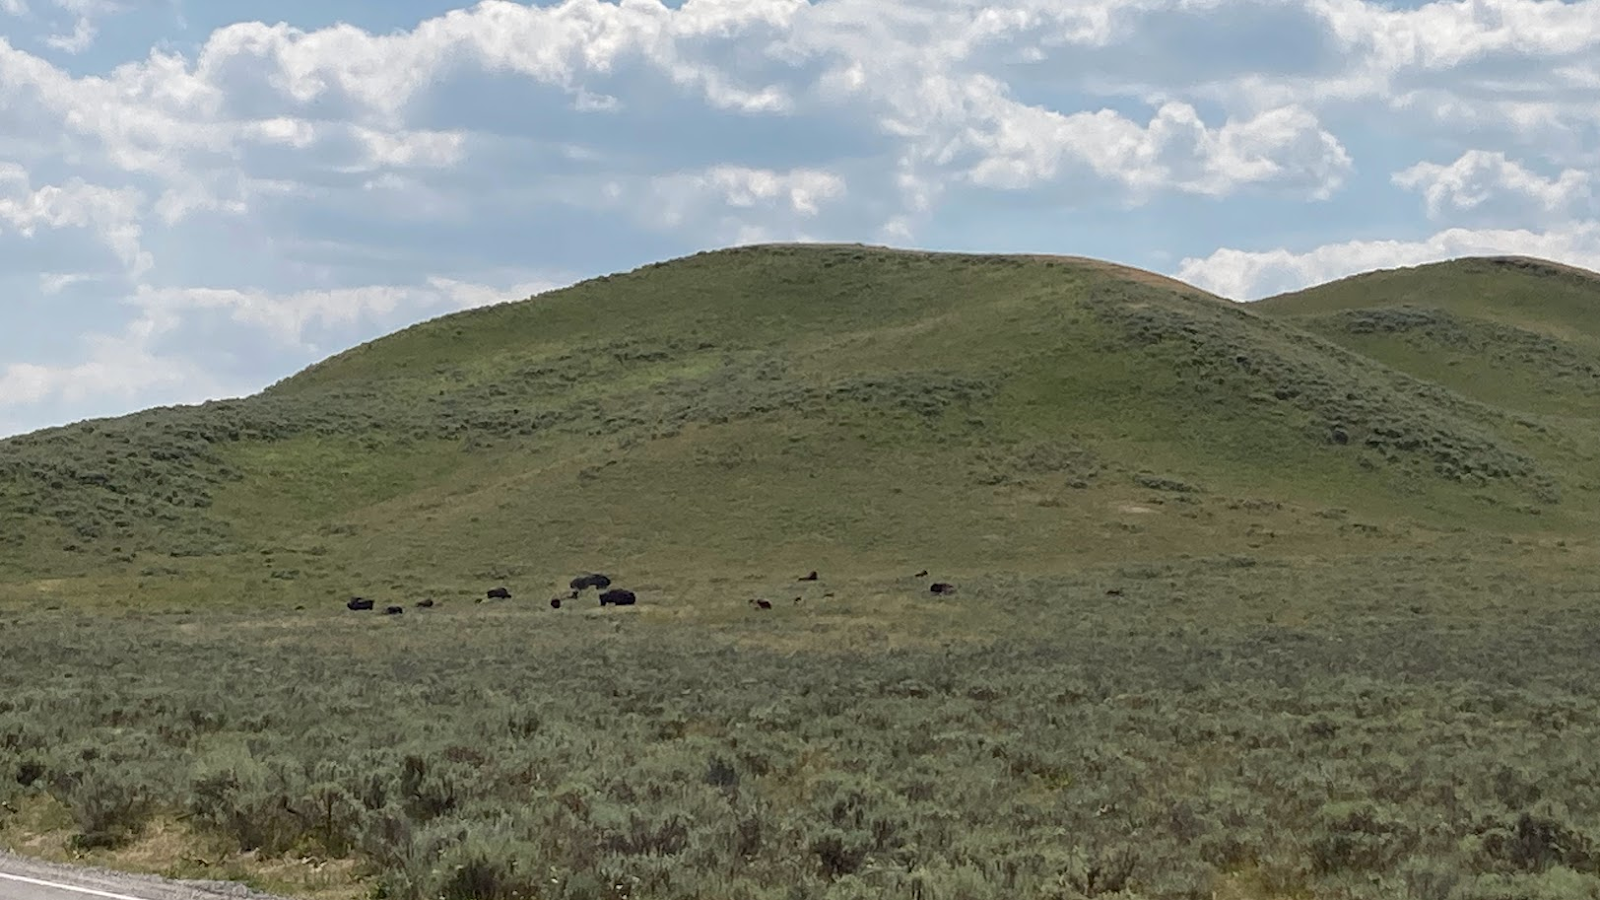
Hayden Valley: Best Wildlife Viewing on This Yellowstone Trip
The Hayden Valley is a 50 square mile wildlife viewing destination, located centrally between Canyon Village and the Yellowstone Lake.
The Hayden Valley is a great place to see bison, wolves, bears, moose, elk and many other animals. The best time to view animals in this area is at dusk or dawn.
As you drive this 7 mile stretch of road, there are numerous places to pull off the road to park to view any animals that you spot. A couple of the bigger pull offs include: Grizzly Overlook and Trout Creek.
We saw a couple of herds of bison in this area. There was a bison that was two cars in front of us that was looking into the car before moving out of the road.
Drive Time to Next Stop: About 10-15 minutes to Upper Falls View
Upper Falls View
The Upper Falls View is located off of South Rim Drive which is right off of the Grand Loop Road. It is a short tenth of a mile walk from the parking area to the viewpoint of the falls. The falls are smaller than the Lower Falls but nonetheless they are still impressive to see.
The parking lot at the Upper Falls is quite large which makes it nice if you are there during peak times.
Drive Time to Next Stop: A few minutes drive to Artist Point
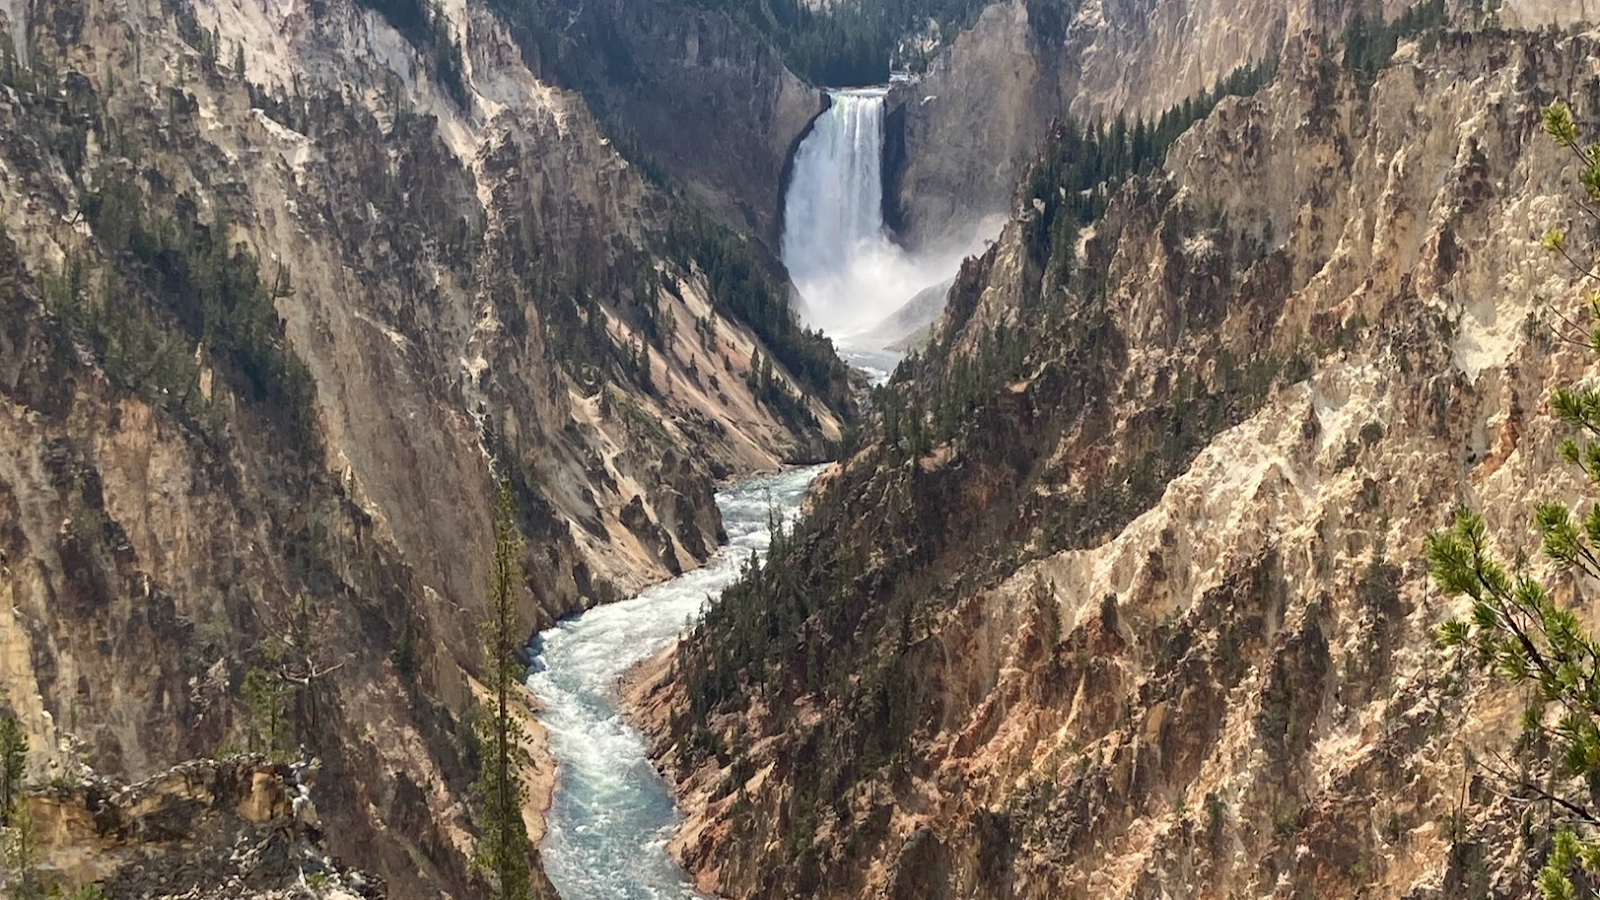
Artist Point
Artist Point is a little over a mile from Upper Falls View. At Artist Point, you get another great view of the Lower Falls. From the large parking lot, you will walk a tenth of a mile down a wide paved path to the overlook.
Drive Time to Next Stop: About 5-10 minutes to Brink of Upper Falls
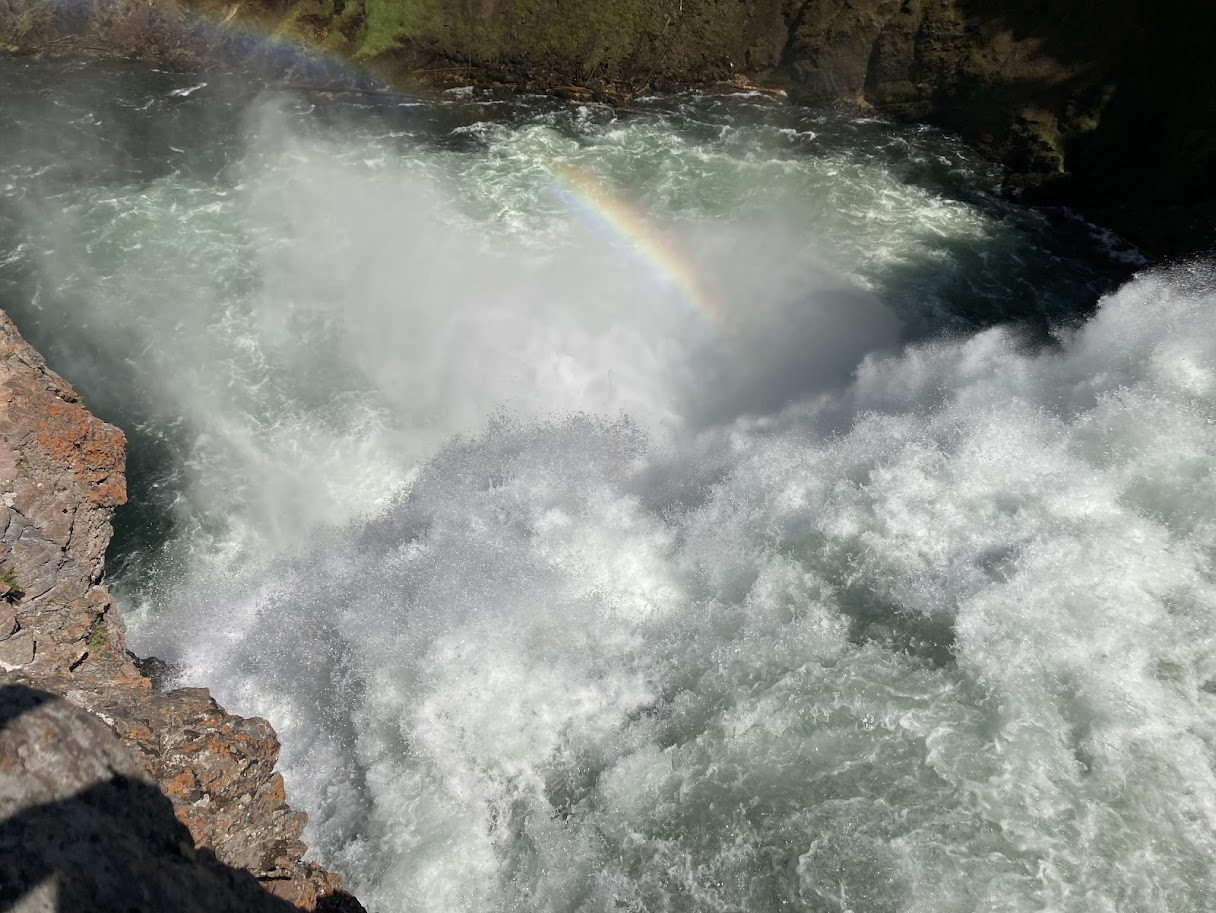
Brink of Upper Falls
It is a short .2 of a mile drive from the Grand Loop Road to the parking area for Brink of the Upper Falls. The trail from the parking lot down to the overlook has a gentle slope.
It is also wide and paved. The total distance is only .3 of a mile round trip. Once on the overlook you get to experience the full power of the falls since you are so close.
After we left the Brink of the Upper Falls, we drove across Norris Canyon Road. Next, we drove up the west side of the park on the Grand Loop Road. We didn’t stop anywhere on this stretch of road leading up to the North Gate.
There were a few different places we could have stopped to take a few pictures but we had a couple of long days and still had an hour and a half drive to Bozeman.
Places to Stay for Yellowstone
Since Yellowstone is so big, there are numerous cities and towns that you can stay in to enter one of the five entrances to the park. The following are some popular locations.
- West Yellowstone, MT– West Yellowstone is located right outside the west entrance of the park.
- Gardiner, MT– Gardiner is located right outside the north entrance of the park.
- Bozeman, MT– Bozeman is located about an hour and forty minutes from the north or west entrances.
- Jackson Hole, WY– Jackson Hole is located an hour and thirty minutes from the south entrance.
- Cody, WY– Cody is about an hour and a half from the east entrance.
- Silvergate/Cook City, WY– Both of these towns are located right outside of Northeast entrance.
Another popular option is staying inside of the park. There are 9 hotels (hotel and cabin style) that are located inside of Yellowstone. If you want to book a room inside of the park, you need to do so early.
If camping is more your thing, the park has 12 different campgrounds with more than 2,000 camp sites.
Where We Stayed
We stayed in Belgrade, a suburb of Bozeman at the Holiday Inn Express and Suites the night before our first day in the park. We had credit card points which allowed us to stay for free. It was a 1.5 hour drive from our hotel to the North Entrance of the park.
The next night we stayed in West Yellowstone at the Holiday Inn on points again. The location was wonderful since it was just outside the west entrance of the park.
Places to Fly Into for Yellowstone
If you are going to fly to Yellowstone, there are a number of different airports that you can select. The following airports are the best choices.
- North Entrance– Bozeman Yellowstone International Airport is an hour and a half from the North Entrance.
- West Entrance– The best airports to fly into to enter the West Entrance include: Yellowstone Airport is 10 minutes away, Idaho Falls Regional Airport is 2.5 hours away and Bozeman Yellowstone International Airport is 2 hours away.
- East Entrance– Yellowstone Regional Airport in Cody is an hour away from the East Entrance.
- South Entrance– Jackson Hole Airport is an hours drive to the South Entrance.
Helpful Tips for Yellowstone National Park
- Arrive Early: The earlier you can get into the park the better. Crowds can be a real issue in certain areas of the park. Plus, bison jams are a real thing in the park.
- Bring Snacks & Water: Collapsible cooler recommended for sandwiches and snacks. Food inside the park is limited and expensive.
- Fuel Up Outside: Gas is pricier inside the park.
- Pack Binoculars: Great for spotting wildlife in Hayden Valley and Blacktail Plateau.
- America the Beautiful Pass: Saves money if visiting multiple national parks.
- Use GPS & Offline Maps: Cell service is limited in Yellowstone.
- Respect Wildlife: Never approach bison, bears, or elk—maintain a safe distance.
Frequently Asked Questions About This Yellowstone Itinerary
Two days is enough to see many of Yellowstone’s most famous attractions, including Old Faithful, Grand Prismatic Spring, Mammoth Hot Springs, and the Grand Canyon of Yellowstone. While you won’t see everything, this Yellowstone itinerary focuses on the most iconic highlights.
The North Entrance in Gardiner, Montana, works well for this itinerary. It allows you to visit Mammoth Hot Springs first and then follow the Grand Loop Road efficiently.
I recommend staying in West Yellowstone, Montana, for easy access to Day 2 attractions like Old Faithful and Grand Prismatic Spring.
Start as early as possible ideally between 7:00 AM and 8:00 AM to avoid crowds and find parking at popular stops.
The best time to follow this Yellowstone itinerary is from late May through September when all park roads are open. July and August are the busiest months, so arriving early in the morning helps avoid crowds and parking issues.
Final Thoughts
Yellowstone National Park is one of the most unforgettable places we’ve visited, and following this Yellowstone itinerary allowed us to experience many of the park’s most iconic sights in just two days.
From the terraces at Mammoth Hot Springs to the incredible colors of Grand Prismatic Spring and the dramatic views at the Grand Canyon of Yellowstone, every stop offered something unique.
If you only have a short time in the park, this Yellowstone itinerary provides a realistic and efficient way to see the highlights without feeling rushed.
With early starts, careful planning, and realistic expectations, you can experience an incredible Yellowstone adventure in just two days.
If Yellowstone is part of a larger western road trip, be sure to check out our guides to Glacier National Park and Albuquerque, where we share detailed itineraries, travel tips, and must-see stops that helped make our trip unforgettable.
Go to my blog Travelwidstom to find ways to save on travel, travel itineraries, how to earn and maximize credit card points and miles and more.


