

Glacier National Park is known as the Jewel of the Continent and after visiting the park I can see why it has that title. There are beautiful views wherever you turn as you travel through the park. My wife and I were in the park for 3 full days at the end of July. In this Glacier National Park itinerary, I share with you things that we did, where we stayed, what we saw, and some tips to make your time in the park more efficient.
Planning a trip to Glacier NP can be a little tricky. There are various areas of the park to enjoy. Some of the areas need a reservation to enter while others don’t. When entering the park from one direction you need a reservation, while coming in the other direction you don’t need one. Don’t worry I got you covered. I will cover what you need to know so that your time in the park will be smooth.
Location of Glacier National Park
Glacier National Park is located in the Northwest part of Montana. The park is adjacent to Waterton Lakes National Park in Canada. The two parks together are known as the Waterton-Glacier International Peace Park.

Popular Regions of Glacier National Park
Going-to-the-Sun Road
Going-to-the-Sun Road is a 50 mile stretch of road that goes through the heart of the park. The drive is one of the most if not the most scenic drives in the U.S. There are many different stops that you can make along the road to enjoy the scenery. Many popular hikes in the park can be found on Going-to-the-Sun Road, also.
The road is open in the lower elevations year round. It is closed at higher elevations usually towards the end of October. Going-to-the-Sun Road varies when it opens back up. It can be as early as the middle of June or as late as the middle of July.
Two Medicine
This area of the park is located in the southeast part of the park. It is an area that has less traffic than some of the other regions of the park which is quite nice. There are 3 lakes that dominate this area of the park. You can also take a boat ride and there are many different hikes to enjoy.
North Fork
The North Fork area of the park can be found in the northwest section of the park. Only private vehicles can travel the rough dirt roads in this part of the park. You can learn more about this area here.
Many Glacier
The Many Glacier area of the park can be found in the eastern part of the park and is located north of Going-to-the-Sun Road. This region of the park is one of the more beautiful areas in the park. There are lakes, mountains, numerous hikes, boat rides, and horseback riding that you can see and do.
Places to Fly Into
My wife and I live in Ohio. It would be a long drive so needless to say, we flew. We had the Southwest Companion Pass. The pass allows you to take a companion with you, as long as there is availability on the flight. The only thing you have to pay is taxes and fees.
So, my wife flew for $5.60 one way. I also flew for $5.60 one way since I was able to book my flight with points. It is one of the best deals in travel. You can read my post about how to earn the Southwest Companion pass here.
The two closest cities to the park that Southwest flies into include Bozeman, MT and Spokane, WA. My wife and I were also going to Yellowstone after going to Glacier. We flew into Bozeman for that reason. The drive from Bozeman to the west entrance of the park is around 5 hours. The drive from Spokane into the park would take 4.5 hours.
Other places to fly into include:
Kalispell – 35 minute drive to the West Entrance.
Missoula – 2.5 hour drive to the West Entrance.
If you are feeling a little more adventurous you can take the train to Glacier. There are numerous stops that Amtrak has for the park. If you are looking to rent a car, you would probably want to get off at Whitefish or West Glacier.
Renting a Car
If you are flying, you want to make sure that you look for rental cars many months in advance. I am talking like 6 months at least. The more time you give yourself the more likely you will get a good deal. Rental cars are pricey since there is low inventory and high demand for them.
I was able to book a SUV 5 months prior to our trip with free cancellation. The price we got was $300 to $400 less than what the car was going for the rest of the time leading up to our trip.
I have a post about how to save on rental cars that you can checkout here. I have written articles about Costco Rental Cars and Autoslash which are both great sites to search for rental cars.
Where to Stay
Using credit card points and miles is one of my favorite things to do to save money for when we travel. So, in this case my wife and I had IHG points. We booked the Holiday Inn Express & Suites in Kalispell. The hotel was the closest IHG property to the park. It ended up taking us around 45 minutes to get to the west entrance of Glacier. The hotel was quite nice and a place I would recommend staying.
Besides Kalispell, some other towns you can stay in near the west entrance include: Whitefish, West Glacier, Columbia Falls, Essex and Pole Ridge. On the east side some towns to find accommodations include: East Glacier, St. Mary and Browning.
Some other options include staying in the park. The following lodges, hotels, inns, cabins, and chalets are found in the park. It isn’t impossible to get reservations at a hotel in the park but it can be hard.
- Many Glacier Hotel
- Lake McDonald Lodge
- Swiftcurrent Inn
- Rising Sun Motor Inn and Cabins
- Village Inn at Apgar
- Sperry Chalet
- Granite Park Chalet
If camping is more your thing, there are 13 different campsites with over a 1,000 sites located throughout the park. You can learn more at this site. There are also Airbnb and Vrbo rentals that you can book near the park.
Tip
To save on driving, a strategy that you can apply is booking a place to stay on the west side of the park for part of your stay. Next, book a place on the east side for the other part of your stay.
Vehicle Reservations
The park can get quite busy and crowded so they have implemented a vehicle reservation system to enter the park. This is different from a valid park pass like the National Park Pass that you need to have to enter the park.
Where you need a reservation
- May 24th through September 8th timed entry vehicle reservations are needed for entering the west side of Going-to-the-Sun Road and North Fork from the Polebridge Ranger Station from 7 am to 3 pm.
- The timed entries come in two hour blocks. If you miss your time slot to enter the park, you must wait until after 3 pm to enter the park.
Where you don’t need a reservation
- A reservation isn’t needed if you travel Going-to-the-Sun Road from the east/St. Mary’s side of the park.
- No reservation is needed to enter the Two Medicine area of the park.
- You can enter the west side of the park and get to Apgar Village and the Apgar Visitor Center without a reservation.
- Because of the construction this year (2025) in the Many Glacier area, cars are being limited into the area.. A temporary shuttle service is running from July 1, 2025 to September 21, 2025 for people who want to go to the Many Glacier and Swiftcurrent area.
How to enter without a reservation
- Enter the park before 7 am or after 3 pm. Entering the park before 7 am isn’t a bad option since it is best to get into the park early to beat the crowds.
- You don’t need a reservation if you have a hotel reservation, camping reservation, or commercial activity like a boat ride, bus tour, etc. within an area that requires a reservation. We had a boat ride reservation for the Many Glacier area that got us in without a reservation.
- Use the shuttle service starting at Apgar Visitor Center or Apgar Village.
Release dates of reservations
- A portion of reservations are released 120 days in advance at 8 am MDT. Depending on the month and day, reservations can disappear quickly.
- Next day reservations are released at 7 pm MDT for next day entry.
Where to get reservations
- You can get the $2 reservations at Recreation.gov or you can get the app on your phone to make reservations.
The length of reservations
- Each reservation that you get is good for the day and time that you signed up for.
Pro Tips about reservations
- It is best to set up your Recreation.gov account and have your information in your account before you try to get reservations. Speed can be the key and this will speed up your booking.
- I did a couple of dry runs before the day(s) that I wanted. I didn’t book the days but I wanted to see what the process was like before the day(s) I wanted.
- Personally, I like using the app versus doing it on the computer. I think it is faster but use whatever method you feel most comfortable with. I was 3 out of 3 when it came to booking reservations with the app.
- Make sure to go to Recreation.gov to see what the current news is related to the reservations. They have tweaked things before and you want to make sure you know the ins and outs before you book.
- Print out your reservation just in case you can’t access it on your phone for some reason. Wifi is almost nonexistent in the park. You can also take a screenshot of the reservation.
Ways to Get Around the Park
The best way to get around the park is by car. The problem with driving is that it can be a pain to find parking at times. Think of a bunch of vultures circling an animal waiting for it to die. That is the same picture of trying to find a parking spot at some locations in the park.
One way to beat the parking situation is by taking the shuttle through the park. The shuttles are free and they run in the park starting July 1st through Labor Day. The shuttle service has 13 different stops throughout the park. A more limited shuttle service runs into the middle of September. You can see more about the shuttles here.

There are a number of bus tours that you can take through Glacier. We did the Red Bus Tour. The Red Bus Tour has tours that start on the west and east sides of the park. They also have tours that take different lengths of time. My wife and I both really enjoyed the Red Bus Tour that we took.
Sun Tours are another bus tour that goes through the park. Sun Tours are presented by the Blackfeet Nation. They also offer tours starting on the east and west sides of the park.
You can also use a combination of driving and using the shuttle. For example, you can drive to a less trafficked area and park. Then hop onto a shuttle to take you to the part of the park that you want to go to.
3 Day Itinerary for Glacier NP
Day 1 Highlights
- Drove to Apgar Visitor Center
- Walked to Apgar Village and Lake McDonald
- Took Red Bus Tour
- Drove Part of Going-to-the-Sun Road
- Hiked Trail of the Cedars and Avalanche Lake

Drove to Apgar Visitor Center
The drive from our hotel in Kalispell to Apgar Visitor Center took around 45 minutes. At the visitor center, there are park rangers to answer questions, maps of the park, and restrooms. The center is also a pickup area for bus tours.
Walked to Apgar Village and Lake McDonald
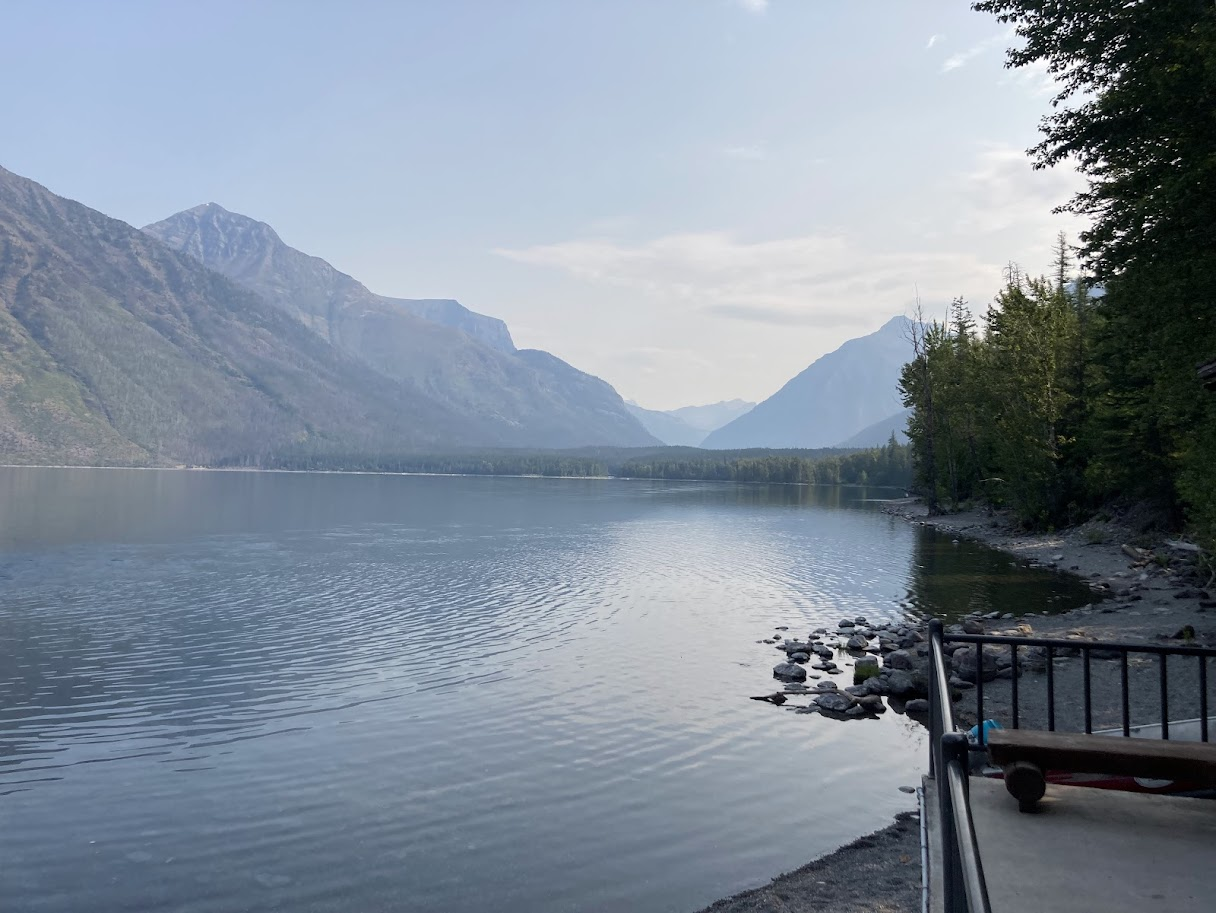
We had some time to kill so we took the nice paved path from the visitor center into Apgar Village. It took us 5-10 minutes to walk from the visitor center to the village. We saw a couple of deer along the path. It was still pretty early so most everything was still closed. Lake McDonald was right there, too. So, we took some time to take in the scenery.

Red Bus Tour
My wife, Tonya, had knee replacement surgery 8 weeks before we went on this vacation. I didn’t know how much hiking she would be able to do. I tried to book numerous activities where she wouldn’t have to do much walking. Taking the Red Bus Tour was one of those activities.
We did the tour from the Apgar Visitor Center to Logan Pass. The round trip tour took around 4 hours total. On the tour, our driver shared all kinds of information about the park and the buses themselves. We stopped at numerous locations along the route. I would highly recommend you taking one of their tours.

Drove Part of Going-to-the-Sun Road
I wanted to drive part of Going-to-the-Sun Road since there were some places that I wanted to stop at that we didn’t stop at while on the Red Bus Tour. We turned around before we got to Logan Pass. If this was something that you didn’t want to do, some other things you could do would be to do some extra hiking, take a boat ride, kayak, or canoe on Lake McDonald.
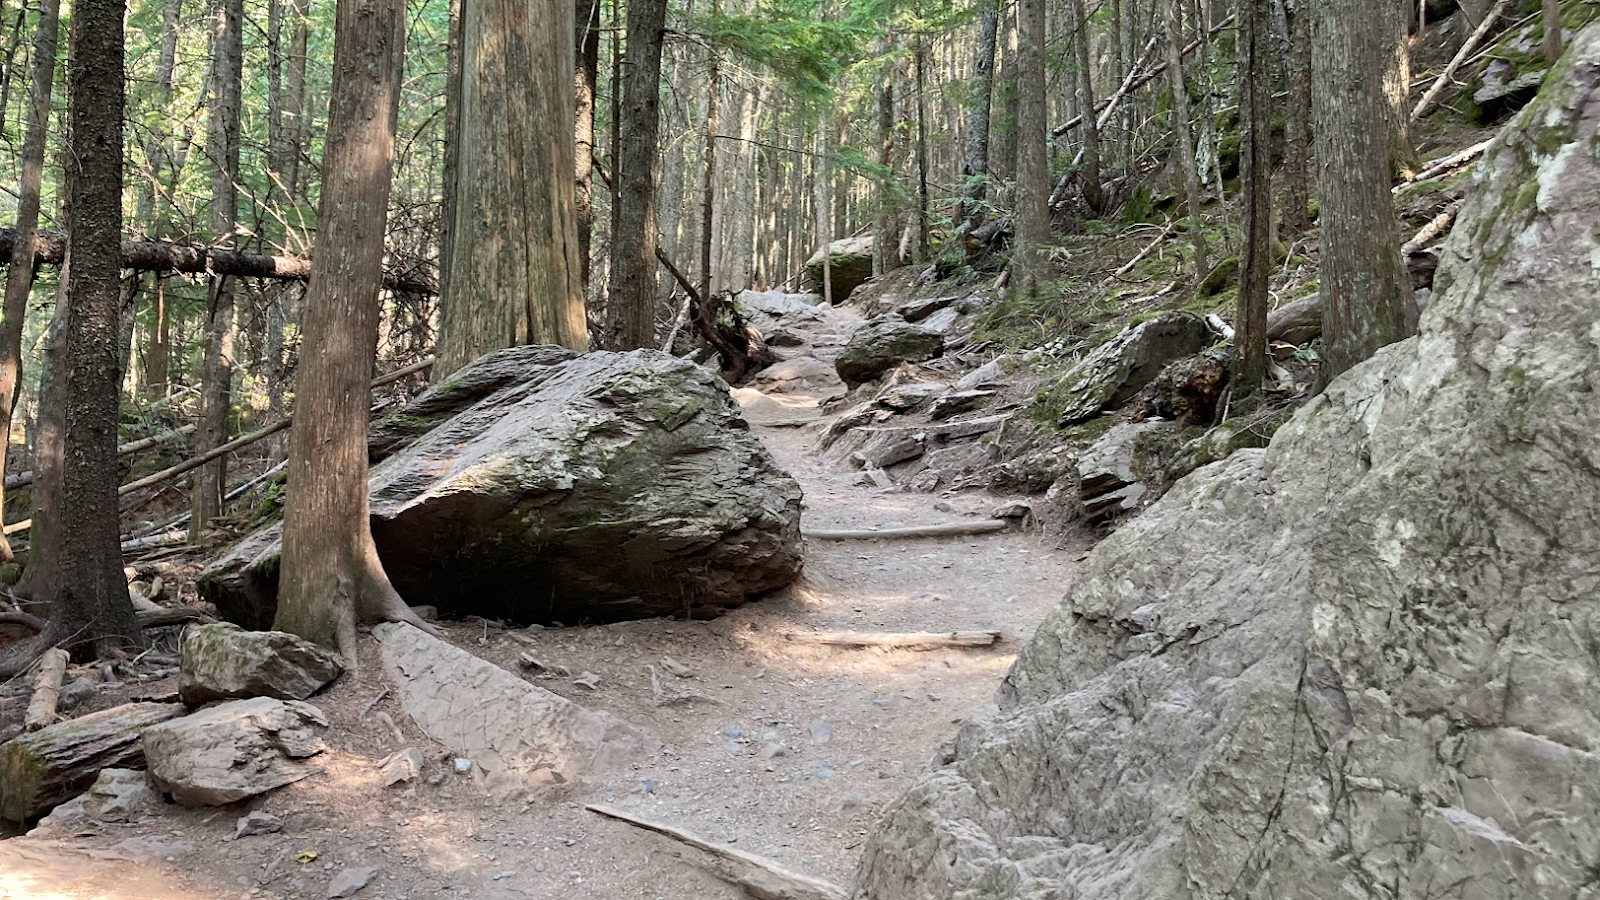
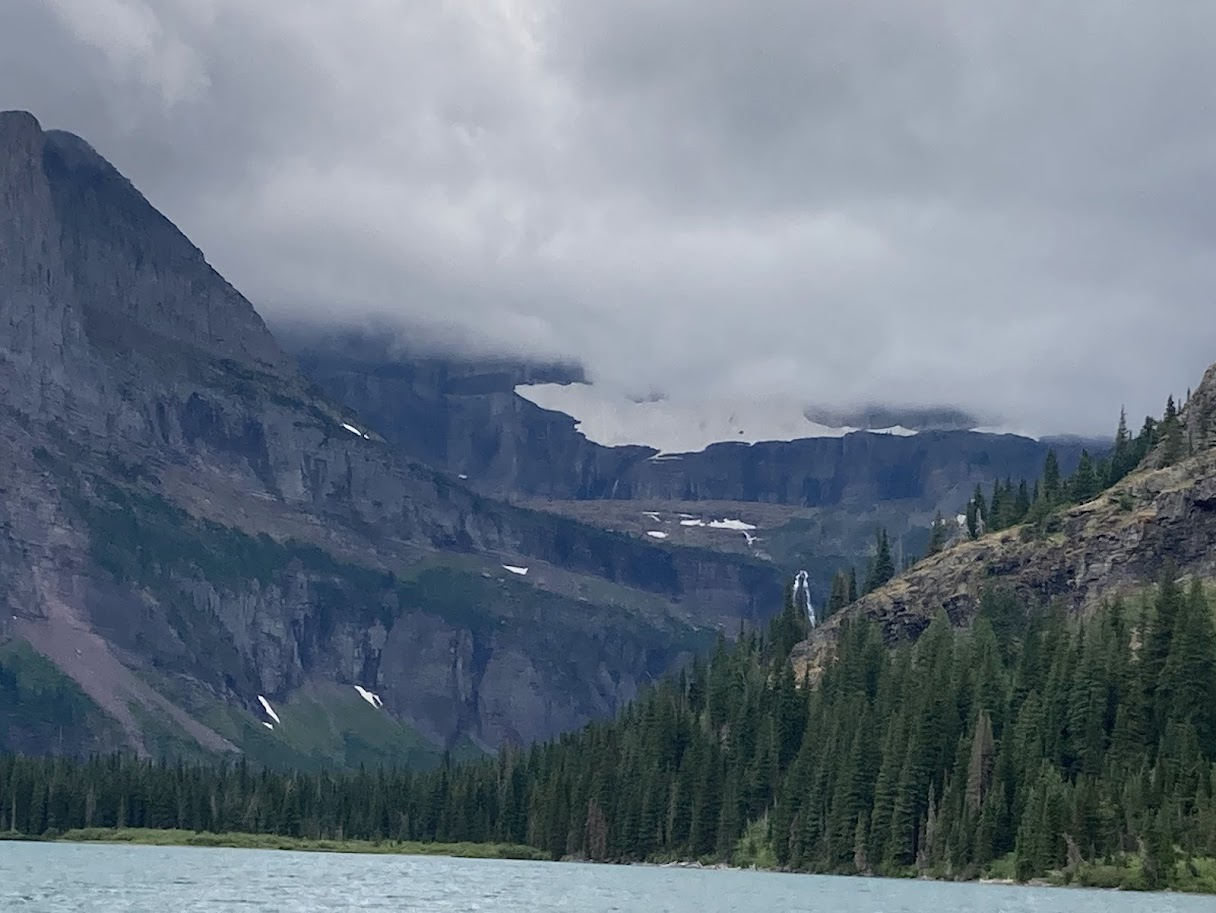
Hiked Trail of the Cedars and Avalanche Lake
This area of the park is very busy and it is truly hard to find a spot to park. We tried on our initial way through this area after lunch but we weren’t successful. On our way back after driving part of Going-to-the-Sun Road, we were fortunate to find a spot.

Trail of the Cedars is a nice hike. It is .9 miles, flat, easy, and well shaded. Tonya was able to do this hike. Part way on the hike is the trail that goes to Avalanche Lake. Tonya wasn’t going to be able to hike to the lake but she talked me into going to the lake.
It was well worth it. The hike to the lake is 5.9 miles in length round trip and is considered a moderate hike. The trail follows Avalanche Creek for the first part of the hike and there is a gradual incline. About 2 miles on the trail, you start to descend down to the lake. There is a large beach area at the lake to enjoy the lake and surrounding mountains.
Pro Tips
- Red Bus Tours can fill up fast. You’ll want to book it as soon as you know that you want to do one.
- One of the best things that we did was to bring a collapsible cooler with us on the trip. We bought lunch meat to make sandwiches. We also kept other snacks and drinks in the cooler. It helped us to save money and time while in the park.
- A pair of binoculars can come in handy when in the park. Some of the different features are far away so having some binoculars can give you a better view of them.
- If you stay in Kalispell, a good restaurant to eat at is the Himalayan Kitchen. The food was really good. The restaurant has a Google rating of 4.7 out of 5.
Day 2 Highlights
- Drove to Two Medicine
- Hiked to Running Eagle Falls
- Hiked to Appistoki Falls
- Boat Ride on Two Medicine Lake
- Hiked to Paradise Point
- Hiked to Aster Falls
- Drove to Two Medicine
It took just under 2 hours to drive from our hotel in Kalispell to the Two Medicine area. The scenery along US 2 was nice and so it made the drive go by quickly.

Hiked to Running Eagle Falls
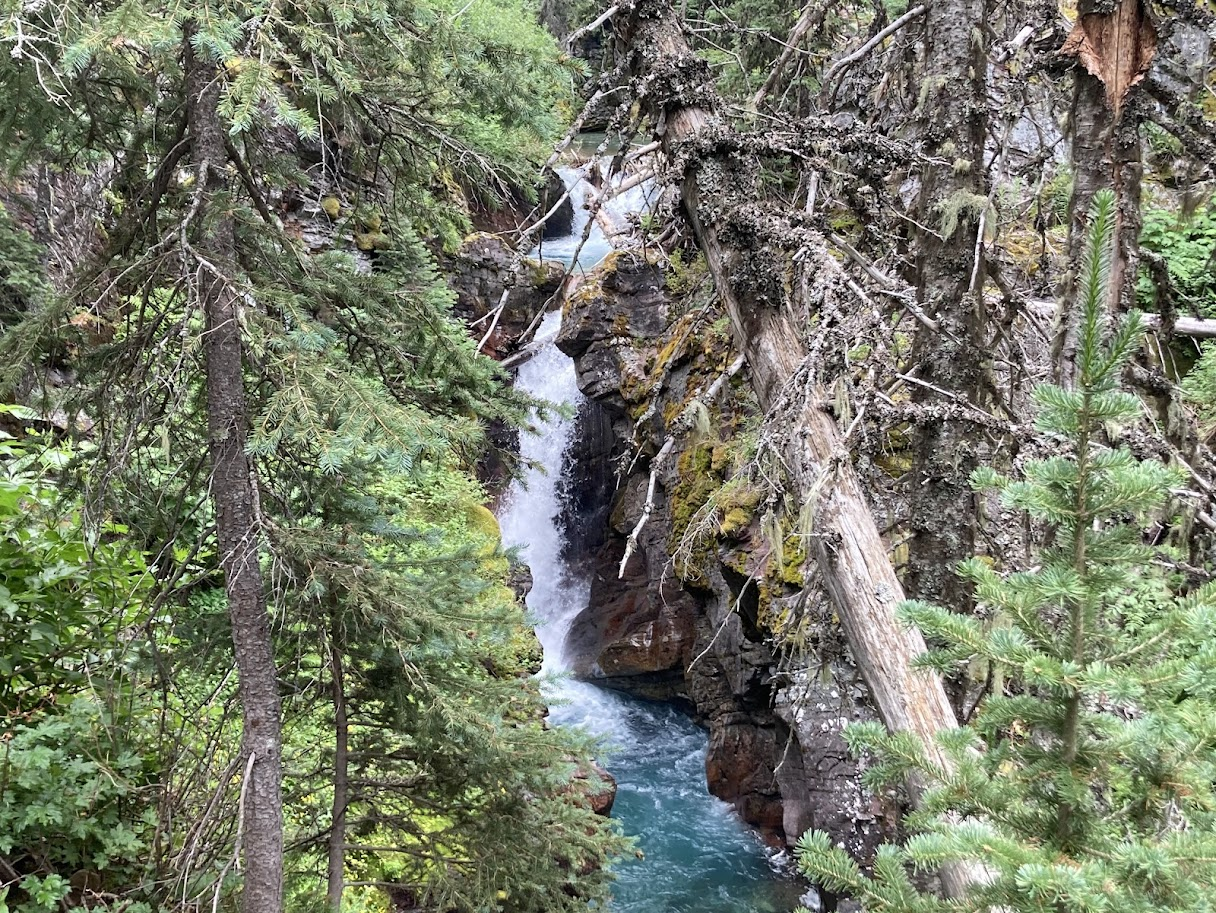
Not too long after getting in this area of the park, you will find Running Eagle Falls. It is a short .7 mile round trip hike. The path is wide and is nice and flat. Once at the falls there are a couple different spots to take in the falls and to get some pictures.

Hiked to Appistoki Falls
Appistoki Falls is a 1.3 mile hike that is classified as easy. The trail is relatively flat with a little climbing at the end to see the falls. The only problem is that there isn’t a great place that I could find to get some nice shots of the falls.
Interesting Note– Tonya didn’t do the last part of this hike. She headed back on her own. While she was going back to the car, she came face to face with a lynx. She was nervous and excited at the same time. Neither were worse for the wear after the encounter. It is a good reminder to keep your eyes open when hiking in the park.

Boat Ride on Two Medicine Lake
Two Medicine Lake, like some of the other lakes in the park, has boat rides. There were a number of things that I liked about the boat ride. First, they give you a different perspective being on the water versus the land. They also shared the history of the area and park. We were also able to go to the front of the boat and take pictures.

After getting on the other side of the lake, there was an optional hike that we could take with the girl driving the boat. We could also get off the boat and hike on your own. There was no guarantee that we could get on the next boat back to the dock so we didn’t go. It wasn’t appealing to us to possibly have to wait there for an hour or so for a boat.
We stayed on the boat and headed back to the main dock. The ride on the lake took around 45-50 minutes round trip. It would be something that I would do again.

Hiked to Paradise Point
The hike to Paradise Point is a 1.4 mile out and back hike. There is a little over 150 feet elevation change in the hike. We could see Paradise Point when we were on the boat ride. The point is right on the edge of the lake. It gives you some great views of the surrounding mountains and lake.

Hiked to Aster Falls
Part of the hike that goes to Aster Falls is along the same trail that goes to Paradise Point. So, when we got out to the main trail, Tonya went back to the car while I went onto the falls.

The hike is an out and back trail that is 2.6 miles in length from the trailhead. The trail is relatively flat with a little climb at the end up to the falls. It was a pretty hike since part of the hike goes through a meadow area with wonderful views of the mountains.
I am a sucker for waterfalls and Glacier has many waterfalls to pick from in the park. The hike and waterfalls were worth the effort.
Pro Tips
- The Two Medicine area wasn’t as busy as some of the other areas of the park. There is a main parking area by Two Medicine Lake with some other smaller parking areas that are a little further away. I initially had to park in one of the smaller lots but was able to move our car to the larger parking lot after our boat ride.
- If you are wanting to do a boat ride, I would suggest booking in advance. It guarantees you a spot on the boat. Plus, you are allowed to cancel leading up to the ride at no cost to you. They do have same day standby seating. There were people who were able to get on that way.
- No reservation was required to get into this part of the park.
Day 3 Highlights
- Drove to Many Glacier
- Boat Ride on Swiftcurrent Lake/Lake Josephine
- Hiked to Grinnell Lake
- Hiked to Hidden Falls
- Hiked Swiftcurrent Trail
- Walked through Many Glacier Hotel
- Visited St. Mary Visitor Center
- Drove Going-to-the-Sun Road
Drove to Many Glacier
It took us a little over 2.5 hours to drive from our hotel to the Many Glacier area. We drove US 2 again so the time went by quickly.

Boat Ride on Swiftcurrent Lake and Lake Josephine
The boat ride in this area was a little different then the previous day since the boat ride takes place on two lakes. We traveled across Swiftcurrent Lake and at the end of the lake, we got out of the boat and hiked 5-10 minutes to Lake Josephine. We then got in another boat and went across the lake.
The same company does all of the boat rides in the park. So, it was like the one the previous day. The girls captaining the boats told us the history of the lake(s) and area. You could also go out and take photos from the front of the boat.

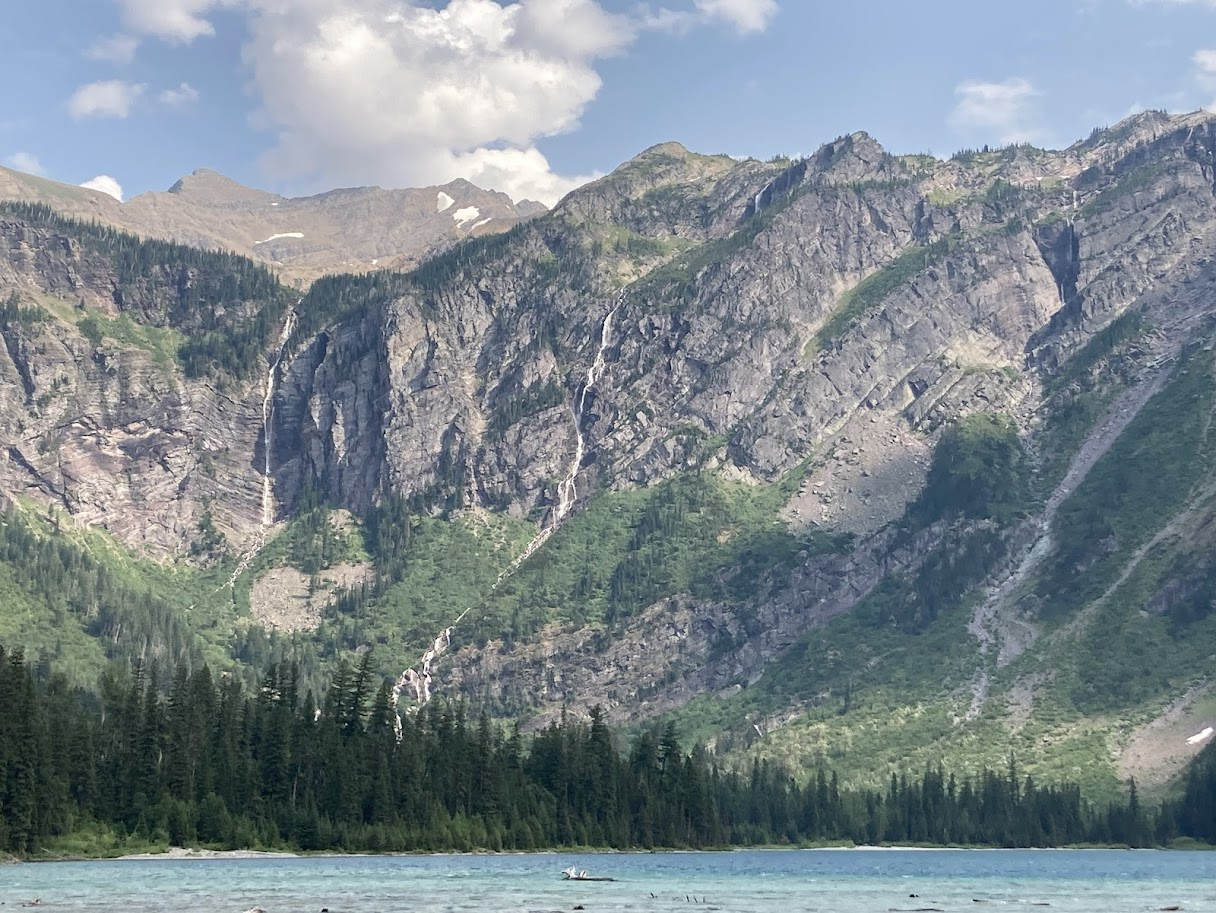
Hiked to Grinnell Lake
There are numerous hikes that you can take once you get off the boat. Grinnell Glacier is a very popular one. I was thinking about doing it but I didn’t want to do it without Tonya. Instead, we took the hike to Grinnell Lake. The hike to Grinnell Lake is 2.2 miles round trip from the dock of Lake Josephine.

We had a traffic jam on the hiking trail since there was a mother moose with a couple of her kids eating right next to the trail. The hike is easy with little elevation change and the scenery at the lake was spectacular.
Hiked to Hidden Falls
The trail to Hidden Falls is located on the hike to Grinnell Lake. It is just .4 miles round trip from the Grinnell Lake trail. We initially had to do some climbing on the trail but it wasn’t too bad. It was worth a little hike up to the falls to see them.
Hiked Swiftcurrent Trail
We initially took the boat across Lake Josephine after we were done with our hikes. Instead of getting on the boat that would take us across Swiftcurrent Lake, Tonya and I decided to hike around the lake back to the dock. The hike is just under a mile long.
There are trails that go the whole way around the lake. We went in a clockwise direction as you would be looking at the Many Glacier Hotel. The hike was very flat and is considered easy. The trail follows along the lake but then turns more inland. Towards the end of the trial it comes back towards the lake.
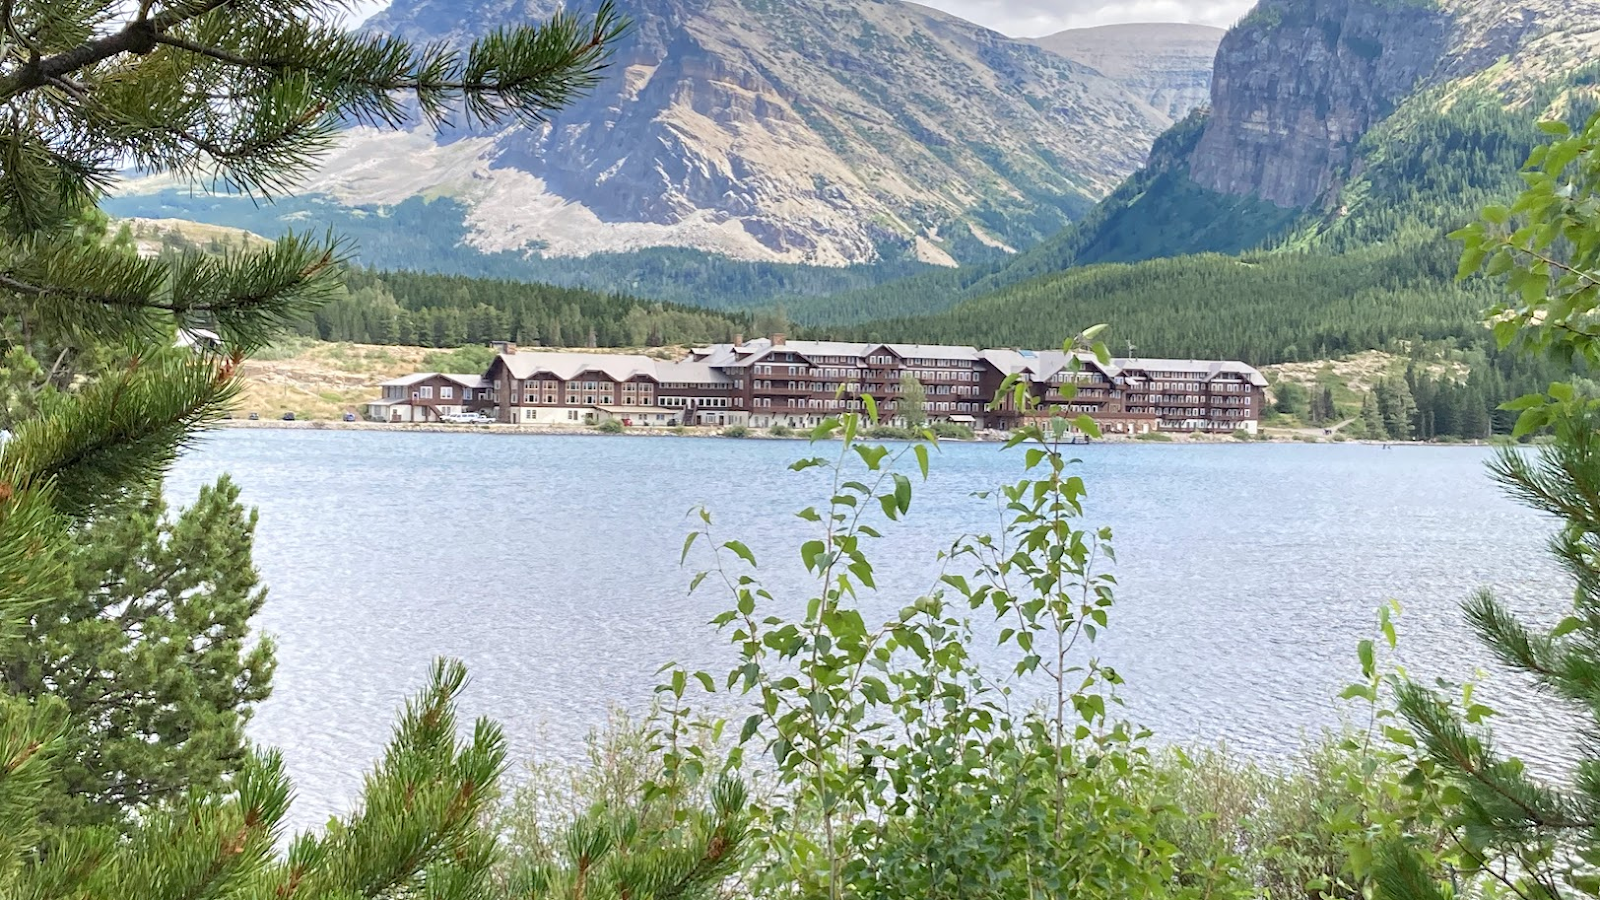
Walked through Many Glacier Hotel
Many Glacier Hotel is the hotel located right on the shores of Swiftcurrent Lake. Many Glacier Hotel is 5 stories that was built in 1914-15. It is a very rustic and a pretty magnificent hotel. It is hard to believe that they built it in just over a year.
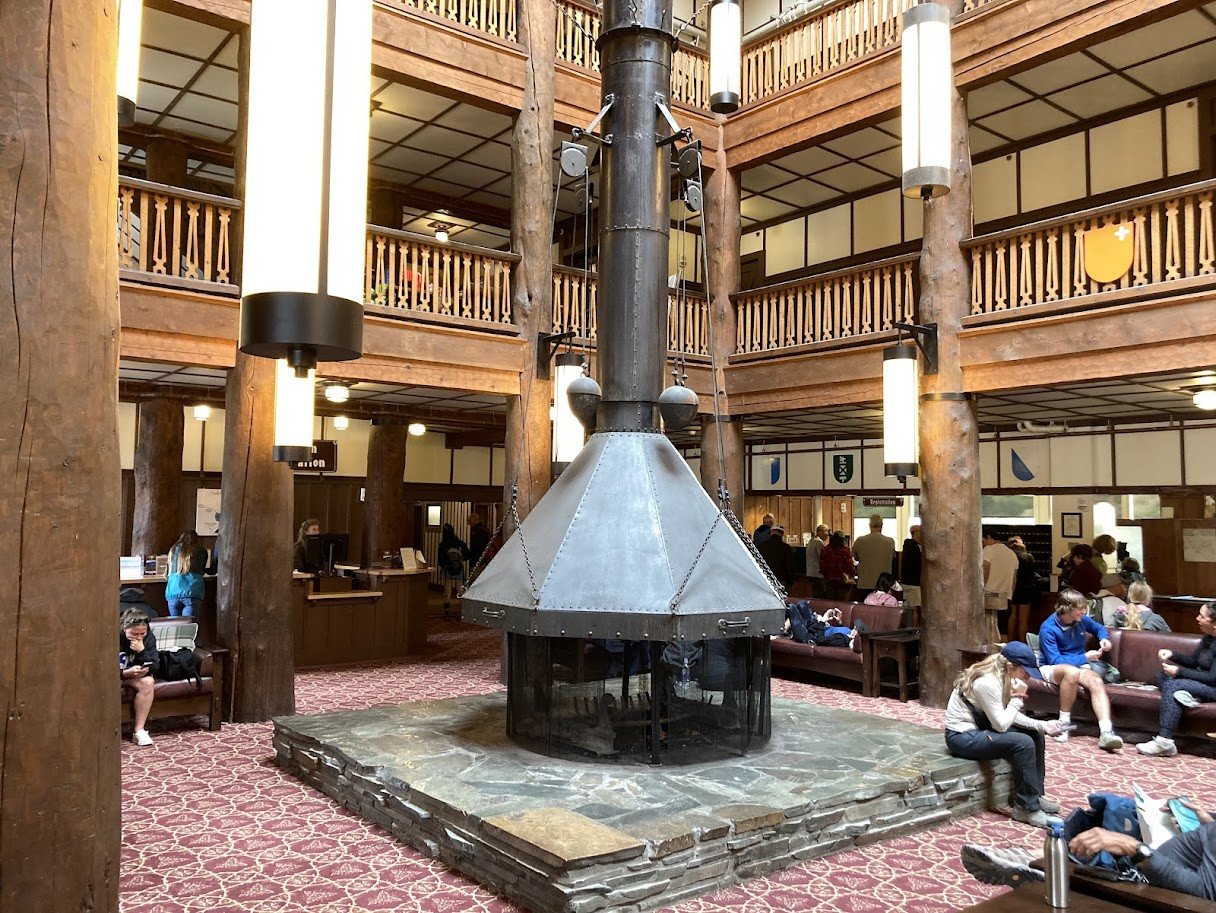
In the downstairs area of the hotel, there is a gift shop, snack shop, restrooms and seating areas. There are two sets of spiral steps that lead to the upper floor.
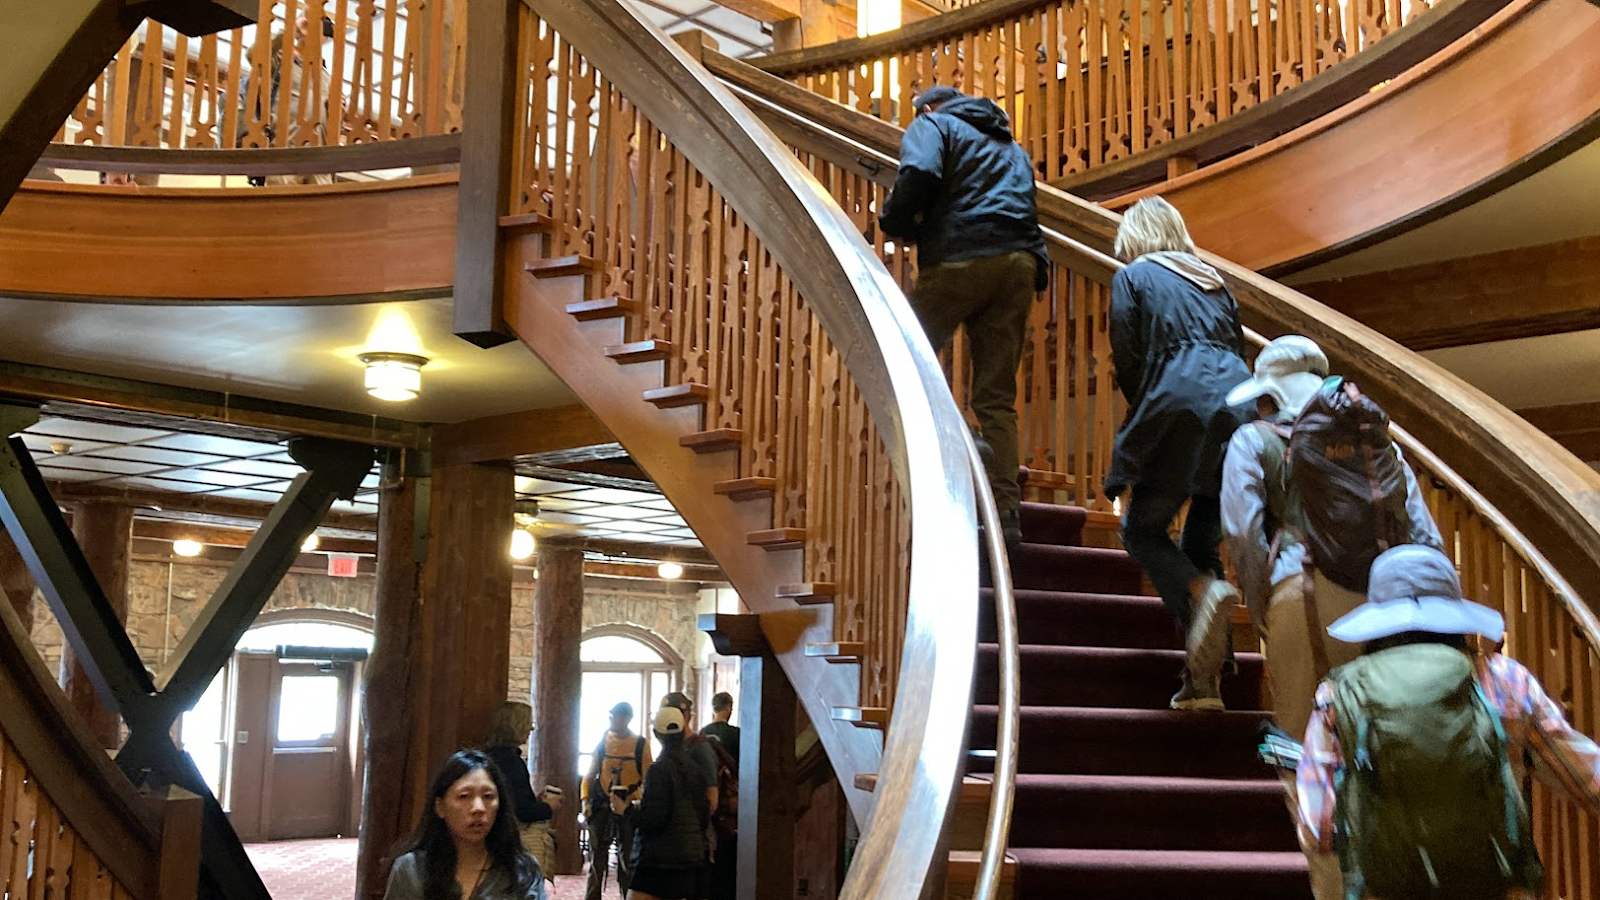
In the lobby area, there is a large check in desk and a wood burning fireplace located on top of a stone base. There are various areas to sit down and there are rocking chairs located in front of large windows overlooking the lake. Various sized lights hang down from the ceiling to help light the area.
It is definitely worth some of your time to go in and check out the hotel.
Pro Tips Many Glacier
- You do need a reservation to enter Many Glacier or you can have a boat ride scheduled for the day.
- The parking lot for the Many Glacier area is located above the Many Glacier Hotel. You can drop people off at the hotel before you go park the car. The parking lot is pretty big and we didn’t have an issue finding a spot.
- The road from the entrance into the main parking lot is pretty rough. You will want to take your time especially if you don’t have a higher riding vehicle.
- The wind on the east side of the park is much stronger than the wind on the west side. You will want to have a sweatshirt or light jacket even in the summertime just in case you need it.

Visited St. Mary Visitor Center
It was only a 30 minute drive from the entrance of Many Glacier to the St. Mary Visitor Center. The center has a lot of information about the park. There are 3D models, restrooms, interactive exhibits, ranger led activities and more. It is worth a stop if you need recommendations or just want to learn a little more about the park. The shuttle service for the east side of the park begins at the visitor center, also.

Drove Going-to-the-Sun Road
The one part of the Going-to-the-Sun Road that we hadn’t seen was from the St. Mary Visitor Center up to Logan Pass. So, this was a perfect way to see the rest of the road. We stopped at numerous stops along the way. We didn’t have to fight traffic too much at the different stops since it was a little later in the day.
I have a blog post titled “22 Great Stops to Make on Going-to-the-Sun Road” that you can read to see where the best places to stop are located.
Final Thoughts
For my wife and I, this 3 day itinerary worked out great for us. We were able to see a lot of the park and we were able to do a lot of different things. It was nice having various activities to do because of Tonya’s knee replacement.
I hope that this itinerary gives you some inspiration on things that you may want to see and do while you are in the park. For us this was our first trip to the park but Lord willing it won’t be our last. There is still much to see and do and we are looking forward to our next visit.
If you have any questions or comments make sure to leave them. I would love to hear your thoughts or questions that you may have. Also, make sure to go to my blog at Travelwidstom to learn how to save money on travel, travel itineraries, how to earn and maximize credit card points and miles and more.


